Page 12 of 33
Re: Eddie's E21 316
Posted: Sun Apr 21, 2013 9:48 pm
by Eddie.
Ahhhh, that makes sense.
Nice one.
Re: Eddie's E21 316
Posted: Sun Apr 21, 2013 11:15 pm
by arshad76
Eddie. wrote:
All of this has been kindly donated to my by the lads on here, I have to say I've been massively humbled by their generosity, cannot thank Mark, Jamie, Nas & Arshad enough, really is appreciated

Spec:
- 323i ARB
- Series 2 control arms
- Stongflex polybushes
Nice meeting you too Eddie, good to know you young un's aren't all about breaking windows and stealing sweets

Really impressed with the work you're putting in and your enthusiasm. Keep the photos coming and look forward to the finished product and the M52 conversion someday
Re: Eddie's E21 316
Posted: Mon Apr 22, 2013 11:45 pm
by Eddie.
Re: Eddie's E21 316
Posted: Wed Apr 24, 2013 1:05 pm
by pandemonium001
O yes, that looks the business.....
Re: Eddie's E21 316
Posted: Thu Apr 25, 2013 11:25 pm
by Eddie.
Nothing overly exciting today:


Struggling to get the bushes out of the new control arms. Going to try sawing them out over the weekend.
A change to my personal life now means I have a lot of spare time, so hopefully progress should pick up to a decent rate soon
Re: Eddie's E21 316
Posted: Fri Apr 26, 2013 2:44 pm
by jls7
Some guys have come up with little rigs to remove them using various bolts and washers.
For the control atm to sway bar bushing, I used a socket that fitted inside the hole in the control arm but contacted the metal part of the bushing, and just knocked it out with a hammer. That one was pretty easy.
The control atm to chassis mount bushing was harder. I trimmed the lip off one side so it could slide through, and again just hit it with a hammer until it went through. It took a lot more effort because the rubber absorbed most if the impact each time I hit it. I think I ended up drilling through bits of the rubber and cutting as much out as I could to make it easier.
I'm loving this build btw. Paint and body work look so damn good.
Re: Eddie's E21 316
Posted: Fri Apr 26, 2013 4:32 pm
by Eddie.
The ARB to control arm bush is the one I need to remove.
I've tried all sorts to get it out, blowtorch, press, cutting, hammering.
I'm going to have another go with a decent hacksaw this weekend.
Re: Eddie's E21 316
Posted: Sat Apr 27, 2013 7:19 am
by jls7
Seriously, use a socket fitting if you have one. Or even a piece of metal tube the right size. Insert socket/tube, rest control arm on a the edge of a piece of wood, and hit the socket/tube with a hammer. Hard. It took me about 20 seconds each bushing using that method.
Re: Eddie's E21 316
Posted: Sat Apr 27, 2013 9:00 am
by e21-Mark
Use a socket and large vice.
The easiest way by far, is take them to an engineering company and ask them to remove them for you. I didn't even break a sweat!
Re: Eddie's E21 316
Posted: Sun Apr 28, 2013 1:07 am
by Eddie.
Sorted the control arms out today.
Original rubbers were destroyed, arms were looking rough, and threads were rusty.


Popped down to a local car place, picked up a pair of random ball joints for a couple of quid:

Burnt the rubber out of the ARB to control arm bushes, then hacksawed the metal sleeve out. Tried a socket and vice, it would not move at all.
Metal sleeve certainly bit the dust:

A bit of a clean with the wire brush, some hammerite, new rubber boots on the ball joints, and new polybushes

Better than stock
Re: Eddie's E21 316
Posted: Sat May 04, 2013 5:26 pm
by Eddie.
Some progress.
Yesterday myself and Christopher got to work on the suspension. Namely, fitting the new dampers.
First off, it was a fraught day, everything we tried to do just went up the wall.
- New ARB doesn't fit, had to revert back to my original one and clean the threads up on the control arms.
- Coilovers appear to be missing a thread on the caliper mounting bracket, need to investigate further.
- 323i hubs I bought so the 323i coilovers would fit, have a cross-threaded wheel bolt hole.
- Retaining screw on the 323i discs was rounded to hell, and I had to angle grind it out, meaning the thread is still in the hub.
All in all, a tedious day, that said, we did achieve victory:

With the wing test fitted:


Need to do some work on the wing, it doesn't seem to quite fit properly atm.
I'll get some better pictures of the front suspension over the rest of the weekend.
Got the door stops on too:

Still lots to do, but it's getting there, if a little slowly!
Re: Eddie's E21 316
Posted: Sat May 04, 2013 9:37 pm
by nas80
What do you mean when you say the anti roll bar doesnt fit? If it seems too wide then i use a ratchet strap to pull the ends in so you can get the bolt in..
Re: Eddie's E21 316
Posted: Sat May 04, 2013 9:46 pm
by nas80
Your car is coming back together really nicely btw
Re: Eddie's E21 316
Posted: Sat May 04, 2013 11:06 pm
by Eddie.
nas80 wrote:What do you mean when you say the anti roll bar doesnt fit? If it seems too wide then i use a ratchet strap to pull the ends in so you can get the bolt in..
It wasn't "long" enough, the points at the front that should mount to the lower crash structure, is about 2 inches too far back.
Nowhere near close.
Re: Eddie's E21 316
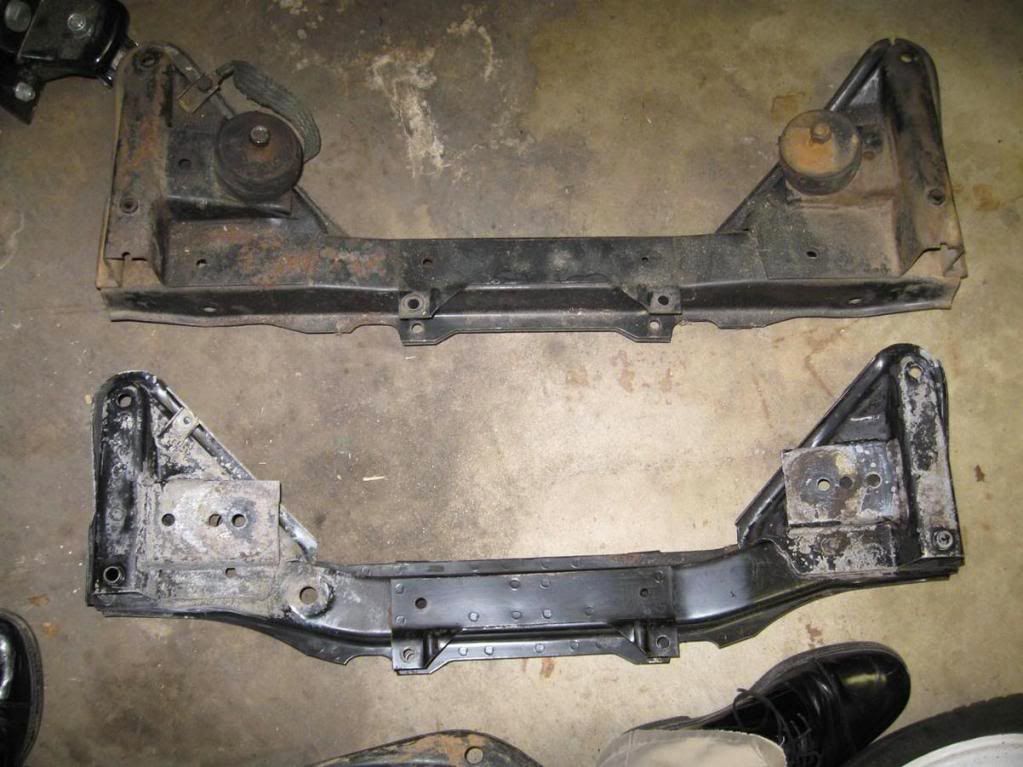
Posted: Sat May 04, 2013 11:50 pm
by mr edd
if you are useing your original crossmember not a facelift crossmember things wont line up ...pic shows early crossmember at top and facelift at the bottom ... Arms mount slightly forward on crossmember on face lift cars (or closer towards the front of the car if you like)....
http://i764.photobucket.com/albums/xx28 ... werres.jpg


