Page 3 of 8
Posted: Wed Apr 22, 2009 4:27 pm
by Jeroen
Well I hate to use those as they ruin the dust cover but yours is already ruined so why not give that a try, too?
Posted: Wed Apr 22, 2009 4:32 pm
by DrGonzoPOW
Just ordered one of those forked joint splitters so hopefully i can prise it open with that
Will have another try on Saturday all being well
Posted: Sat Apr 25, 2009 8:35 pm
by DrGonzoPOW
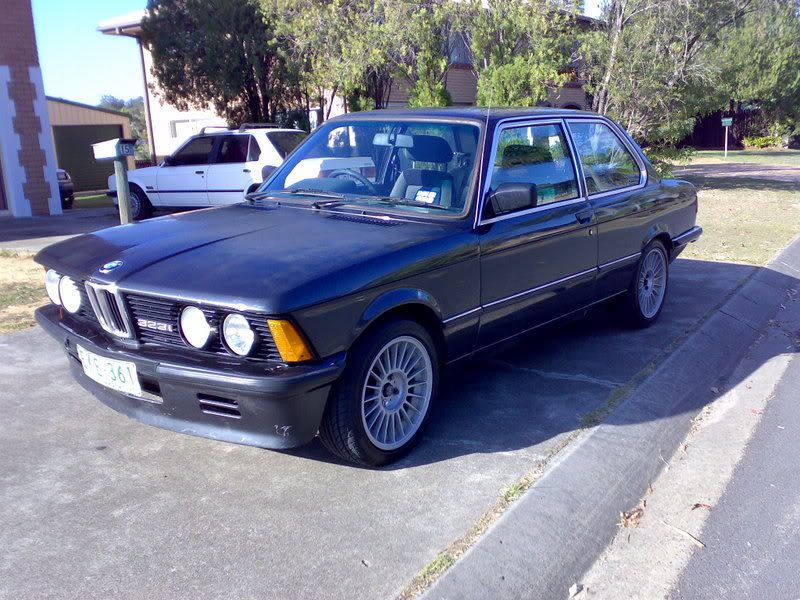
Well............its taken me from 10 this morning to now which is just before 7pm, but i have made some lovely progress, albeit just the front suspension done. Mainly this was down to things going wrong which meant re-doing parts over and over till i got it nailed (which im not 100% sure i have as i have'nt driven it yet!) It has been the biggest f*** nightmare i have ever endured and my back is killing me but hey, when i saw the result it made me smile. Here's some piccies for all you lovely people (except you Murran, your from Sheff

)
The carnage begins

This son'bitch gave me absolute ball ache on both sides of the car as you could'nt un-do it fully because of the steering rack. I managed it after lots of swearing and ragging the hell out of it. When i re-did it i made sure to put it in the other way around so the bolt can be extracted from the front of the cross-member

Tied the calipers to the anti-roll bar and proped them up with a metal box so no brake lines got damaged

Got the wishbone, anti-roll bar, tie rod and calipers off then set to work on the 3 nuts in the engine bay. I made sure to slacken the main strut bolt in the middle so i wouldnt need a clamp to remove it once off the car

Whole assembly removed

A very venomous compressed spring, scary stuff on stock springs as there huge!

Out with the old

A brief chat with the playstation generation

Then BAM ! Slipped her right on in there. All back together and smelling fresh. The spring pads/rubbers were in surprisingly good condition. The new bump stops i put in seem to be a bit large, I may take a knife and cut them down a tad.

Back on the girl. Gave it a nice clean and a pasting of hammerite afterwards

All finished after a hell of a day and here she is, i was suprised how much lower it was when i came to take the jack out - nearly chopped my arm off on the front spoiler.


The most deserved cup 'o' tea in the history of cup 'o' tea's

Just the rears to do now but that will have to wait till Wednesday. Thanks for the help from everyone!
Posted: Sat Apr 25, 2009 9:09 pm
by --ALPINA--
Well done mate!! looks sweet now!!, you should have slipped the strut off rather than unbolting the anti roll bar, then use a ratchet belt to pull it back in to the strut when re-fitting... but you`ve done it now!! looks good!!
j
Posted: Sat Apr 25, 2009 9:42 pm
by drjim
Good work there Gonzo, sorry I wasn't around to assist.
Posted: Sat Apr 25, 2009 10:43 pm
by e21-Mark
Splendid work my man!

Posted: Sun Apr 26, 2009 1:27 pm
by DrGonzoPOW
Ta
. I think i could do it in a 3rd of the time if i were to try again, (heaven forbid) as there are many things that went wrong. The biggest f*** up i had was when i had it all back together and torqued up. I tightened the main bolt at the top of the strut in the engine bay which then pushed the spring rubbers out of their fitting. There was no quick fix for this so i had to take it all apart and start again. It's deffo a two man job as those suckers are heavy and hard to align when your trying to get them back in. Fingers crossed the rears will go more smoothly.
Aint you suposed to be on holiday Jim ? Did the missus not ban you taking your laptop ?
Posted: Sun Apr 26, 2009 2:00 pm
by ac/dennis
nice nice nice!
Posted: Mon Apr 27, 2009 8:45 am
by mbuus
Nice job, absolute pain in the arse to do, but the rears are alot easier!! Good thing you saved them for last. I had fun replacing the shocks with bilsteins and lowered springs. But need to lower the fronts more.
Posted: Mon Apr 27, 2009 11:39 am
by MadMax
Lookin RUDE!
Have the springs settled since Saturday or is that as low as she's going (which is plenty far enough in my book!) ?
Posted: Mon Apr 27, 2009 12:13 pm
by DrGonzoPOW
I took it for a quick drive later on Saturday evening and everything seemed fine (other than brakes which i have upset in some way)
Dont know if the springs will settle anymore than they already have. I did set them to the softest setting before putting them on so thats probably the lowest its going to look which is pretty much spot on how i wanted it. The only thing that worries me slightly is that the lowered springs didnt need much compression to fit them onto the struts (compared to the stock anyway). I have a small fear of them coming off the spring plates. Ill take it nice and easy for a good while until im confident with it.
More pics to come tomorrow of the rears - weather permitting that is, as its shit right now

Posted: Mon Apr 27, 2009 4:37 pm
by e21-Mark
I used to wire the springs into their seats or use heavy duty cable ties. Never had any problems after that.
Posted: Mon Apr 27, 2009 5:13 pm
by DrGonzoPOW
Why, what problems did you have before that?

Posted: Mon Apr 27, 2009 7:04 pm
by e21-Mark
Actually, I never had problems - just imagined I might if I hit a bump or pot hole and the spring came unseated. Also if jacking the car up to change a wheel or pads.
Posted: Mon Apr 27, 2009 7:56 pm
by rob0r
You sir, are a winner
. I remember the first time I took my front suspension off with my dad, we changed the shocks and springs with the strut still attached to the car. We ended up with my dad losing a chunk off his finger as the spring clamps pinged round. I wouldn't of bothered taking the front ARB mounts off though, unless it was necessary. You'll do it 3x quicker next time!
The rears will be an absolute pleasure compared to the fronts.