M20B20 to MegaSquirt build
-
Jeroen

- Site Admin
- Posts: 30200
- Joined: Tue Sep 14, 2004 12:23 pm
- My E21(s): '81 323i Baur
- Location: The Netherlands
- Contact:
Re: M20B20 to MegaSquirt build
Good news, but I guess you need a wideband 02 indeed. Looking forward to more video!
Regards/groeten, Jeroen
-
BertjeConti

- E21 Mad
- Posts: 3138
- Joined: Mon Nov 04, 2013 9:49 pm
- My E21(s): E12 520-6
- Location: nederland , Weert
Re: M20B20 to MegaSquirt build
Some updates:
Leaky fuelline:
Here some pictures of the badly corroded fuellines, worst corroded place between the last clip and the hose.
i've solved it for now by using the returnline as presurre line (returnline dit not leak yet) and shorten the pressure line and use it as return line.
The fuelline both need replacement soon, here some pictures:


Airfilter box
I've used a airfilter box out of a E30, which came with my spare/donor engine. I've altered the mounting flange on the box, which normaly connects to the AirMassMeter, this is a square hole 50mm*50mm. Now the box accepts a round pipe with a 70mm diameter, the same as the airintake rubberboot.
Now the airfilter connects to the throttle body with a 70mm diameter pipe, for least air restriction.


Dizzy out / oilpump gear in
As mentioned earlier, i've throwed the old distributer from the engine and installed a gear assembly instead to drive the oilpump. The gear assebly comes from the E30 donor/spare engine.
 dizzy out
 gear assembly in
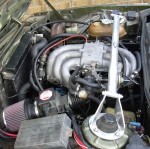
Engine ready for first testdrive:
and some pictures from the engine bay, ready for the first testdrives.
lots need to be done:
- relocation of the Cruise Control Servo Motor, because the bowden cable needs anorher approach to the throttle body (Yes my E12 has a Cruise control, from a E23)
- fabricating a mouting bracket for the airfilterbox
- fabricating a bracket for the MAP sensor
- make the gaspedal bowden cable suitable for use with cruise control combination.
- mounting the fuelpump assembly on silent blocks, because now you hear the pump humming loud in the car.
- cleaning up the old engine wiring loom (delete wires for the carburettor and distributor)
- fabricating a blind plate so the old mechanical fuelpump can leave the engine bay

In the left top corner the Cruise Control Servo is situated.

Made a second test trip today and fiddled with some parameters, tried "Closed loop Idle Control", Idle was not steady in this mode, wobbling. So put it back to "temperature based". In this setting the Idle Control Valve is set to a position according to a table depended on Coolant Temperature.
also fixed the problem with the EGO correction (automatic correction of air/fuel ratio), i've forgot to callibrate the Narrow Band O2 sensor, the ECU was still callibrated for a wide band O2 sensor.
Thats it for now,
Stay Tuned
Leaky fuelline:
Here some pictures of the badly corroded fuellines, worst corroded place between the last clip and the hose.
i've solved it for now by using the returnline as presurre line (returnline dit not leak yet) and shorten the pressure line and use it as return line.
The fuelline both need replacement soon, here some pictures:
Airfilter box
I've used a airfilter box out of a E30, which came with my spare/donor engine. I've altered the mounting flange on the box, which normaly connects to the AirMassMeter, this is a square hole 50mm*50mm. Now the box accepts a round pipe with a 70mm diameter, the same as the airintake rubberboot.
Now the airfilter connects to the throttle body with a 70mm diameter pipe, for least air restriction.
Dizzy out / oilpump gear in
As mentioned earlier, i've throwed the old distributer from the engine and installed a gear assembly instead to drive the oilpump. The gear assebly comes from the E30 donor/spare engine.
dizzy outgear assembly inEngine ready for first testdrive:
and some pictures from the engine bay, ready for the first testdrives.
lots need to be done:
- relocation of the Cruise Control Servo Motor, because the bowden cable needs anorher approach to the throttle body (Yes my E12 has a Cruise control, from a E23)
- fabricating a mouting bracket for the airfilterbox
- fabricating a bracket for the MAP sensor
- make the gaspedal bowden cable suitable for use with cruise control combination.
- mounting the fuelpump assembly on silent blocks, because now you hear the pump humming loud in the car.
- cleaning up the old engine wiring loom (delete wires for the carburettor and distributor)
- fabricating a blind plate so the old mechanical fuelpump can leave the engine bay
In the left top corner the Cruise Control Servo is situated.
Made a second test trip today and fiddled with some parameters, tried "Closed loop Idle Control", Idle was not steady in this mode, wobbling. So put it back to "temperature based". In this setting the Idle Control Valve is set to a position according to a table depended on Coolant Temperature.
also fixed the problem with the EGO correction (automatic correction of air/fuel ratio), i've forgot to callibrate the Narrow Band O2 sensor, the ECU was still callibrated for a wide band O2 sensor.
Thats it for now,
Stay Tuned

Megasquirted '77 E12 520-6
Aspen Silver '96 E39 523i
-
BertjeConti
- E21 Mad
- Posts: 3138
- Joined: Mon Nov 04, 2013 9:49 pm
- My E21(s): E12 520-6
- Location: nederland , Weert
Re: M20B20 to MegaSquirt build
Made another drive around today, and try'd to film it with my mobile, so driving, shifting and filming with only two hands.
Quality is not good, but you'll get a idea how the car is running now. engine was warming up during this session.
When you hear a rumbling sound, thats caused by driving over the curbside.
While browsing the internet this evening i found a nice example how not to megasquirt your engine.
Everything this guy has done is horrible, the guy self seems fairly relaxed though
I'll be shure this project will never end succesfull.
Megasquirted '77 E12 520-6
Aspen Silver '96 E39 523i
-
BertjeConti
- E21 Mad
- Posts: 3138
- Joined: Mon Nov 04, 2013 9:49 pm
- My E21(s): E12 520-6
- Location: nederland , Weert
Re: M20B20 to MegaSquirt build
Airfilter box Bracket
I'd still to fabricate a bracket to hold the airfilterbox in place. I made a bracket out of the old powersteering reservoir bracket and a piece of L bar and flat bar.
As always, the pictures tell a lot more:
here come the battery and airfilterbox:

battery and bracket in place (did not paint the bracket, steel is thick enough.:

Hole for fresh air is still to do, old fresh air hole is at the other side of the radiator.
First i'll monitor the airintake temperature for a while, and leave the left headlights cover off for entering extra fresh air in this region
top view with airfilter in place:

Airfilter box misses 1 clip:

CruiseControl servo
Another job i did this evening was relocating and connecting the CruiseControl Servo,
This is the old location, bowden cable approached the carburettor at the front:

Here a closeup from the cruisecontrol (top) and throttle pedal bowden cables connected to the Throttle house:

And the new location for the CruiseControl Servo, it is now located behind the coolant reservoir at the right side of the engine bay:

Did a test drive ofcourse, to test the CruiseControl which ofcource worked fine and got some fuel. And did a first run on the motorway.
What an improvment this conversion made to the car
(anybody interested in a Solex 4A1 and electronic dizzy ??)
Stay Tuned
I'd still to fabricate a bracket to hold the airfilterbox in place. I made a bracket out of the old powersteering reservoir bracket and a piece of L bar and flat bar.
As always, the pictures tell a lot more:
here come the battery and airfilterbox:
battery and bracket in place (did not paint the bracket, steel is thick enough.:
Hole for fresh air is still to do, old fresh air hole is at the other side of the radiator.
First i'll monitor the airintake temperature for a while, and leave the left headlights cover off for entering extra fresh air in this region
top view with airfilter in place:
Airfilter box misses 1 clip:
CruiseControl servo
Another job i did this evening was relocating and connecting the CruiseControl Servo,
This is the old location, bowden cable approached the carburettor at the front:
Here a closeup from the cruisecontrol (top) and throttle pedal bowden cables connected to the Throttle house:
And the new location for the CruiseControl Servo, it is now located behind the coolant reservoir at the right side of the engine bay:
Did a test drive ofcourse, to test the CruiseControl which ofcource worked fine and got some fuel. And did a first run on the motorway.
What an improvment this conversion made to the car
(anybody interested in a Solex 4A1 and electronic dizzy ??)
Stay Tuned
Megasquirted '77 E12 520-6
Aspen Silver '96 E39 523i
-
BertjeConti
- E21 Mad
- Posts: 3138
- Joined: Mon Nov 04, 2013 9:49 pm
- My E21(s): E12 520-6
- Location: nederland , Weert
Re: M20B20 to MegaSquirt build
Time for a update:
Last week i did some tuning, testing with "closed loop idling", tuned the VE table a little, but from the start the VE table seems quite good.
Most effort in tuning went into a smooth and strong idle.
The closed loop idle did not work well, engine started wobbling and after a light load (power steering) the engine reved up.
Now i've managed to tune the idling quite well in open loop mode in combination with idle advance.
The car has been used a couple of times by my wife this week, and she did not complain about anything, so thats a good sign...
I think the car runs much better now, so ive made a video, so you can see it for yourself.
At the end in the video i'm turning on the "idle advance" mode, in this mode the ignition advance is regulated by engine load while idling. when the load is low the advance is less, and when the load increases the ignition advance increases with it to engage more power. This makes a more stable and powerfull idle.
The power steering pump is quite a load for the engine when engaged as engine is idling. In the backdays the engine could stall while turning the steering wheel at a full stop.
The video (HD) shows a beautiful ride around the countryside.
Right from the radio there are 2 leds blinking, yellow means lean and red means rich reading from the O2 sensor
enjoy the video and stay tuned
Megasquirted '77 E12 520-6
Aspen Silver '96 E39 523i
-
BertjeConti
- E21 Mad
- Posts: 3138
- Joined: Mon Nov 04, 2013 9:49 pm
- My E21(s): E12 520-6
- Location: nederland , Weert
Re: M20B20 to MegaSquirt build
Engine Wiring Harness
Today i've pulled the original engine wiring harness and stripped out all unused wiring, mainly wires for the ignition and carburettor had to leave.
alse relocated the air intake temp sensor from the plenum to the airfilter box. Air intake temp indication was to high when engine had warmed up.
A picture from the original wiring harness:

And the new stripped out harness:

and of course the leftovers:

stay tuned
Today i've pulled the original engine wiring harness and stripped out all unused wiring, mainly wires for the ignition and carburettor had to leave.
alse relocated the air intake temp sensor from the plenum to the airfilter box. Air intake temp indication was to high when engine had warmed up.
A picture from the original wiring harness:
And the new stripped out harness:
and of course the leftovers:
stay tuned
Megasquirted '77 E12 520-6
Aspen Silver '96 E39 523i
-
BertjeConti
- E21 Mad
- Posts: 3138
- Joined: Mon Nov 04, 2013 9:49 pm
- My E21(s): E12 520-6
- Location: nederland , Weert
Re: M20B20 to MegaSquirt build
An update:
I forgot to measure the deadtime of the injector when i had the whole injector assembly on the bench. STUPID !!
Injector dead time is the time the injector does not deliver fuel. Say your injector has a dead time of 1mS and the computer opens the injector for 4mS, then the injector give fuel for only 3mS.
This is an important parameter in the Megasquirt setting. if you get it wrong you'll end up with bad idle and rough running engine.
i did not know the injector dead time of mine and left the setting in megasquirt to 1mS deadtime.
The most common way to determine the injector dead time is to do flow tests at different pulsewidths, explained here : http://www.msextra.com/doc/ms3/injdeadtime.html
I tried another method, by measure voltage over and current through a injector using a scope.
I hooked up my scope ans a shunt resistor, and let the idling whig gave me this image:

You can see a bump in the rising current at the moment the injector is fully opened (pintle stops moving) and a bump in the voltage line when the injector is fully closed.
The "dead time" is the measuered "opening time"- "closing time" = 0.7mS
The opening time is unfortunatly not constant, but depends on battery voltage. Higher voltage means shorter opening time.
The closing time however is constant, and determined by the clamping voltage of the switching cirquit.
So you'll have to determine the dead time at a certain battery voltage. I did the measuring at 13.3volts and repeated the tests with 15.2V, 11.2V and 8.2V.
batt dead time
15.2 V 0.44 mS
13.2 V 0.64 mS
11.2 V 1.04 mS
8.2 V 2.16 mS
As you can see this is not a linear behavior. So a gave my Megasquirt a deadtime of 0.7mS and a correction of 0.2mS/volt
After altering the settings i had to recalculate the VE table to get roughly the same pulsewitdhs for the already dialed in VE table.
Last saturday i made a long drive, approx 130km. The car runs great with this setup. Good starting either cold or hot. stable idling. good throttle responce and most important a better milage as before.
Logged the whole session on my laptop.
Today ive ordered 7.6 meter CuNiFer 8mm fuel line to replace the old rustycrusty fuel line.
Stay tuned.
I forgot to measure the deadtime of the injector when i had the whole injector assembly on the bench. STUPID !!
Injector dead time is the time the injector does not deliver fuel. Say your injector has a dead time of 1mS and the computer opens the injector for 4mS, then the injector give fuel for only 3mS.
This is an important parameter in the Megasquirt setting. if you get it wrong you'll end up with bad idle and rough running engine.
i did not know the injector dead time of mine and left the setting in megasquirt to 1mS deadtime.
The most common way to determine the injector dead time is to do flow tests at different pulsewidths, explained here : http://www.msextra.com/doc/ms3/injdeadtime.html
I tried another method, by measure voltage over and current through a injector using a scope.
I hooked up my scope ans a shunt resistor, and let the idling whig gave me this image:
You can see a bump in the rising current at the moment the injector is fully opened (pintle stops moving) and a bump in the voltage line when the injector is fully closed.
The "dead time" is the measuered "opening time"- "closing time" = 0.7mS
The opening time is unfortunatly not constant, but depends on battery voltage. Higher voltage means shorter opening time.
The closing time however is constant, and determined by the clamping voltage of the switching cirquit.
So you'll have to determine the dead time at a certain battery voltage. I did the measuring at 13.3volts and repeated the tests with 15.2V, 11.2V and 8.2V.
batt dead time
15.2 V 0.44 mS
13.2 V 0.64 mS
11.2 V 1.04 mS
8.2 V 2.16 mS
As you can see this is not a linear behavior. So a gave my Megasquirt a deadtime of 0.7mS and a correction of 0.2mS/volt
After altering the settings i had to recalculate the VE table to get roughly the same pulsewitdhs for the already dialed in VE table.
Last saturday i made a long drive, approx 130km. The car runs great with this setup. Good starting either cold or hot. stable idling. good throttle responce and most important a better milage as before.
Logged the whole session on my laptop.
Today ive ordered 7.6 meter CuNiFer 8mm fuel line to replace the old rustycrusty fuel line.
Stay tuned.
Megasquirted '77 E12 520-6
Aspen Silver '96 E39 523i
-
BertjeConti
- E21 Mad
- Posts: 3138
- Joined: Mon Nov 04, 2013 9:49 pm
- My E21(s): E12 520-6
- Location: nederland , Weert
Re: M20B20 to MegaSquirt build
Costs
thats ofcource an important issue. What did this project cost so far?
most of the money went into the megasquirt based electronic module itself, this was 320,- Euros.
Spare engine and parts for engine like sensors, coilpack, gaskets and hoses did 300,- Euros
Misc parts like tape, wiring stuf and J-B weld did 50,- Euros.
So this project emptied my wallet for 670,- Euros. thats approx 530 Pounds.
was is worth it ? Oh yes, i had a lot of fun doing this conversion and i learned a lot!
I'm trying to sell my Solex 4A1 carburettor, electronic ignition and some other parts from the spare engine to lower the costs of this project.
Stay tuned.
Megasquirted '77 E12 520-6
Aspen Silver '96 E39 523i
-
Jeroen
- Site Admin
- Posts: 30200
- Joined: Tue Sep 14, 2004 12:23 pm
- My E21(s): '81 323i Baur
- Location: The Netherlands
- Contact:
Re: M20B20 to MegaSquirt build
Wow, now that's called low budget engineering! And it looks like many thousands more!
Regards/groeten, Jeroen
-
BertjeConti
- E21 Mad
- Posts: 3138
- Joined: Mon Nov 04, 2013 9:49 pm
- My E21(s): E12 520-6
- Location: nederland , Weert
Re: M20B20 to MegaSquirt build
Today the Megasquirted car passed the dutch MOT (APK) with glance !
Megasquirted '77 E12 520-6
Aspen Silver '96 E39 523i
-
BertjeConti
- E21 Mad
- Posts: 3138
- Joined: Mon Nov 04, 2013 9:49 pm
- My E21(s): E12 520-6
- Location: nederland , Weert
Re: M20B20 to MegaSquirt build
Last Weekend we did the " BIG TEST "
We had a classic caravanning weekend on a campsite 200 km away from home, so i filled the fueltank, packed our classic caravan, mounted a vintage roofrack with some stuff on it and off we went.
The route to the campsite was a mix of motorway and country roads.
In the weekend we made several trips without the caravan hooked up an de route back home today was mainly motorway.
The car performed well, towed the 1200kg caravan without any problems and on the motorway cruising @90km/h in fifth (overdrive) gear went well.
Packed and ready to go:

at the campsite:

So we did 400 km with the caravan hooked up and 70km without.
Back home the fueltank still wasn't dried up, better, there is approx 20 liters left in the tank. This ment we used only 50l petrol for the weekend, not bad at all !
An average of approx 11l/100km or 9km/liter towing a caravan wasn't possible in the past.
The car didn't give a hickup at all. So the homebrew fuel injection and ignition proved reliable and economic tuned.
Now back home i checked the sparkplugs, oil level and coolant level. oil and coolant levels where the same as we left and the spark plugs had a nice clean brown color.
spark plug color:

oil filler cap nice clean:

Mission accomplished
We had a classic caravanning weekend on a campsite 200 km away from home, so i filled the fueltank, packed our classic caravan, mounted a vintage roofrack with some stuff on it and off we went.
The route to the campsite was a mix of motorway and country roads.
In the weekend we made several trips without the caravan hooked up an de route back home today was mainly motorway.
The car performed well, towed the 1200kg caravan without any problems and on the motorway cruising @90km/h in fifth (overdrive) gear went well.
Packed and ready to go:
at the campsite:
So we did 400 km with the caravan hooked up and 70km without.
Back home the fueltank still wasn't dried up, better, there is approx 20 liters left in the tank. This ment we used only 50l petrol for the weekend, not bad at all !
An average of approx 11l/100km or 9km/liter towing a caravan wasn't possible in the past.
The car didn't give a hickup at all. So the homebrew fuel injection and ignition proved reliable and economic tuned.
Now back home i checked the sparkplugs, oil level and coolant level. oil and coolant levels where the same as we left and the spark plugs had a nice clean brown color.
spark plug color:
oil filler cap nice clean:
Mission accomplished
Megasquirted '77 E12 520-6
Aspen Silver '96 E39 523i
-
steed
- Upcoming E21 fanatic
- Posts: 66
- Joined: Fri Apr 25, 2008 10:57 am
- My E21(s): '79 316 manual (4spd)
- Location: Southampton
Re: M20B20 to MegaSquirt build
Awesome result, and what a good 'Acid Test'
'79 316 (sepiabraun, awesome!)
Re: M20B20 to MegaSquirt build
I linked through to here from another thread and read right through - Great work! The M20B20 sounds so smooth now in your videos. Love the acid test towing the caravan too.
The 190E video you posted looks like an absolute disaster. The tin foil wrapping the wiring is disturbing!
The 190E video you posted looks like an absolute disaster. The tin foil wrapping the wiring is disturbing!