Page 4 of 12
Posted: Mon Aug 10, 2009 12:56 pm
by murran
i too second the "power steering goes in the bin, not on the car!" id rather have steering feel than ease of parking.
Posted: Mon Aug 10, 2009 1:05 pm
by e21-Mark
I prefer the feel of the non assisted steering too.
Posted: Tue Aug 11, 2009 3:37 pm
by varden
Progress report!
I had another coupe of hours in the shed today and i managed to tack THREE sections of pipe together into some useable form.

I had tacked on the old collector too but when i completed the test fit it ended up being hard up against the floor of the car suggesting some discerpency between my test bench and the actual car.

I also spent some time trying to find a chassis punch to put a neat hole in my firewall, i ended up buying the set as the individual screw type one was half the cost of a set they had in stock and it still had to be shipped up from Sydney.

That set represents the final piece in the puzzle, giving me a way to make that big hole in the firewall without butchering it.
Still plenty to do yet, I've got tomorrow off so I will cross my fingers for a 5-6 hour stint.
Posted: Tue Aug 11, 2009 4:10 pm
by --ALPINA--
Very well done varden, looking good!!
j
Posted: Wed Aug 12, 2009 1:19 pm
by varden
A small amount of progress....the 5 hours i hoped for didn't come about.
I got the 2 that i usually manage to squeeze in.
I started the afternoon by trying and failing to match up the collectors on my old engine and then move the front collector from the engine in one corner of my shed to where my welder is at the opposite end of the shed at the limit of my only 15amp extension cord.
It didn't work out and i spat the dummy and used the hoist to move my engine and stand to the welder so i could get all the angles right and weld while the headers were mounted on the engine.
And it worked out!
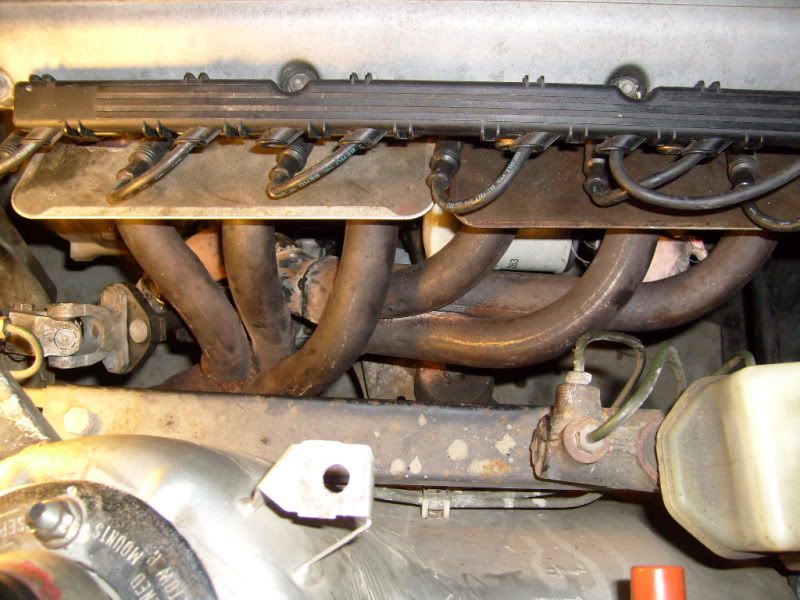
Pipes come out in approx the same place and aren't touching anything.

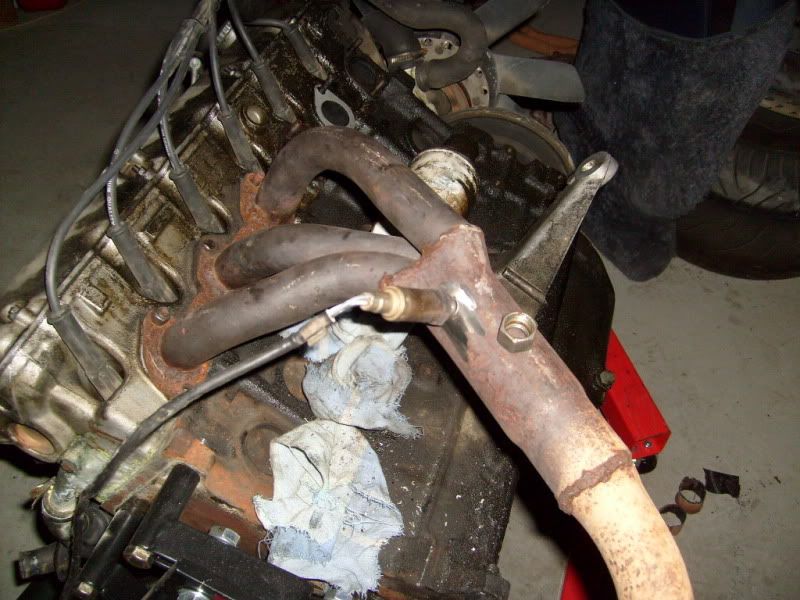
The last thing i did was to remove, drill and grind the rear headers in readiness to weld my O2 flange (oil pipe nut) onto the collector.
I will only bolt up the headers till i get the car running as i think i will have some exhaust leaks to sort out before i finish off the exhaust.
Posted: Thu Aug 13, 2009 4:50 pm
by varden
Since my wife was out and about with our 3 month old daughter from 9:30am i was in my shed by 10am...w00T!
I welded my home made O2 flange on, i can prolly expect leaks from both sets of headers now.


Then i firmly bolted up the headers to the engine, busting off an exhaust stud in the process....


hopefully the 11 others are enough.
After that i did yet another clean up to get all the metal chaff and filings off the floor before going under the car to bolt up the clutch slave cylinder.
Next came the faffing about with the motronic dizzy and the oil sender wire that i had to cut cos the aircon bracket it was routed under would not come off when i stripped the engine for fitting. Its all soldered up now.
Then i moved onto the f@#king

water pump pulley that till today only had two bolts in it, it took me a few frustrating minutes to figure out that the four bolt holes were not evenly spaced around the pulley face but grouped together in pairs which i had around the wrong way, requiring me to remove all the bolts and start from scratch.
Something so minor turned out to be a royal pain in the arse with the pulley and the water pump flange moving independently of each other every time i got a bolt in there by the fingertips of my fat hands.
I ended up using a smaller bolt to locate the pulley face to the water pump, THEN it worked out.
But not before i noticed my next hurdle, (well two) the 325i water pump has no means to fit up the e21 water bottle AND the steel pipe used to get water from thermostat housing of the 325i past the motronic dizzy is incompatible with my e21 radiator plans.
Swapping water pumps is not an option cos i have no means to pull the harmonic balancer off the crank to get at the water pump.
Bloody hell.....
I'm not about to fit the 325i water bottle as it goes on the left side of the engine bay and there is just no room, not to mention I'd have to get under the inlet manifold to plumb it back in...

Posted: Tue Aug 18, 2009 7:03 am
by varden
I got my old water pump off and i must say for a pump I paid to get replaced when i shelled out for my timing belt change 3 years ago it looks.....OLD!!!

So tomorrow I'm buying timing belt, tensioner, water pump AND a 32mm spanner.
Posted: Tue Aug 18, 2009 7:49 am
by e21-Mark
Keep going mate. Well done for pushing on and getting over the hurdles you've come up against so far. I'm sure you'll forget them all the first time you drive it.

Posted: Tue Aug 18, 2009 10:29 am
by Thayat
Hi Varden,
great to see the progress. I really appreciate your efforts to document the process too as you are a little way ahead of me, so I'm watching for the pitfalls!

I have the engine in, alternator and power steering pump bolted up. Water pump looks good on mine. I am doing the volvo front brake upgrade at the same time so manage to keep myself busy most Sundays.
Next are the twin brake lines, battery relocation and making up the new blanking plate for the gearbox bellhousing as I am retaining the E30 sump.
All the best
Posted: Tue Aug 18, 2009 4:43 pm
by varden
Thanks for the words of encouragement lads

If you look at the timing belt tensioner in this pic does it look old or new?

Given that my water pump was clearly NOT replaced when my timing belt was done I am wondering what other parts i paid for out of the $800 bill for work that never actually got replaced....
Anyway...
ECU is in! I had to remove the dash support bracket to get ECU in without cutting up my glovebox.
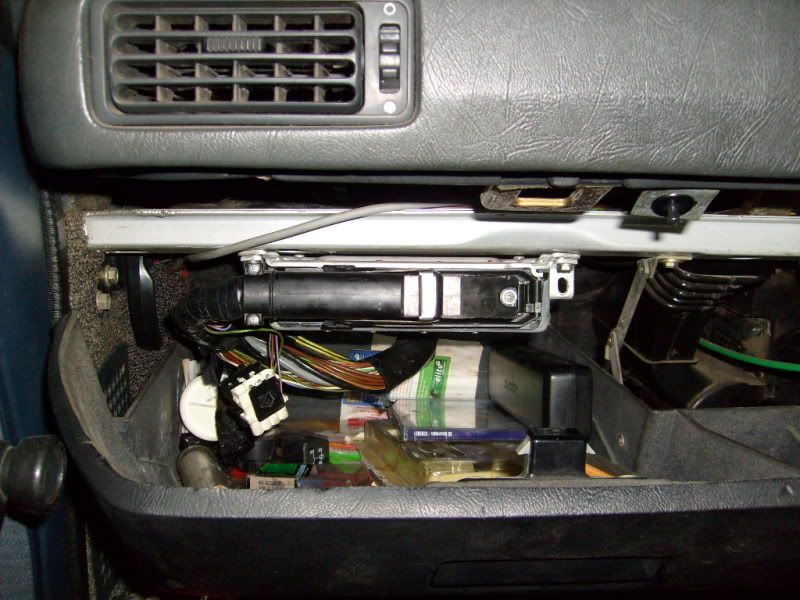
The chassis punch worked a treat, tho i think the 49mm hole it has made is too small for the rubber mount...

Oh and i used a regular timber hole saw on the sound proofing in the glovebox before i used the chassis punch.
Getting the harmonic balancer off the engine while it was on the stand proved to be pretty straight forward once i bolted a 300mm length of 50x5mm steel bar to two of the flywheel mounting holes on the crank, effectively locking the crank in place.
As an added measure i clamped a 3m length of angle to the stand incase i up ended it, oh and i put an axle stand under the sump as reefing on the breaker bar kept making the engine bob up and down as the stand flexed.....yikes!!

I had planned on fitting my e21 water pump to the 325i engine but not now,its well old and i busted a lug off it when i got it off anyhow, there are three bolts and if you need to use a pry bar you should double check everything is undone.
Thayat wrote:Next are the twin brake lines, battery relocation and making up the new blanking plate for the gearbox bellhousing as I am retaining the E30 sump.
Hmmmm....blanking plate....i should do that too.
Posted: Tue Aug 18, 2009 10:11 pm
by murran
yeah i used an e21 pump on my 325i lump. you dont need the e30 metal coolant tube across the front of the engine this way.
use the e21 tin sump! it doesnt crack and smash when it hits the floor. ally ones do!
the cambelt tensioner, take it off and spin the pulley if it feels rough replace it!
Posted: Wed Aug 19, 2009 6:32 am
by varden
just been to repco auto parts.....what number of teeth does my 325i engine timing belt need to be?
Dude strongly suggested that i find out for sure before i placed order.
Posted: Wed Aug 19, 2009 6:42 am
by varden
i just called BMW, they have 127 tooth timing belts in stock so i will pick one up tomorrow afternoon, 127 being the right number of teeth.
Posted: Thu Aug 20, 2009 6:58 am
by varden
Timing belt picked up from BMW today, OEM no less!

Also picked up my new NEW water pump.

Fingers crossed i get into the shed tomorrow....
Posted: Sat Aug 22, 2009 12:38 pm
by varden
I made it into the shed at about 10am and it felt like i hardly got anything done.....

First job was to lengthen the wires to the coil, i dug up an old wiring loom to pilfer the right colour code wires to start the job. Too pedantic? Maybe, but then its all just going to waste sitting there.
I also extended the wires for the O2 sensor too, i was a bit dubious about this cos i was concerned that adding a bunch of extra joints might upset the signal, or however it works. I soldered all the joints but the grey wire as it seemed to be unsolderable, so i just used connector blocks, which meant a trip to Supercheap auto.

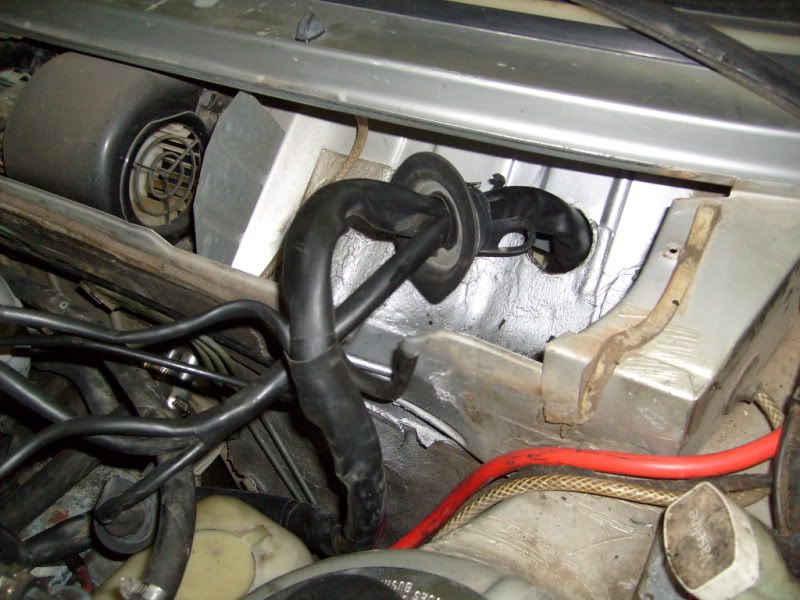
I came back to the rubber firewall plug which i then completely butchered to get it into my 49mm firewall hole, not happy with the way i finished it but its functional.
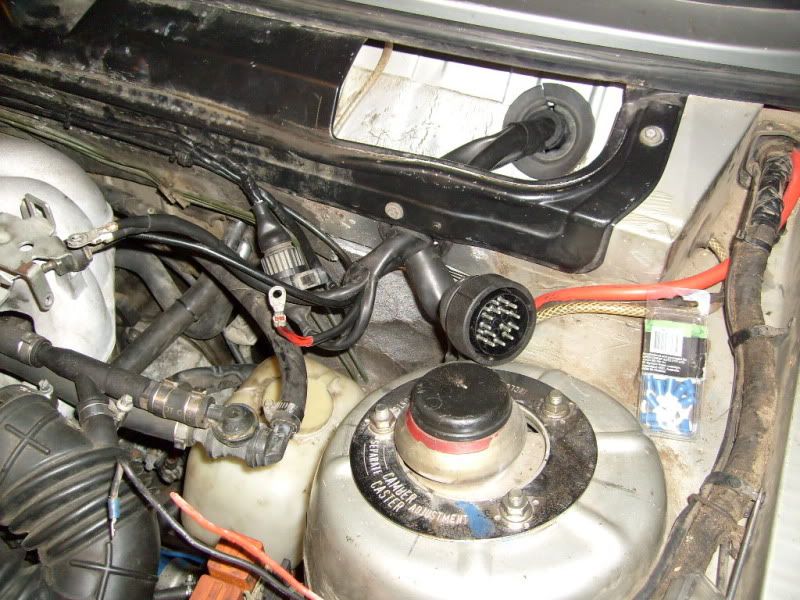
The rest of the afternoon was spent puzzling over the wiring loom and comparing notes on the internet, the last thing i did was tag up the e21 loom to figure out which wires were needed and which ones weren't, even cutting back the loom to see which black wire was starter and which one is tach, the thick one is starter and there are three other black ones to choose from in the morning.

I made the mistake of leaving the car side of my motronic connector in the 325i wreck when it left so i will have to cut up the engine side of the plug and cut the e21 loom long to bridge the gap.
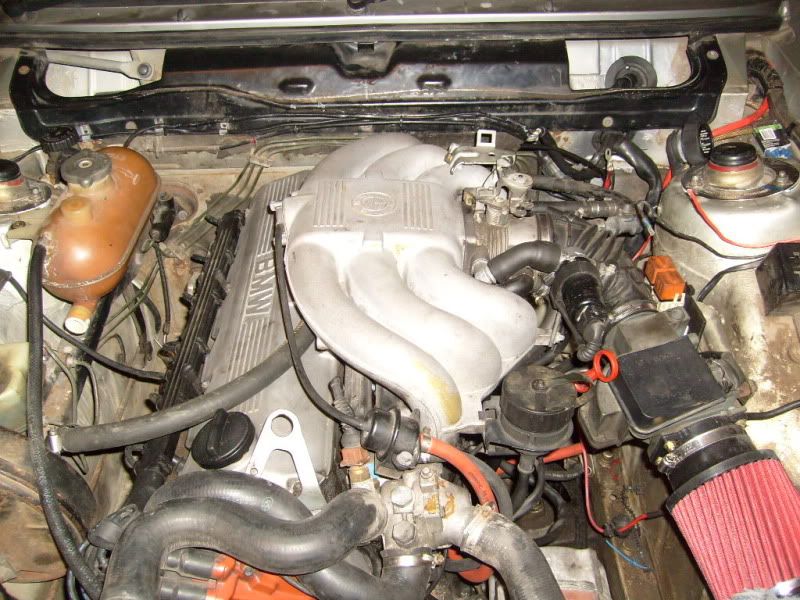
Fingers crossed tomorrow it fires up....after i install the oil cooler.
Then i can fit the timing belt, water pump and reinstall the radiator.
Oh and weld up the exhaust and change the g/box oil...maybe they will wait till next week.