
316 Rolling resto and upgrades
-
e21-Mark

- E21 Master
- Posts: 5715
- Joined: Fri Mar 21, 2008 2:19 pm
- My E21(s): 316 m52/2.8 Cat Cams & Jenvey ITB
- Facebook page: https://www.facebook.com/JackyardBackoff
- Location: Cornwall - UK
-
pandemonium001
- E21 Pro
- Posts: 527
- Joined: Sun Oct 07, 2012 1:19 pm
- My E21(s): E12 535i T (ish)
- Location: Scotland Ayrshire
Re: 316 Rolling resto and upgrades
love the wheels, but must admit, im not sure on the gold. Maybe repiant a graphite grey or match to the pinstripe down the side?

Re: 316 Rolling resto and upgrades
Wow you body repairs please teach me or weld up my rear arches amazing!!!
-
polov8

- E21 Pro
- Posts: 512
- Joined: Wed May 29, 2013 6:30 pm
- My E21(s): '83 Polaris silver 316
- Location: Dronfield
Re: 316 Rolling resto and upgrades
Thanks Lee, My best advice there is practice your welding as much as possible, spend all the time you need to prepare the area to be welded, and try to preserve as much of what BMW put there as you can. Despite the rust, BMW can put an E21 together better than anyone, so don't cut out any of the good stuff unless you absolutely have to!
More suspension oriented updates to come in the next few weeks!
More suspension oriented updates to come in the next few weeks!
Andy
-
e21-Mark
- E21 Master
- Posts: 5715
- Joined: Fri Mar 21, 2008 2:19 pm
- My E21(s): 316 m52/2.8 Cat Cams & Jenvey ITB
- Facebook page: https://www.facebook.com/JackyardBackoff
- Location: Cornwall - UK
Re: 316 Rolling resto and upgrades
Just took the time to read through your repairs properly. Very nice work!
How do you find the seats for headroom? I've had a couple of sets of non e21 Recaro fitted and they always seemed to sit a little too high. Did your adaptors compensate for that? I've been looking at removing the e21 rail and fixing new ones directly to the floor. (compensating for the shaped floorpan) Your idea would be ideal if it keeps the new seats low though.
Mine came from a VW/Audi too I believe?
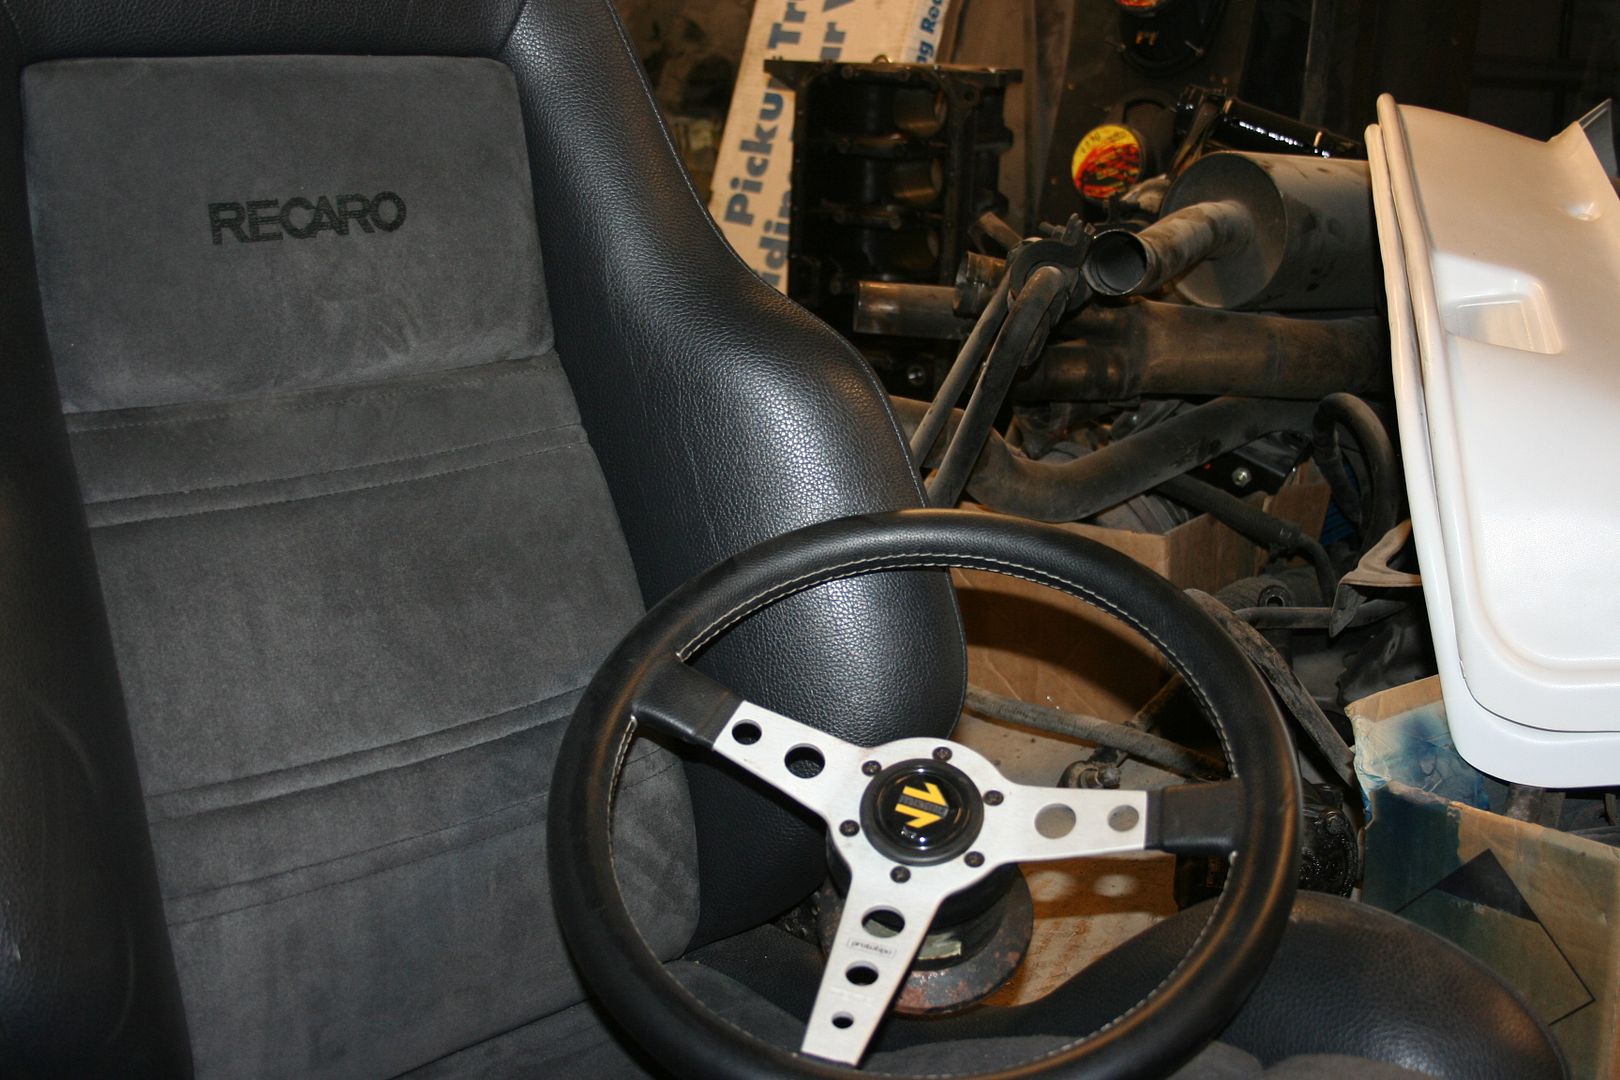

-
polov8
- E21 Pro
- Posts: 512
- Joined: Wed May 29, 2013 6:30 pm
- My E21(s): '83 Polaris silver 316
- Location: Dronfield
Re: 316 Rolling resto and upgrades
To be honest, I've never sat in pukka E21 ones, so I don't really have a frame of reference, but I do have an identical Recaro taken from an '83 Cavalier SRI in my spare room which I use at the desk, and both it, and the Audi ones have the same base cushion height and support, so I assume my seats would sit the same as stock ones if they were on original runners. I can say that the driving position is spot on, I could drive this car for hours in comfort! Centralising the seat and extending the steering was well worth it!
Andy
-
polov8
- E21 Pro
- Posts: 512
- Joined: Wed May 29, 2013 6:30 pm
- My E21(s): '83 Polaris silver 316
- Location: Dronfield
Re: 316 Rolling resto and upgrades
Hope this update isn't too long.... Nobody has dial up do they?
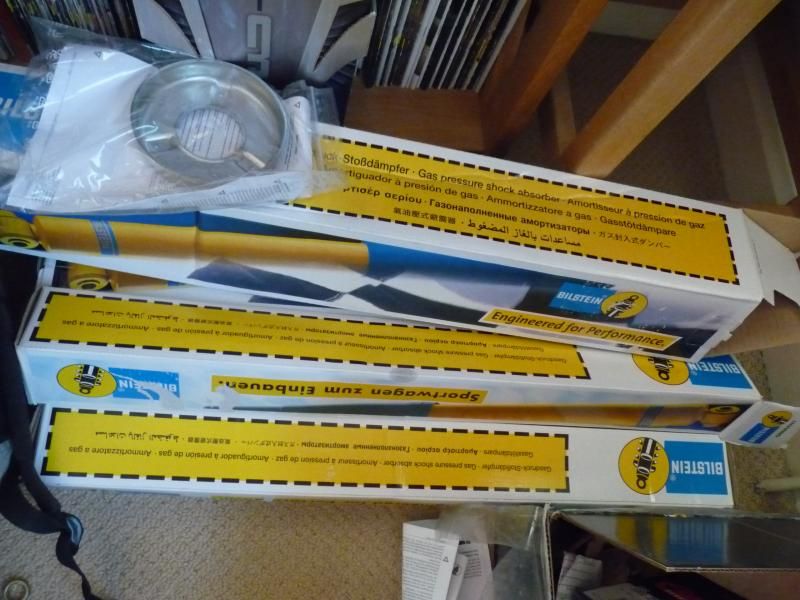
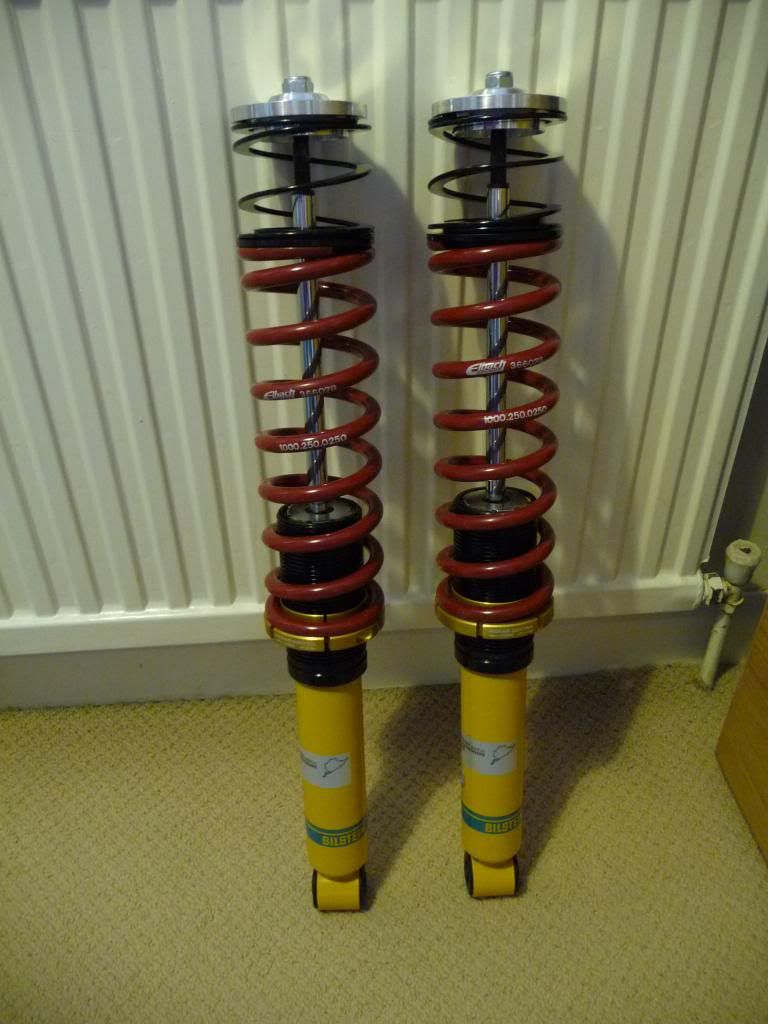
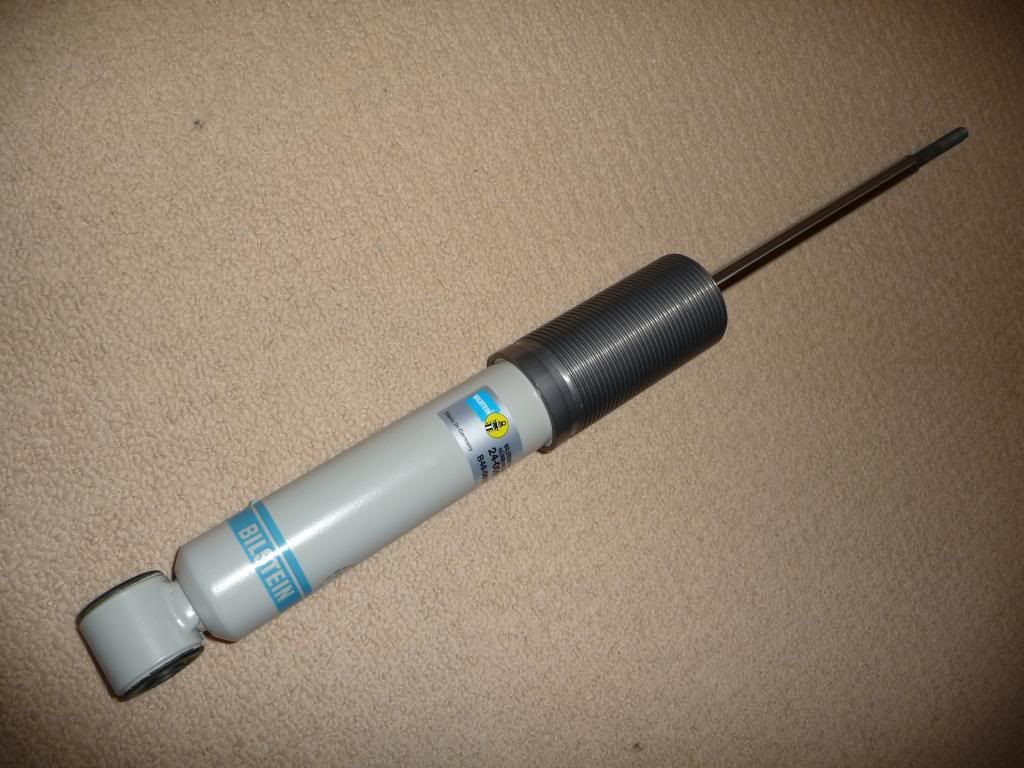
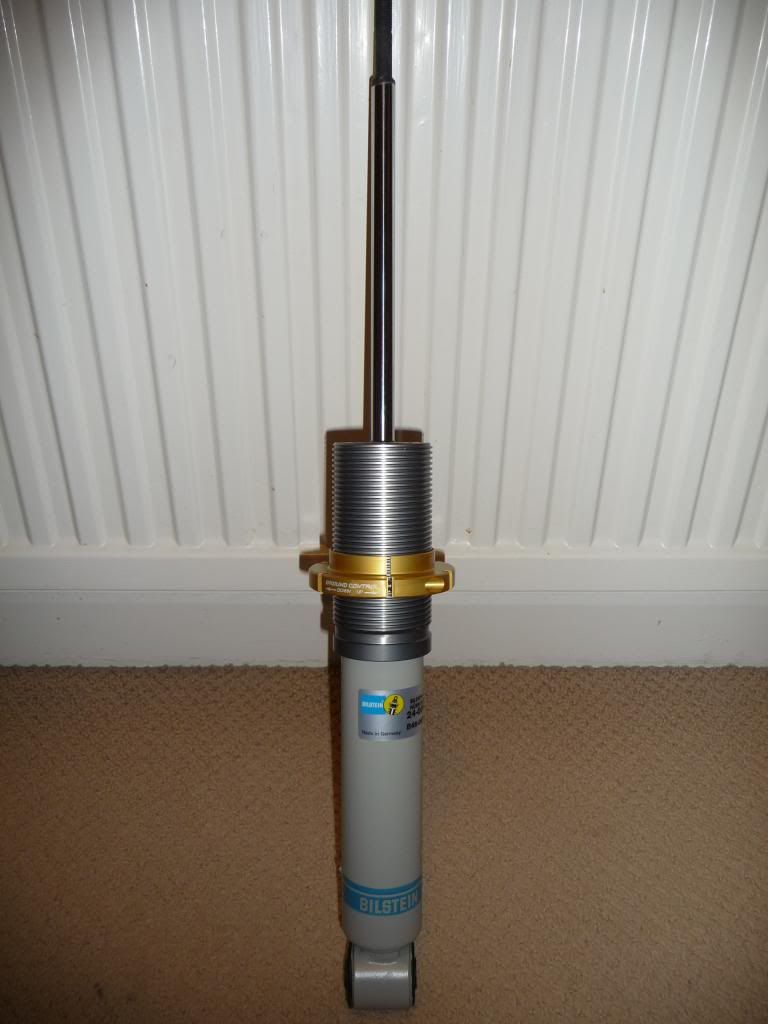
I purchased some Bilstein B6's for the car:
Then decided I wasn't keen on the lowering spring options available, so figured I'd make my own coilovers.
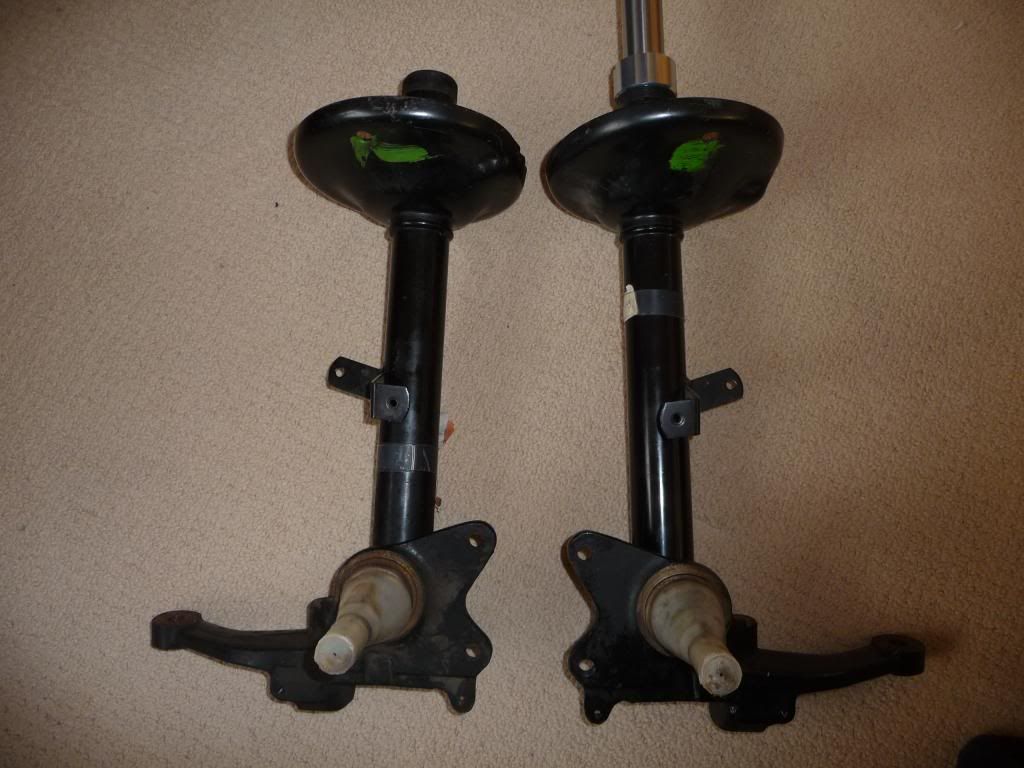
Now I don't want anyone to think I only buy stuff on ebay, but...... I scored these NOS front struts on US ebay. They're small dia for a 4 cyl car, but have the larger dia stub axles, so take the bigger bearings. I do need to get some hubs though, if anyone has some spare, I'm interested.
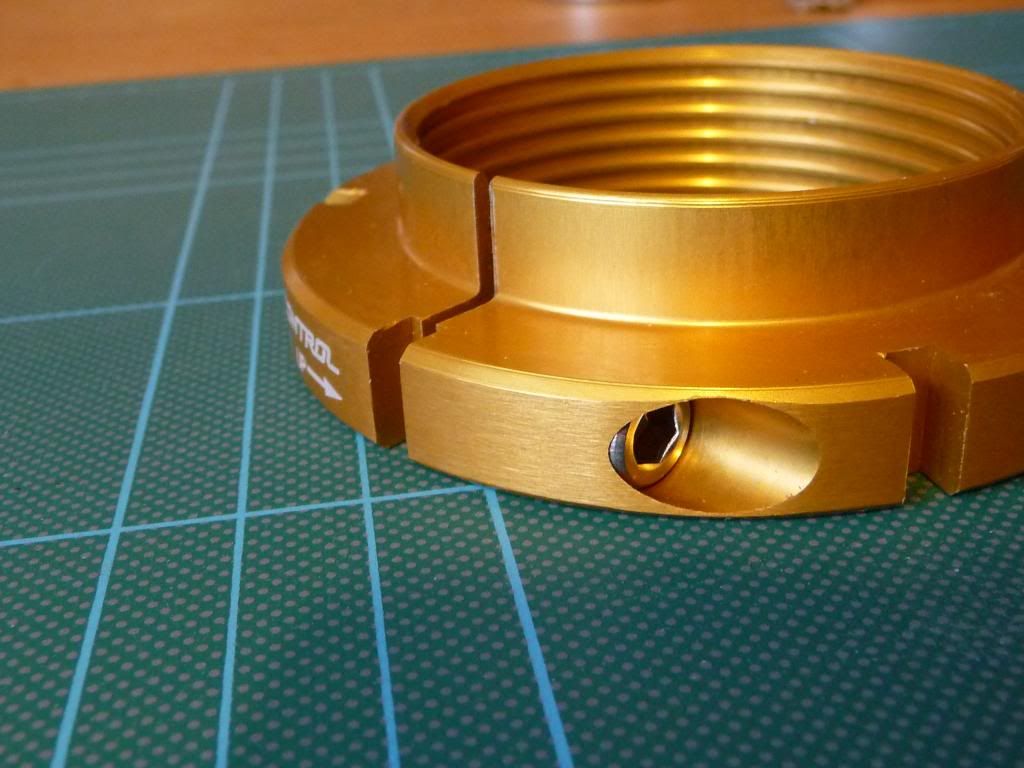
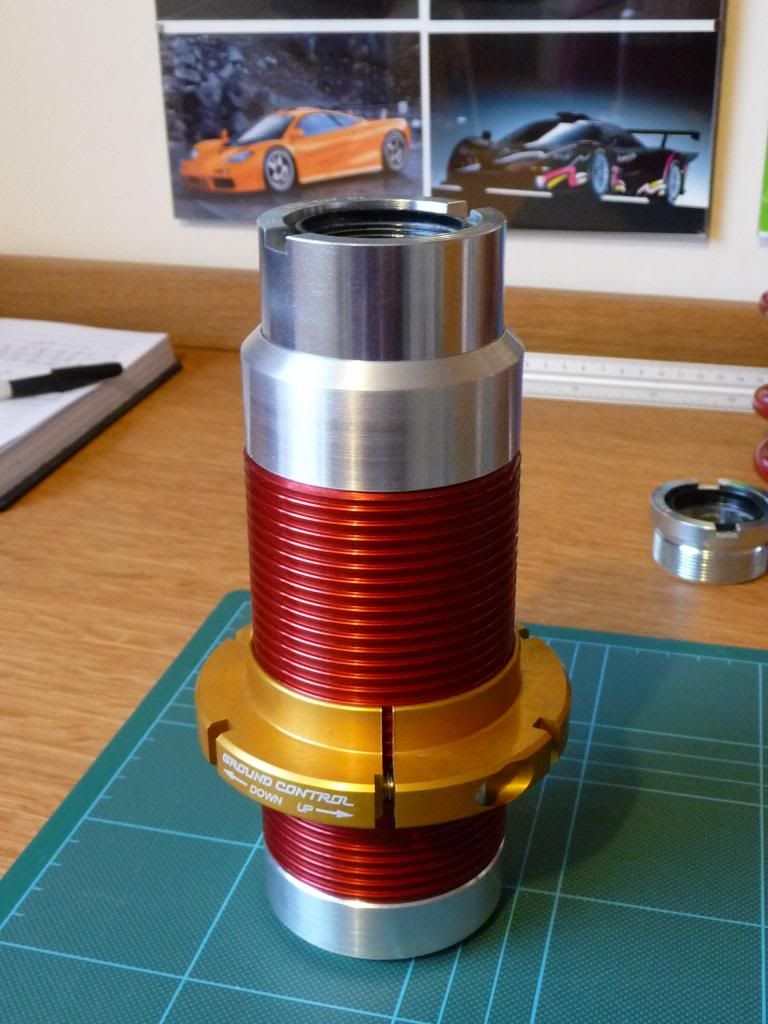
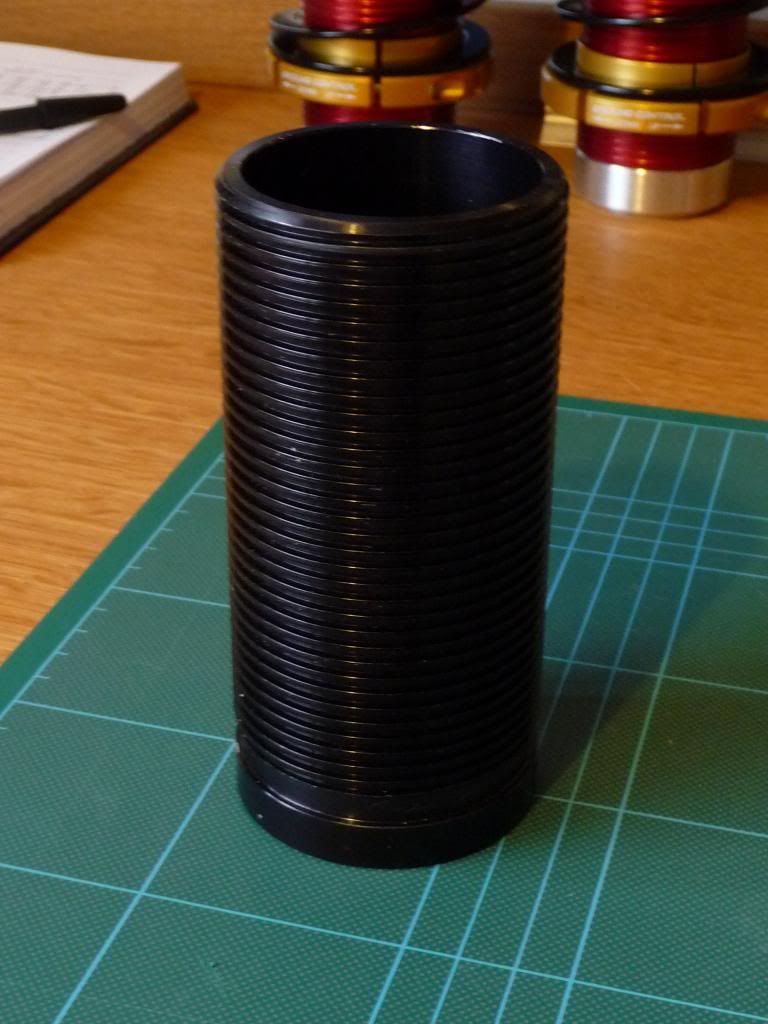
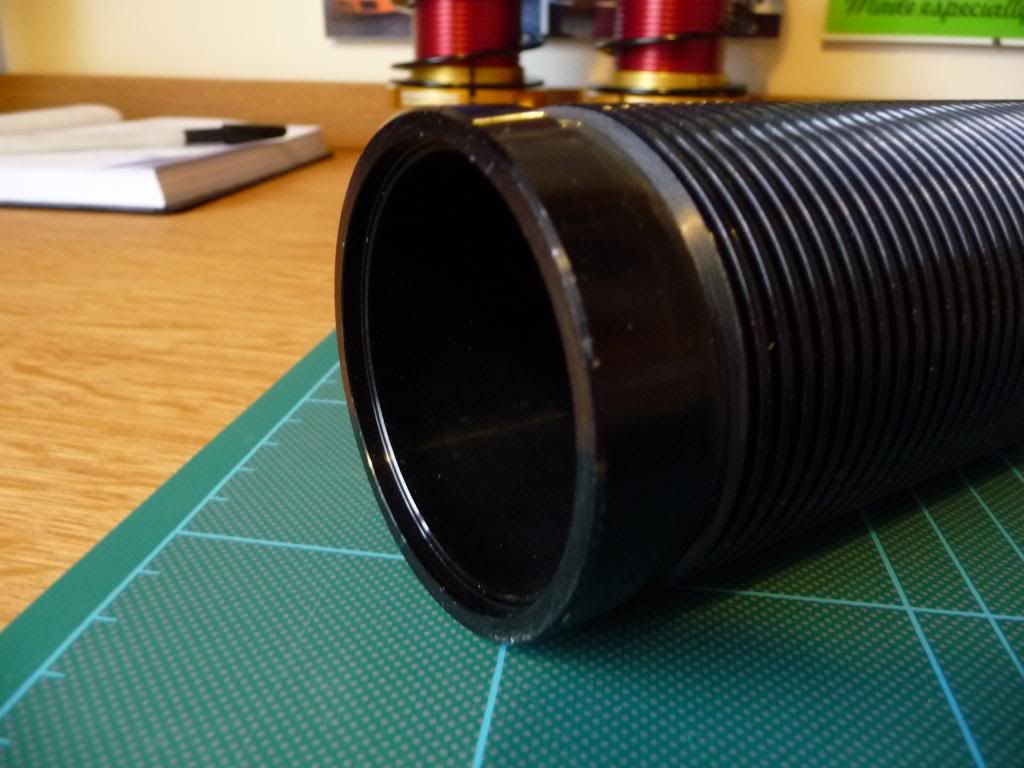
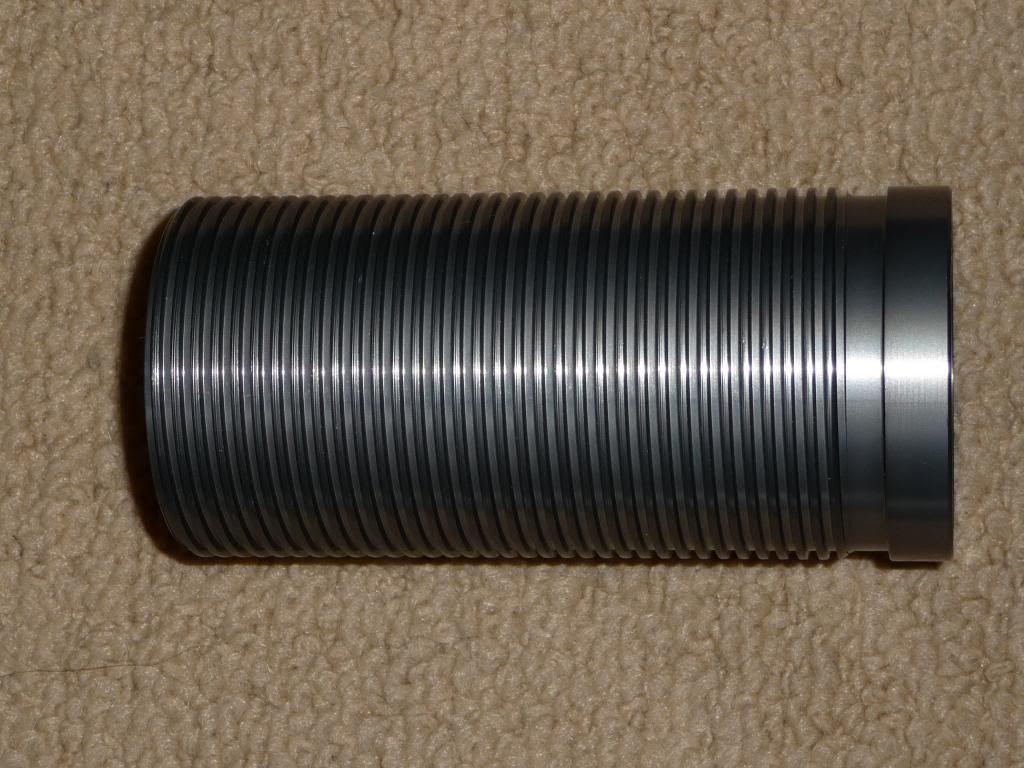
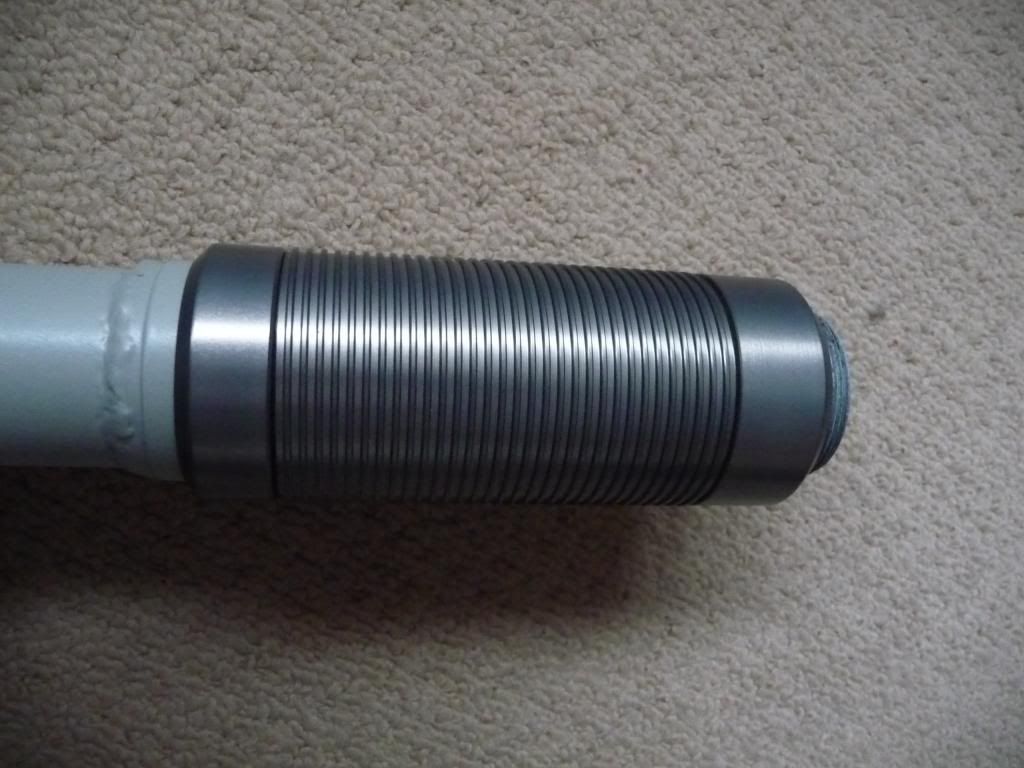
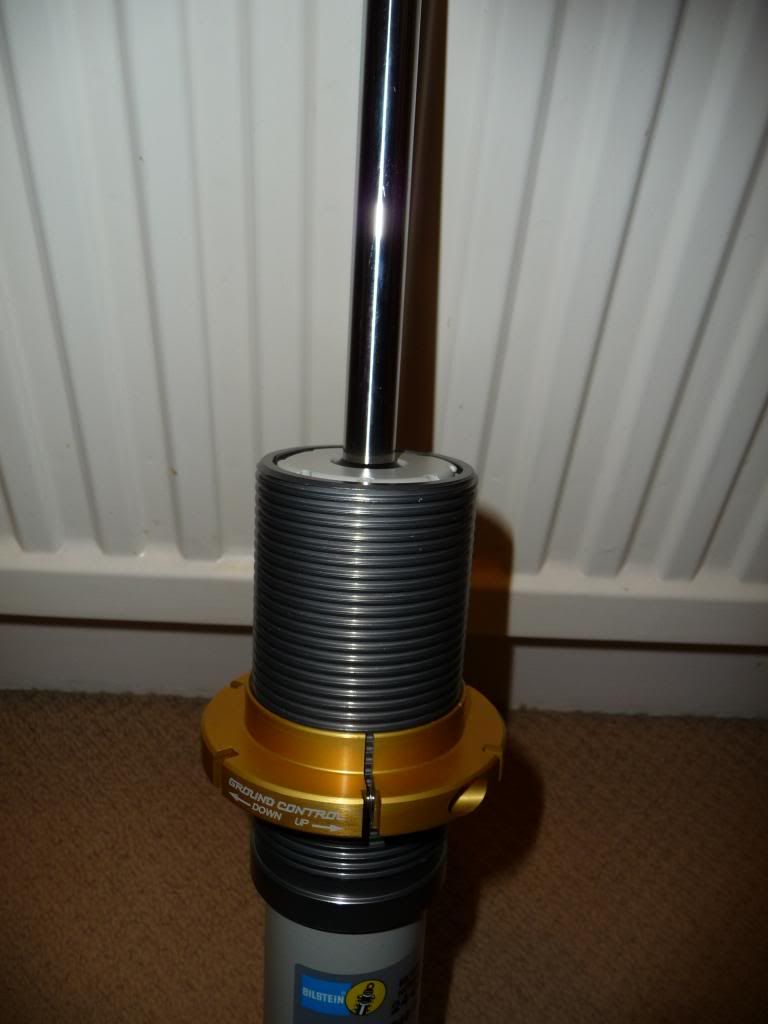
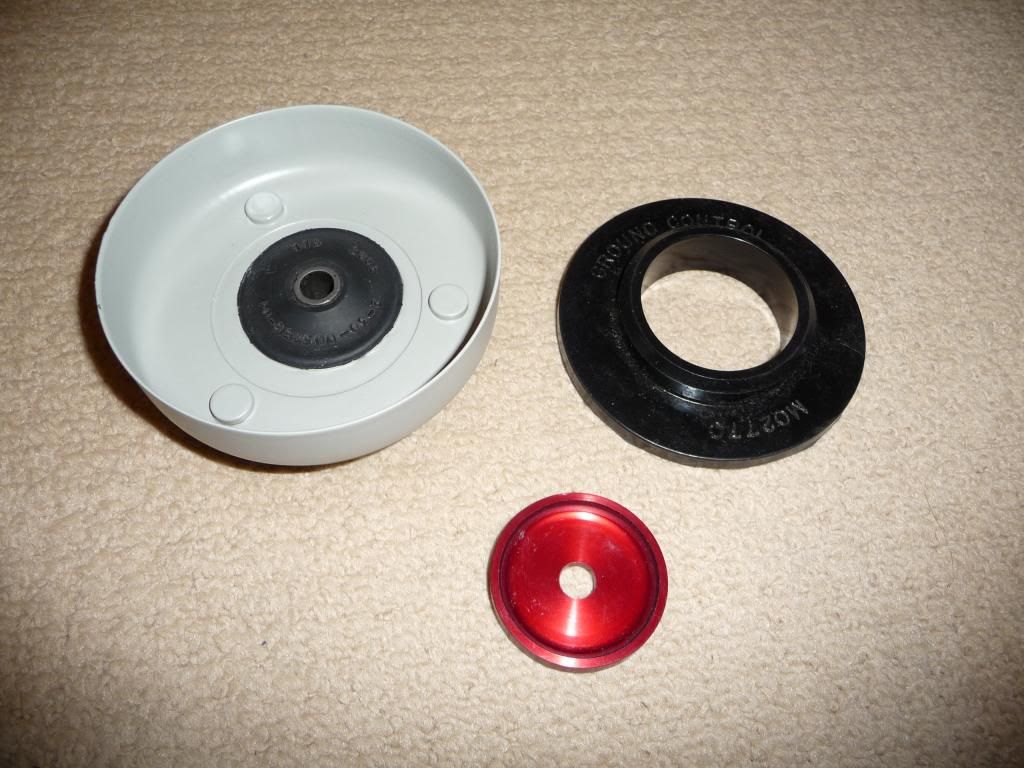
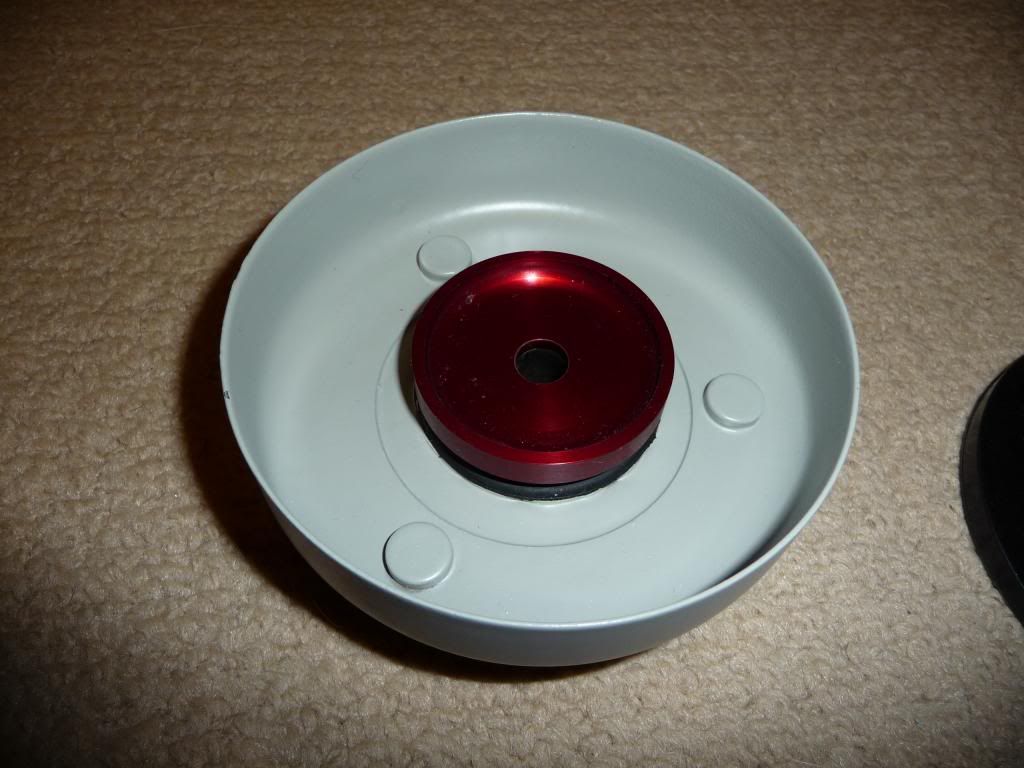
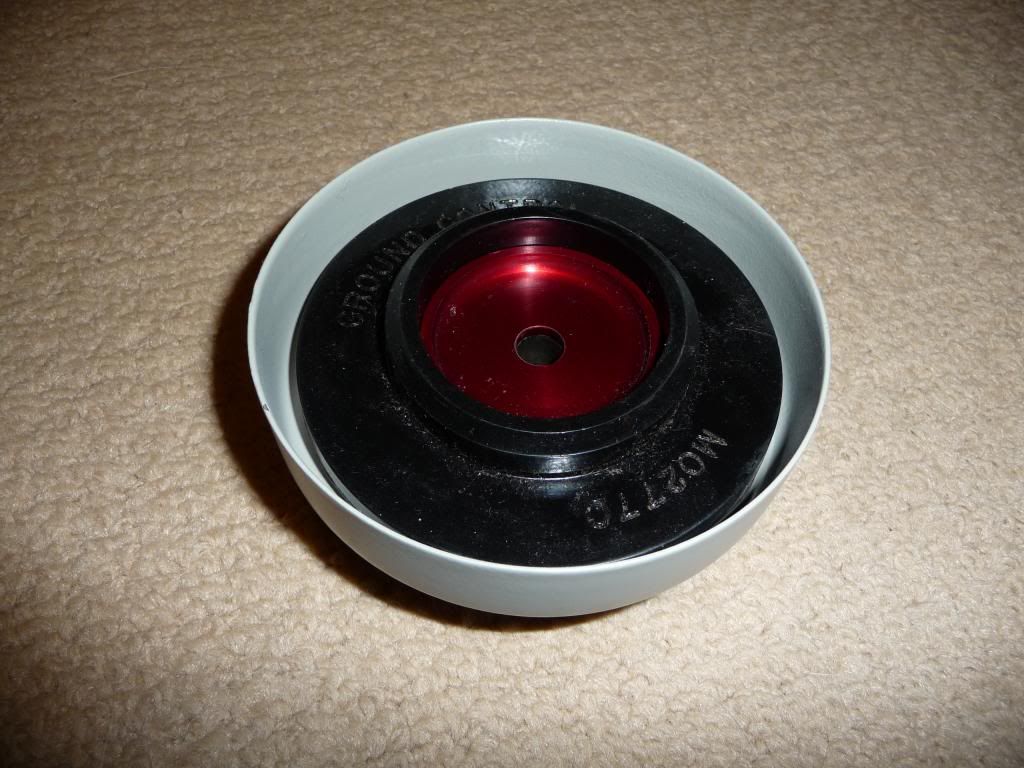
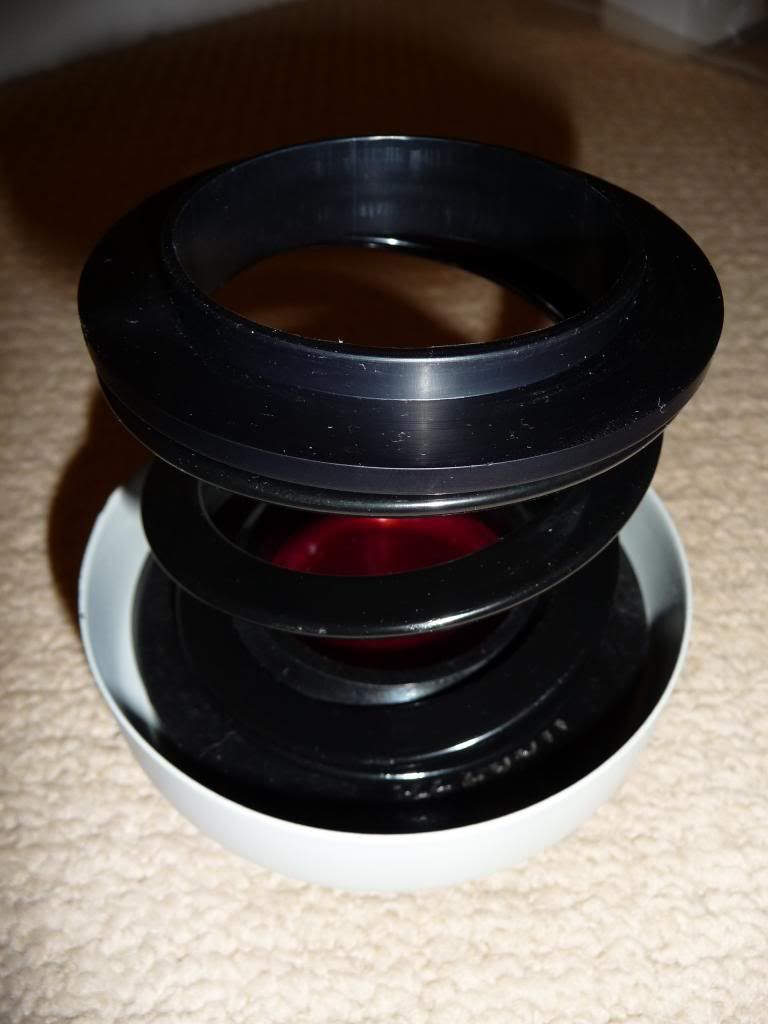
I have a friend in the states, so tend to have a few things shipped to him, then get him to send them here in bulk. Cuts down on shipping costs, and they can be, ahem, more thrifty with the customs info! I return the favour when there's stuff here he wants. So making the most of this, I got hold of a Ground Control kit. If you're not familiar, Ground Control are a US company that make alloy coilover sleeves to convert various import cars to coilovers. They retail for $300 and upwards, and inlude coilover sleeves, spring platforms, and eibach springs. I found a kit on US ebay for some Honda I'd never heard of, but the sleeves and platforms looked useful, and I could get my buddy to sell the springs on their own and recoup some money. The sleeves and platforms are nicely anodised alloy, and the platforms clamp onto the sleeves without having to lock 2 together, or driving grub screws into the threads.
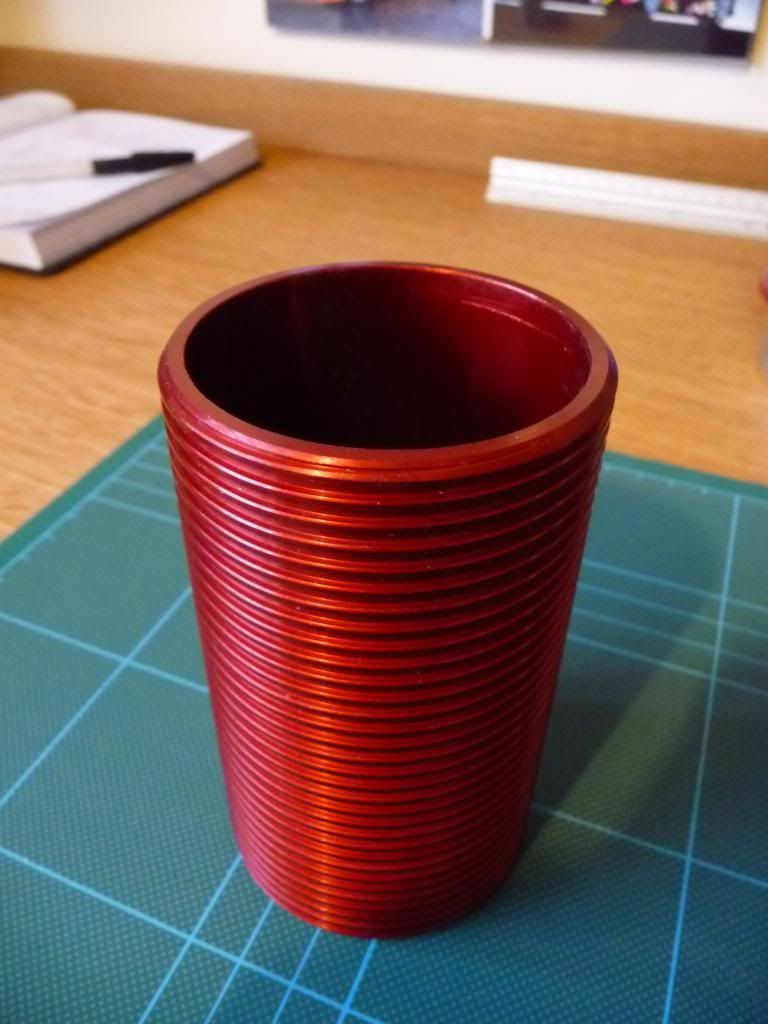
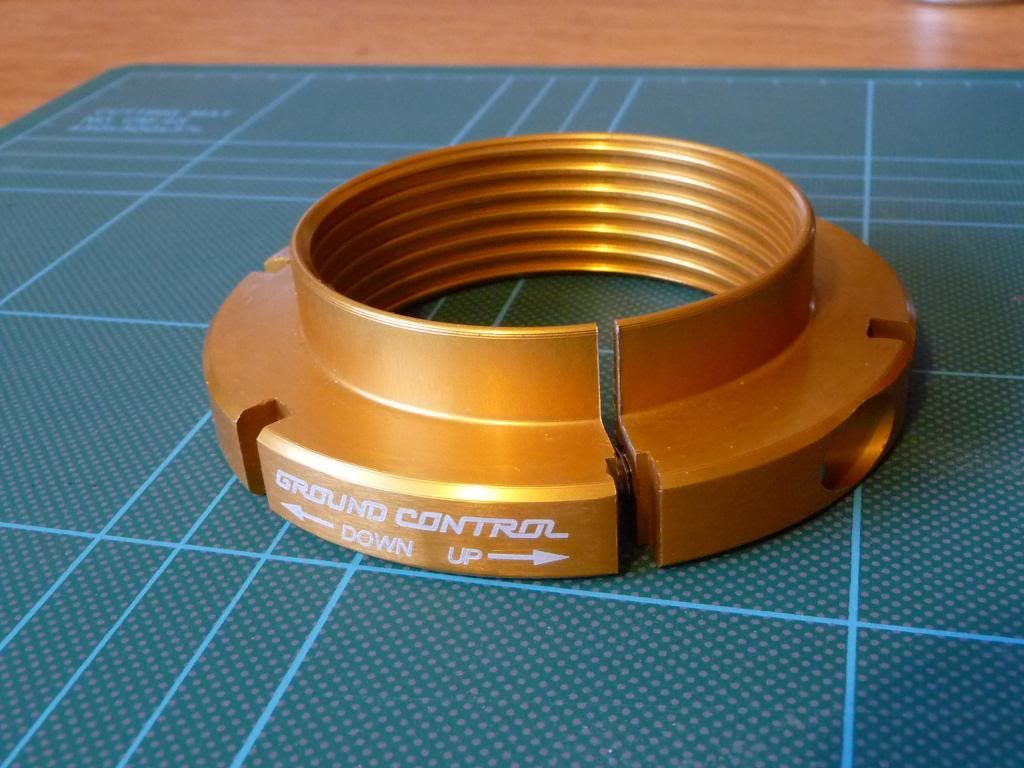
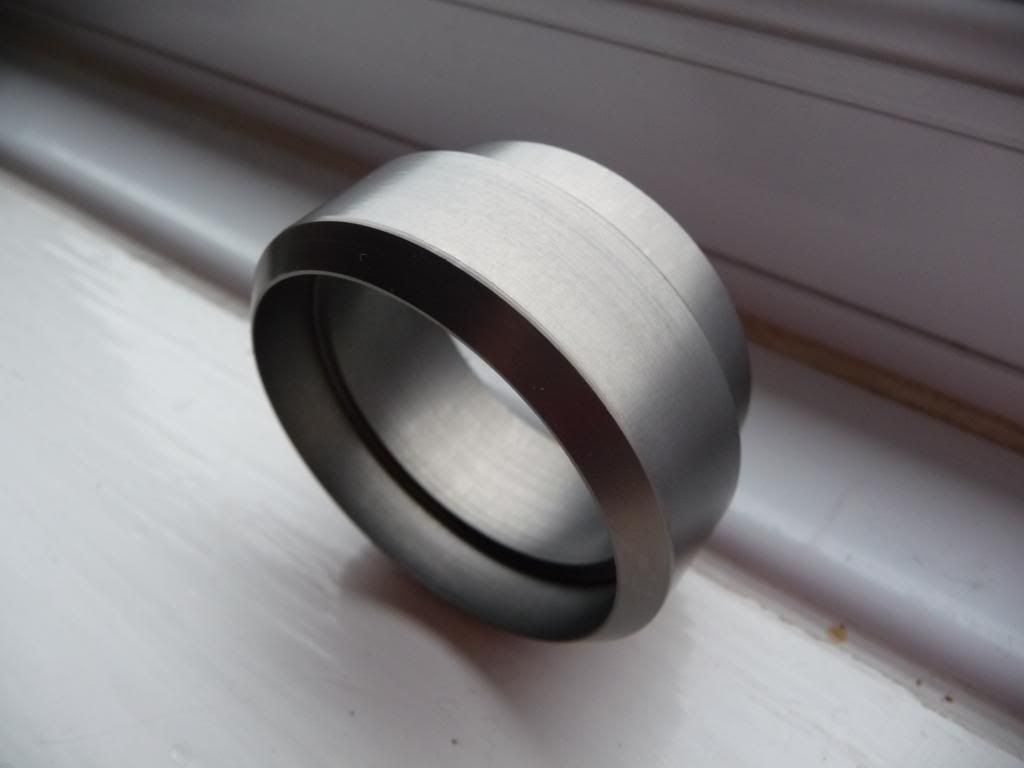
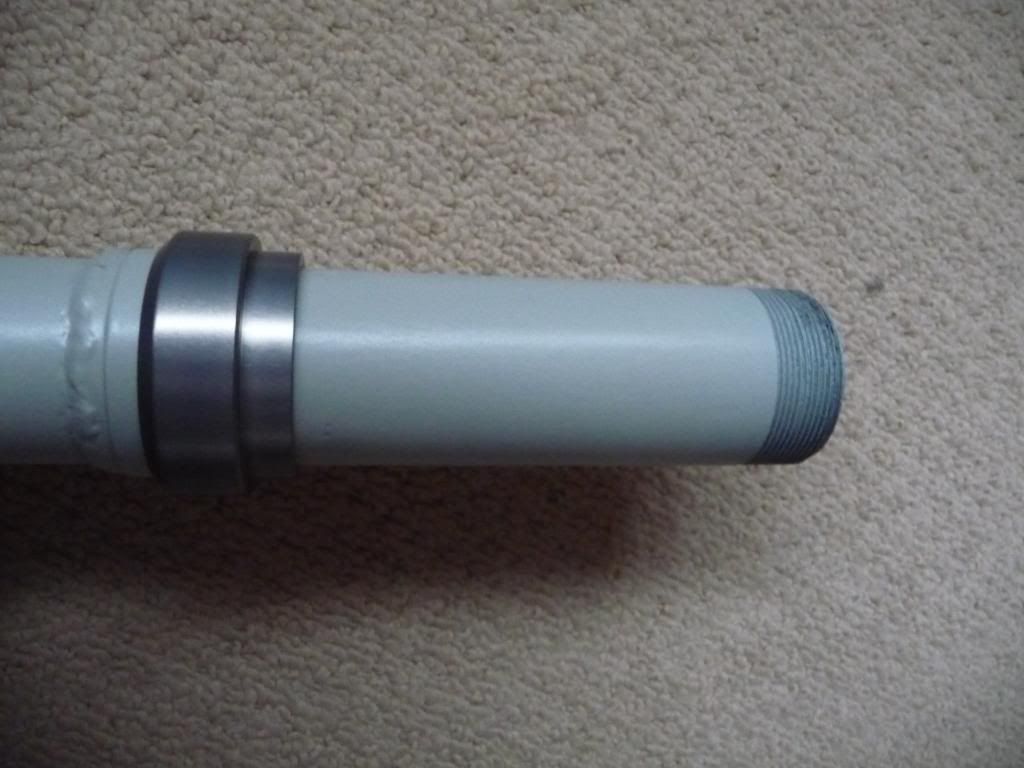
The inner diameter of these sleves is 2" or 51mm, and the outer dia of the struts is 45mm, so an adapter for the bottom was needed for it to sit on, and one for the top that would allow the bistein strut caps to lock them in position. I have a lathe, so i ordered some 60mm alloy tube, with a 10mm wall thickness (inner dia 40mm) and set to work. I figured I'd make a steel ring to weld onto the strut tube , that the adapter would then sit on, so first off I made these:
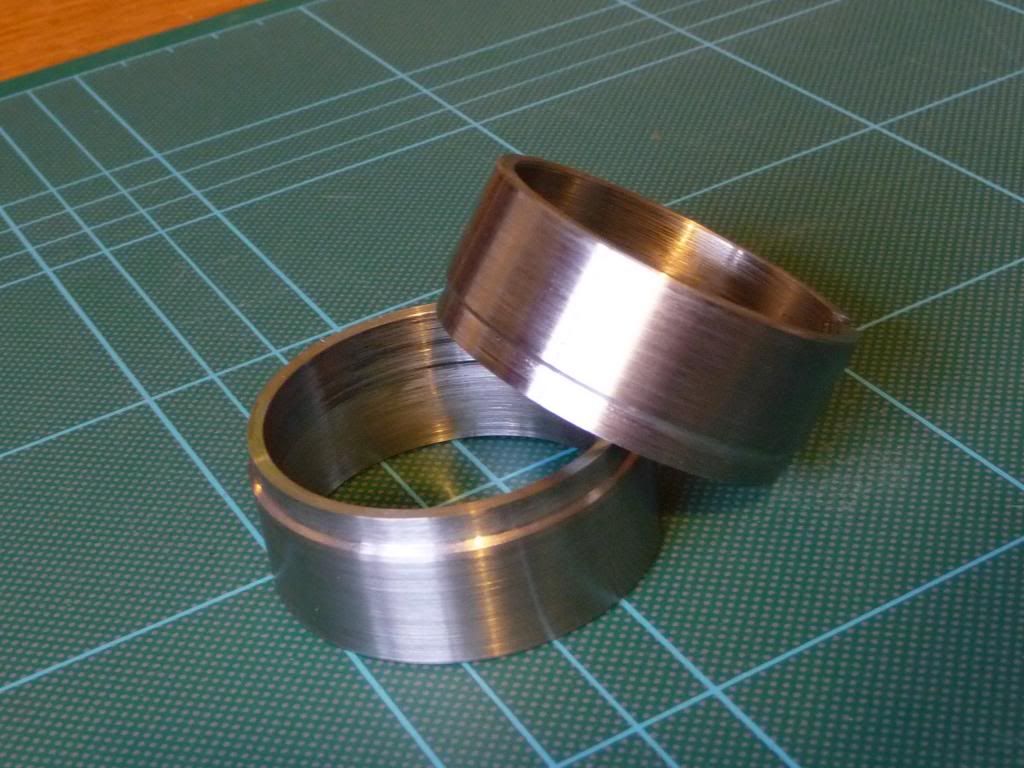
They're waisted down at one end so the thickness matches the strut tube thickness so the weld can be gauged better.
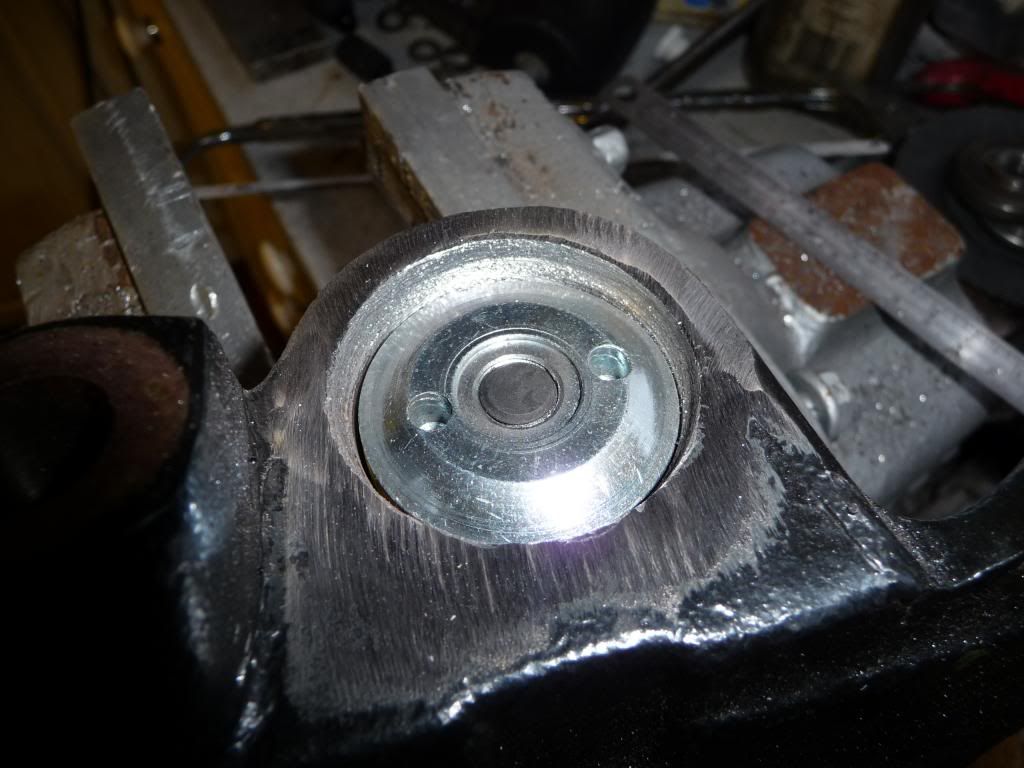
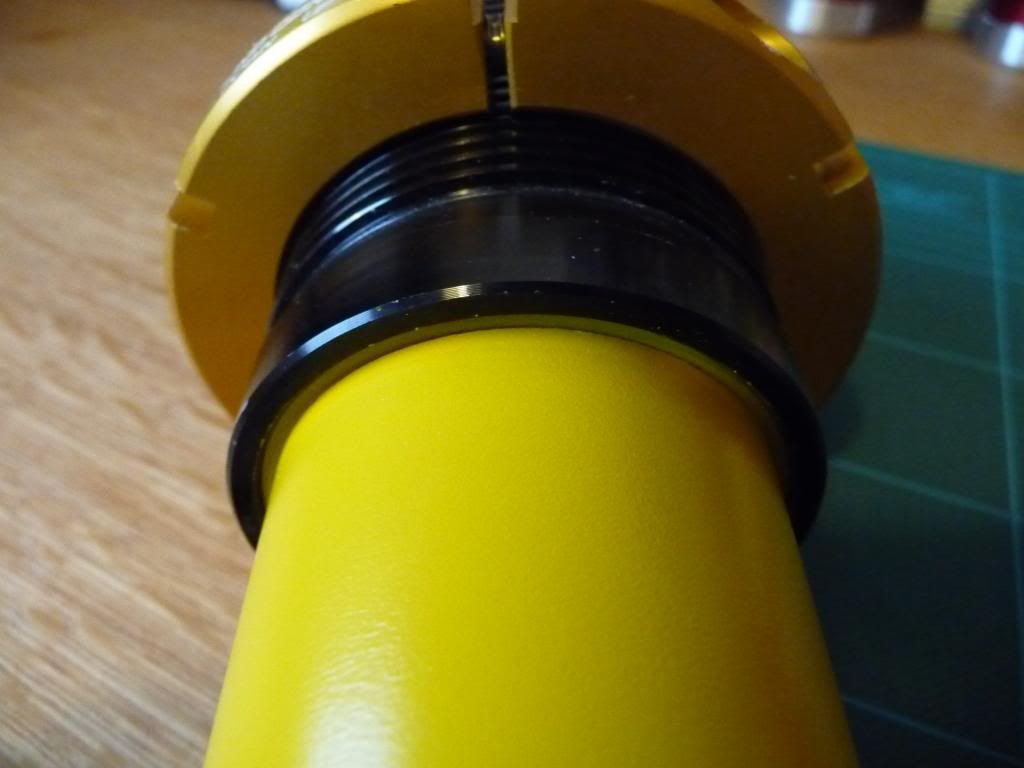
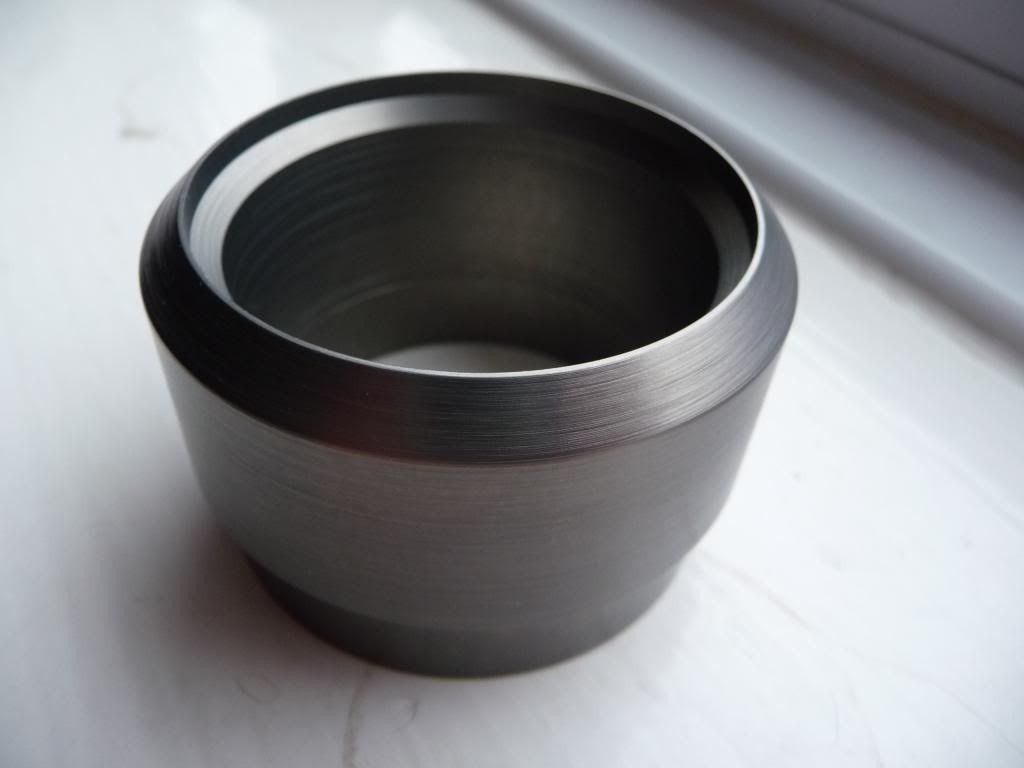
Then I made the lower adapter. It's stepped outside at the top to sit inside the sleeve, and stepped inside at the base to fit over the steel ring that'll be welded to the strut.
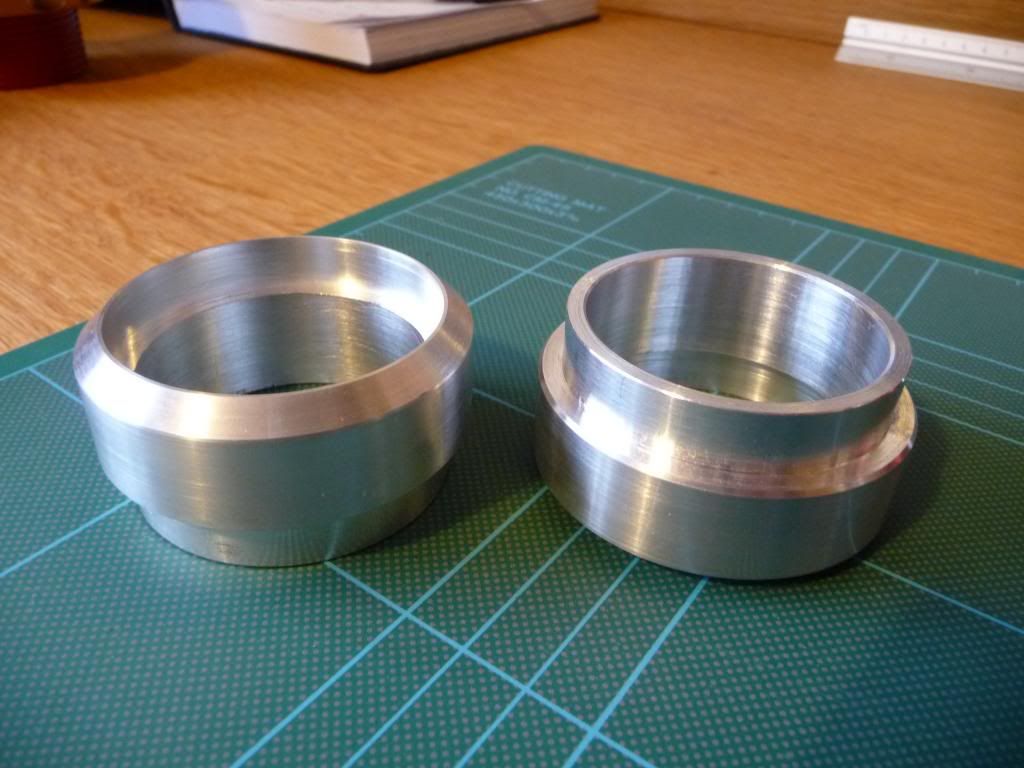
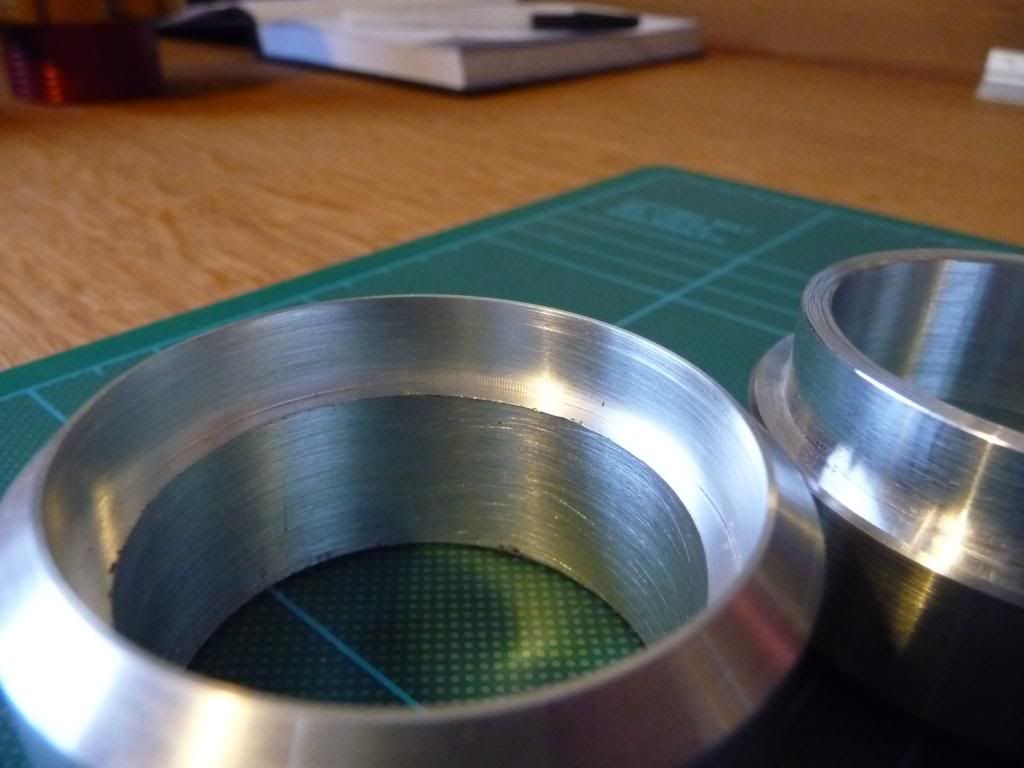
Then I made the top adapter. This has to be stepped on the outside at the base to fit into the sleeve, and stepped inside at the top for the bilstein strut cap to fit inside, but the base of the cap has a 45 deg bevel, so the adapter had to match this.
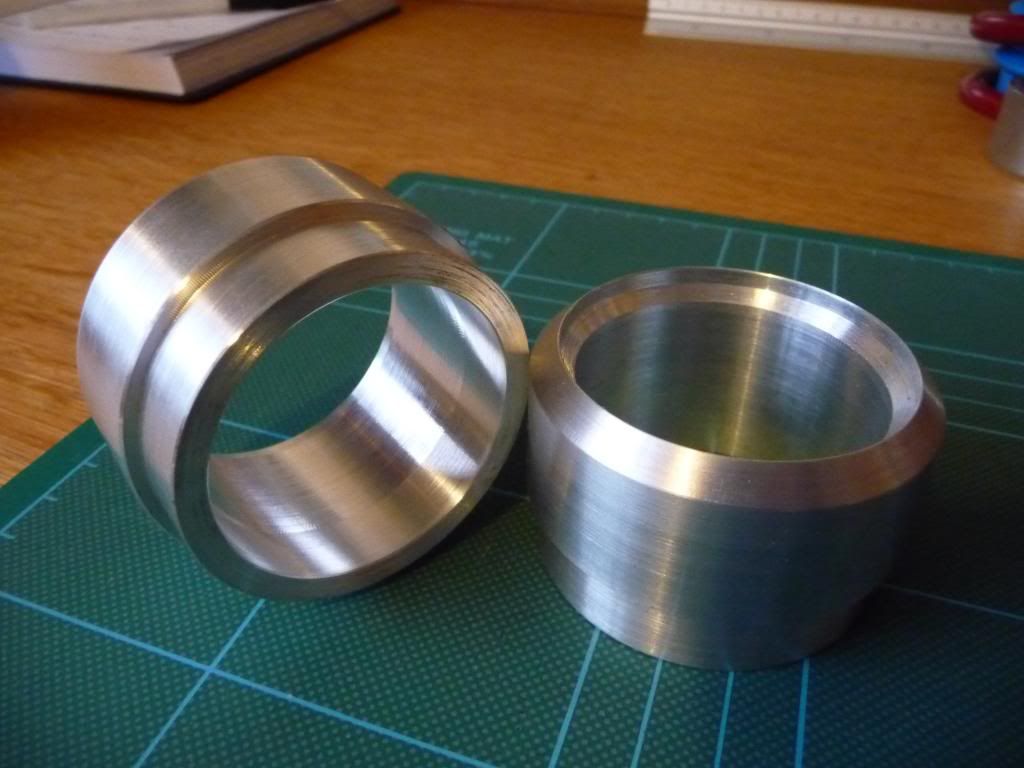
So then you end up with this that's ready to fit the strut:
Next step is to chop the spring platform off the strut (If anyone wants these brand new spring platforms, let me know, you can have them for the price of postage!)
Then I got thinking. On my previous VW Sciroccos, I've been able to lower the cars about 30-35mm by chopping the struts and adding some to the bottom. If you do this right, you lower the car, but as the spring and shock are moved down by the same amount, there's no loss of suspension travel, and hence no degradation in ride quality. I wondered if something was possible on the E21......
Looking at the suspension, the bottom of the shock isn't over anything in the straight ahead position, but when on full lock, it's over the track control arm. The clearance is at it's least when the suspension in full droop, so when the car is jacked up, or you've gotten "air"
I decided to measure it at this point, and worked out with the bottom of the strut tube cut out, and a cup making up of just the right size, there was 25mm of suspension travel to be gained here. Might not sound much, but it makes a difference when you're cornering hard and hit that mid corner bump.
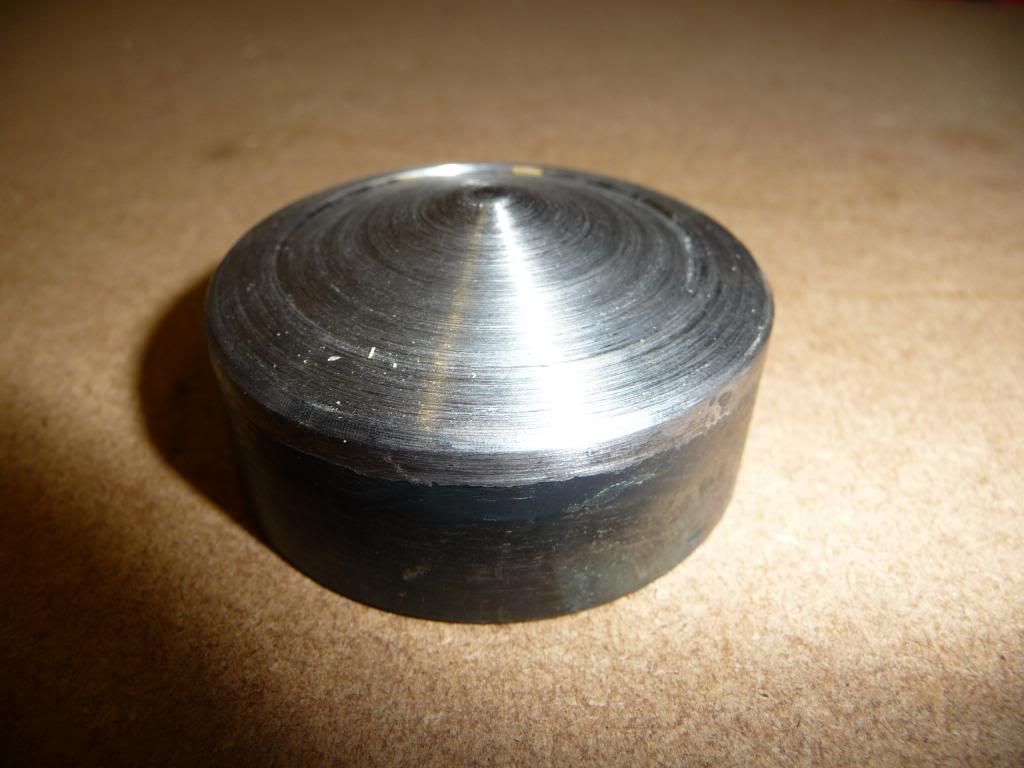
So, I made up a conical press tool from some scrap steel, and pressed out two round pieces from 3mm steel, and welded these to some short sections of steel tube. Then dressed the welds up in the lathe to ensude maximum clearance:
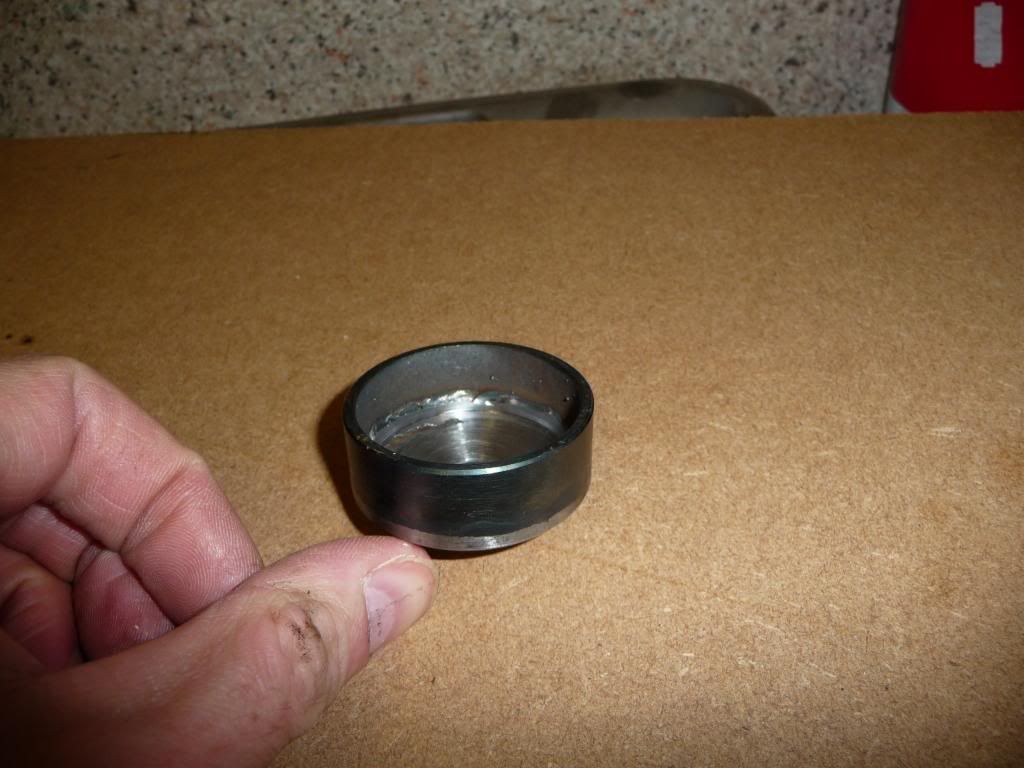
Tried them in place with the car jacked up:
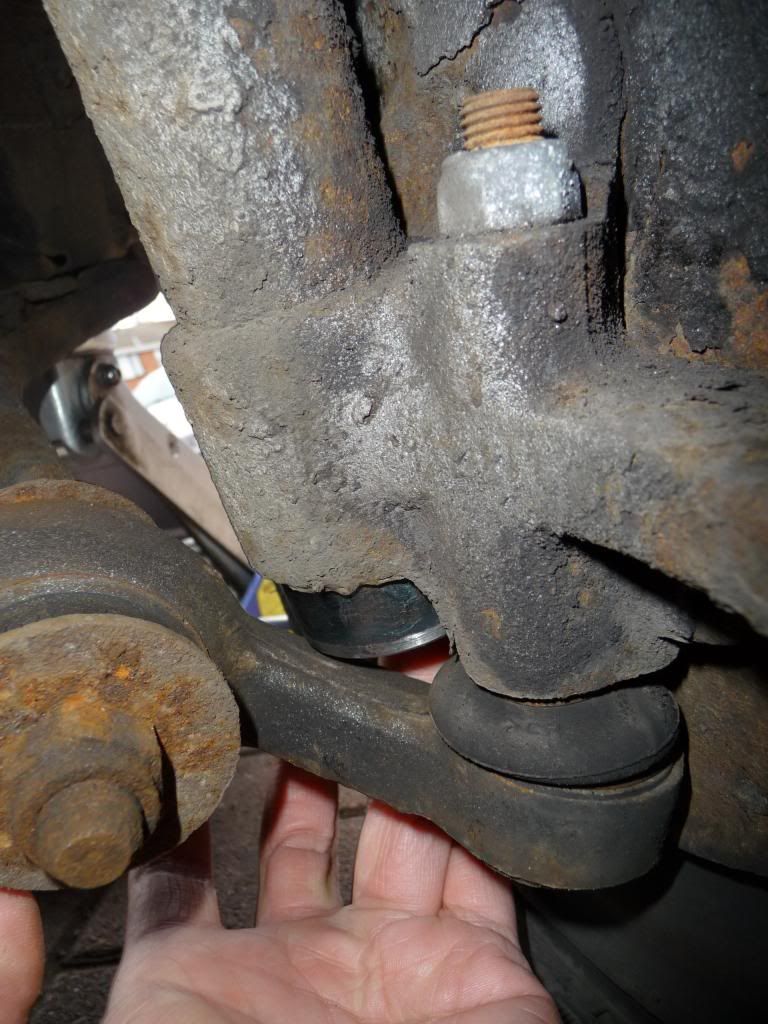
1mm of clearance is plenty! Especially since the droop travel is reduced by doing this modification.
So, Power tools time!
This is how far the bilstein comes down the strut stock
Time to weld on the new base
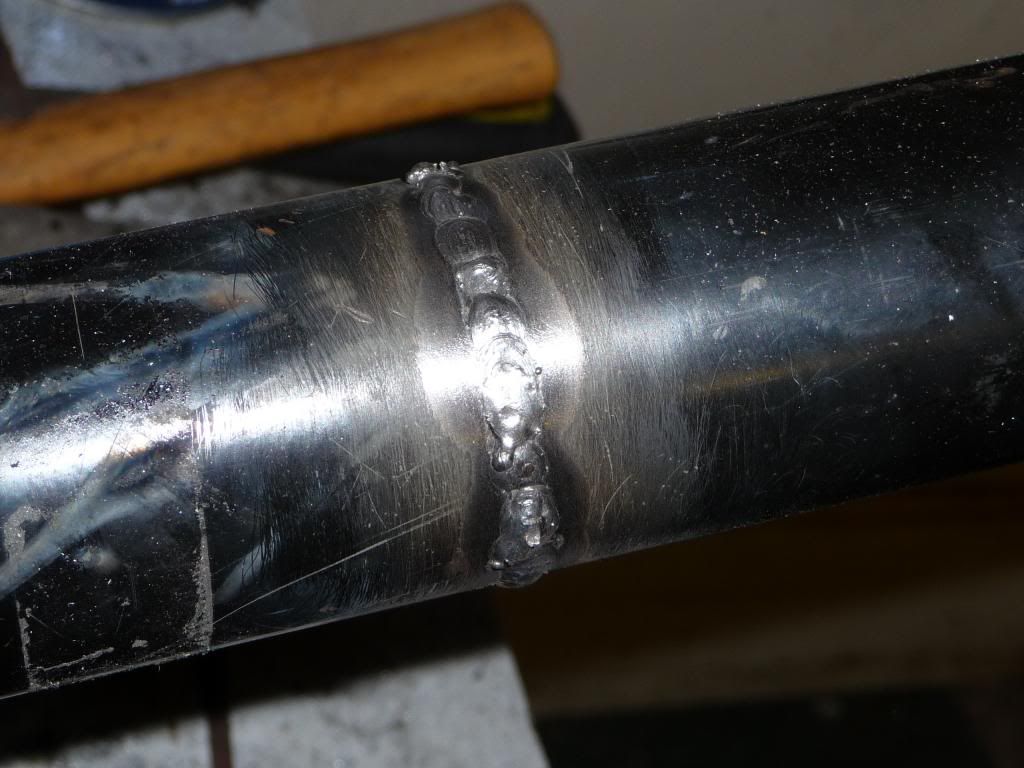
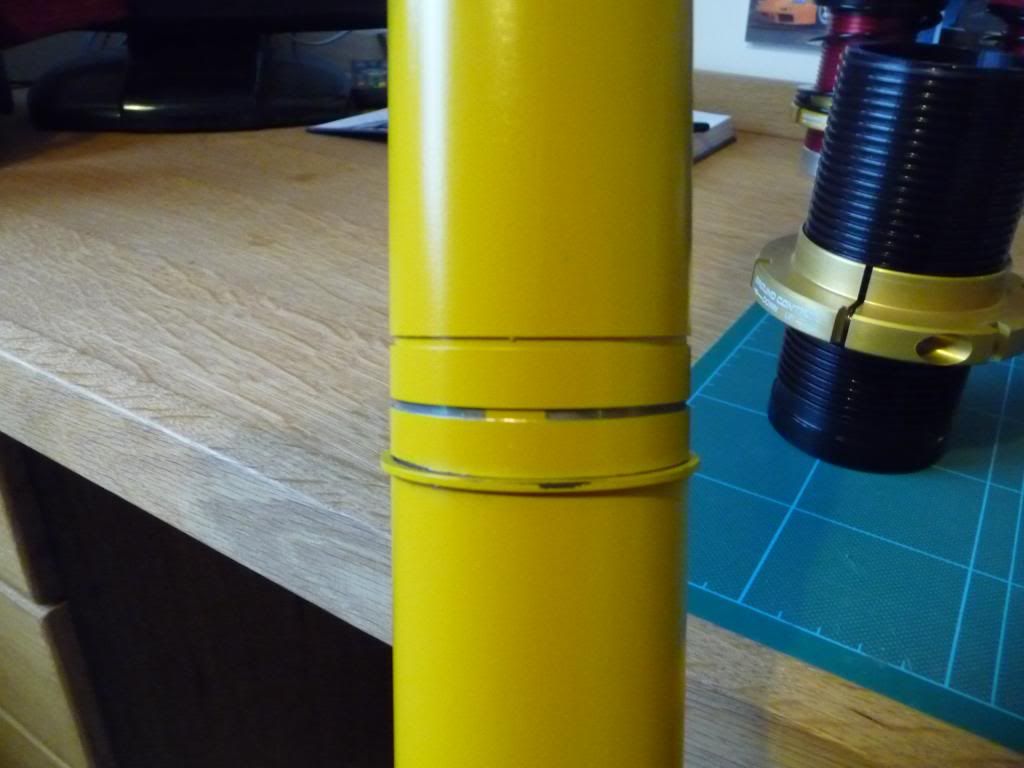
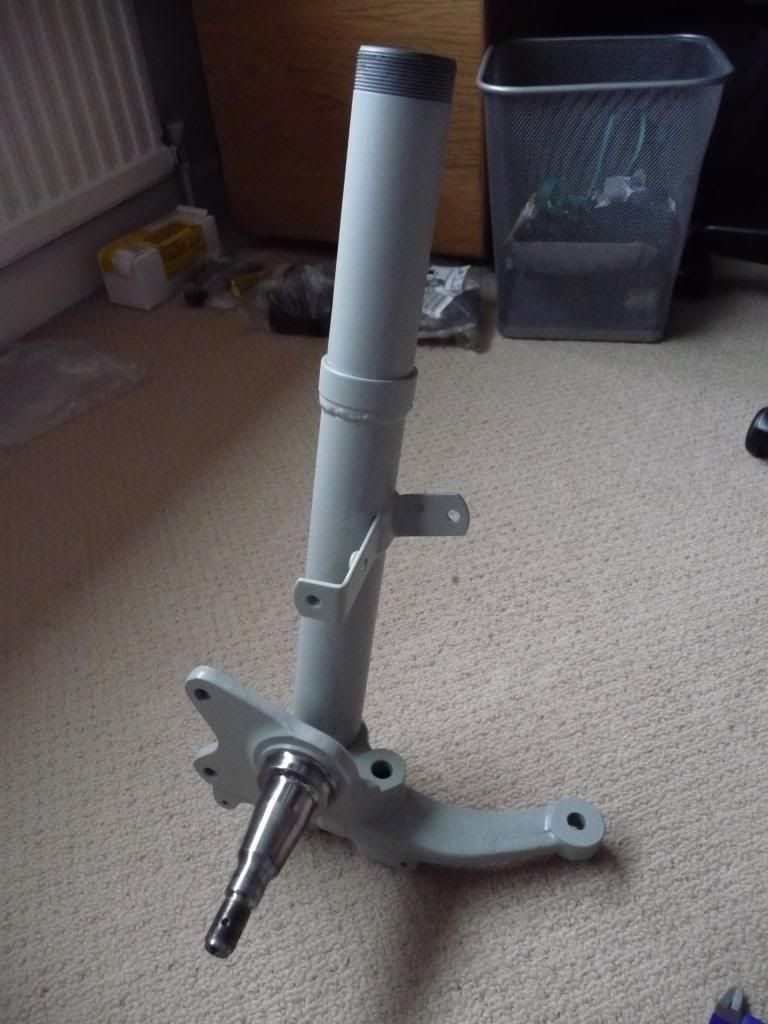
Next, it's time to shorten the strut tube. I did this under the area where the sleeve will fit, but in order to get the lower adapter over it, I had to make sure the welds were ground smooth, so getting good penetration was important. A 25mm section of the strut was removed, and the ends to be welded were beveled, then it was welded, ground smooth, and finally sanded.

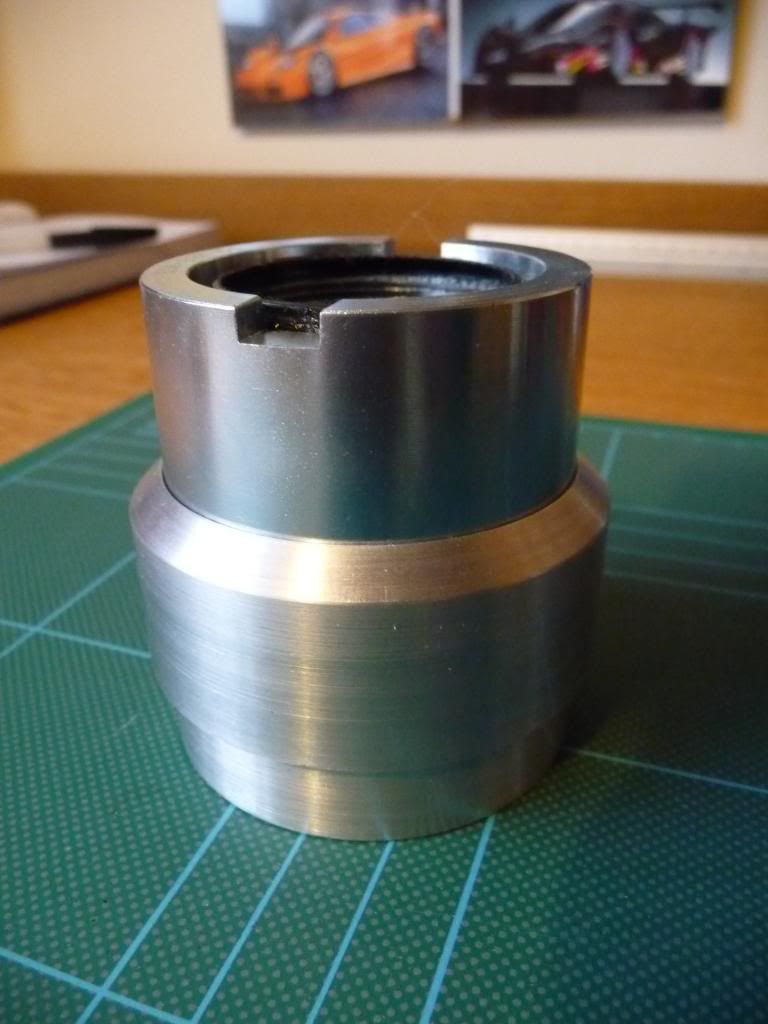
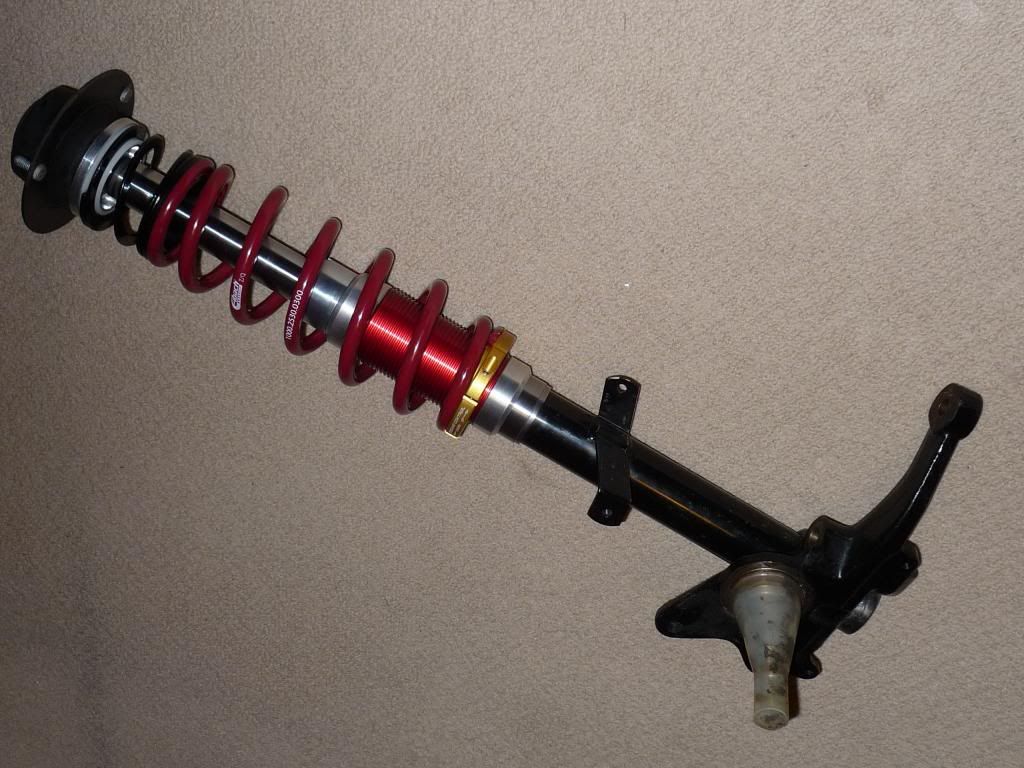
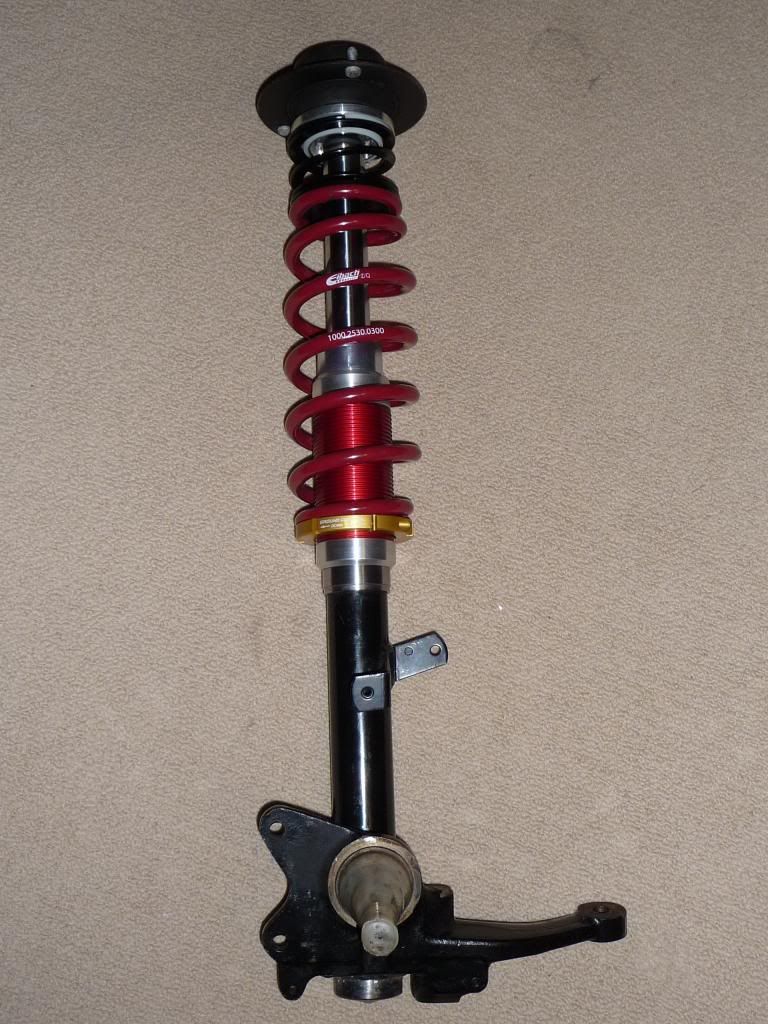
So, now I have 1" shorter front struts, I now can assemble the various components, and figure out Springs.
The steel ring that it all rests on isn't welded yet, as that had to wait till the shock could be tightened down, then the sleeves, adapters, and the ring pushed up to the base of the cap. otherwise the risk is that when tightened down, the sleeves and adapters would be loose, or they'd be too high, and the shock wouldn't be clamped down fully.
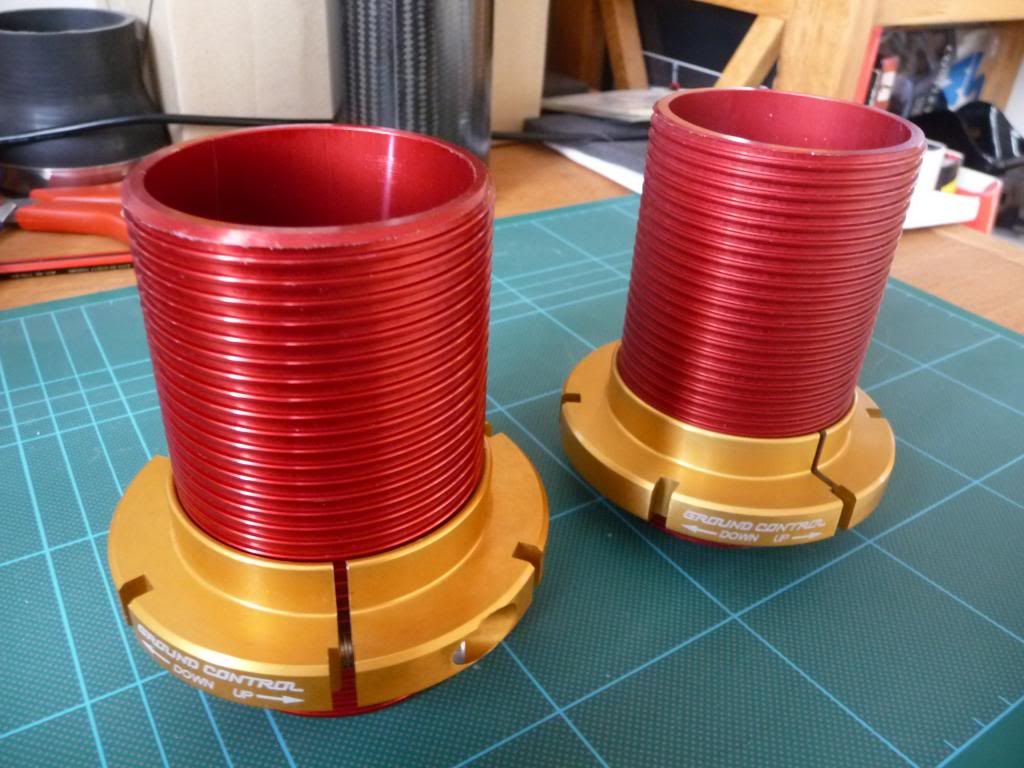
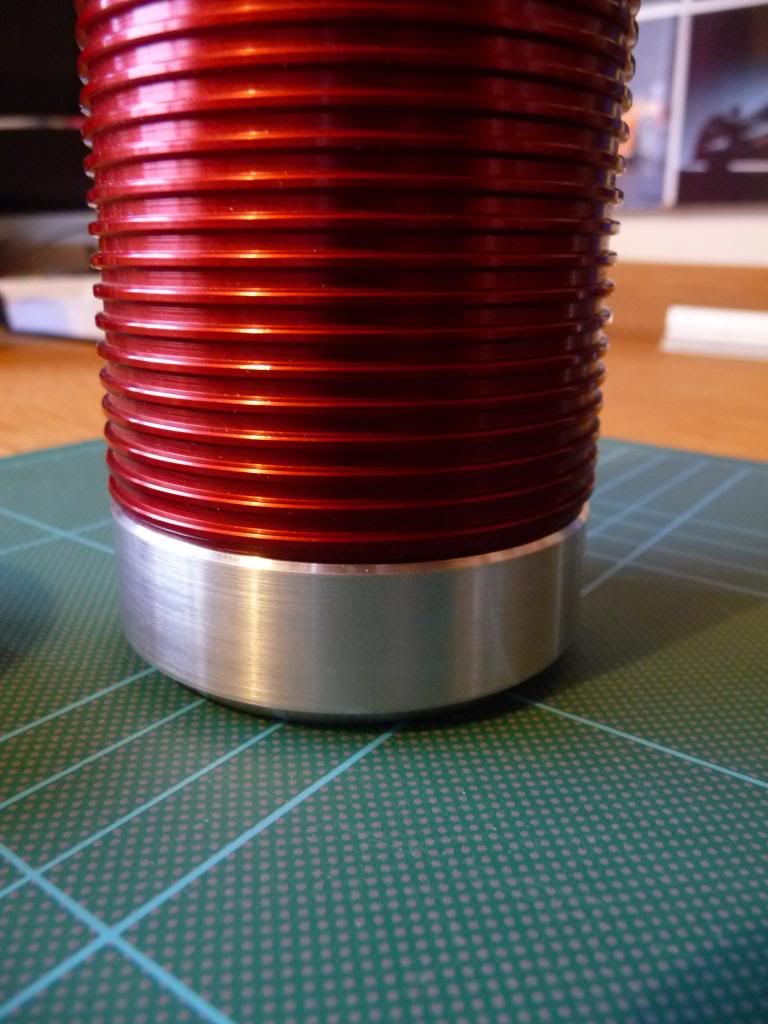
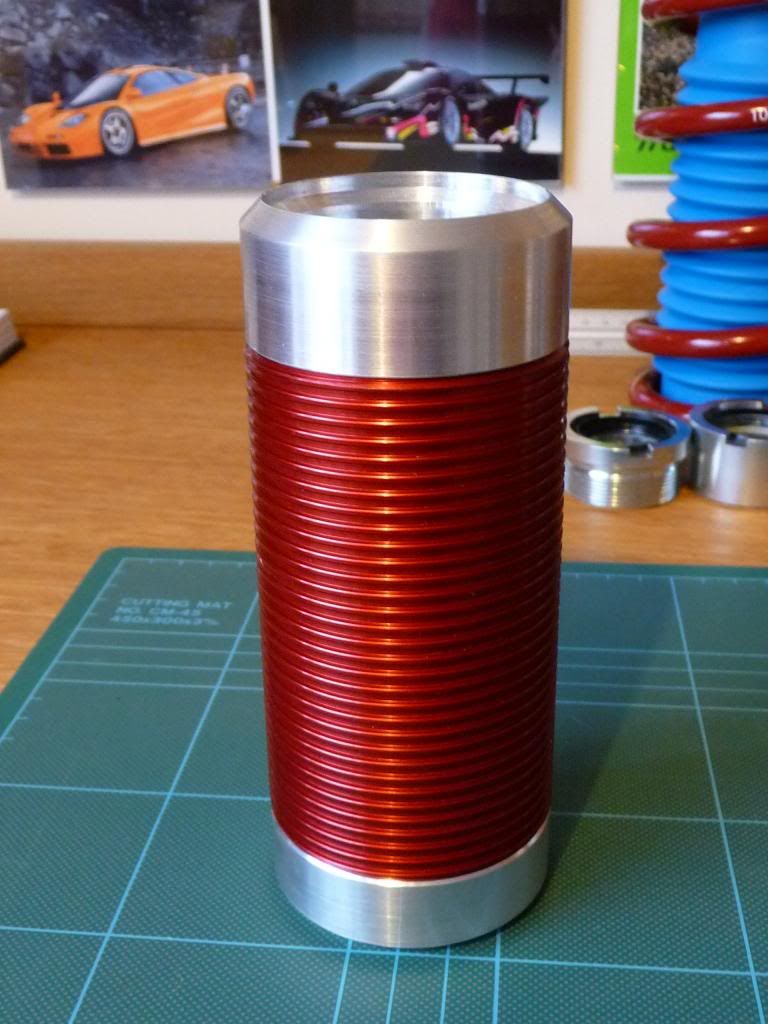
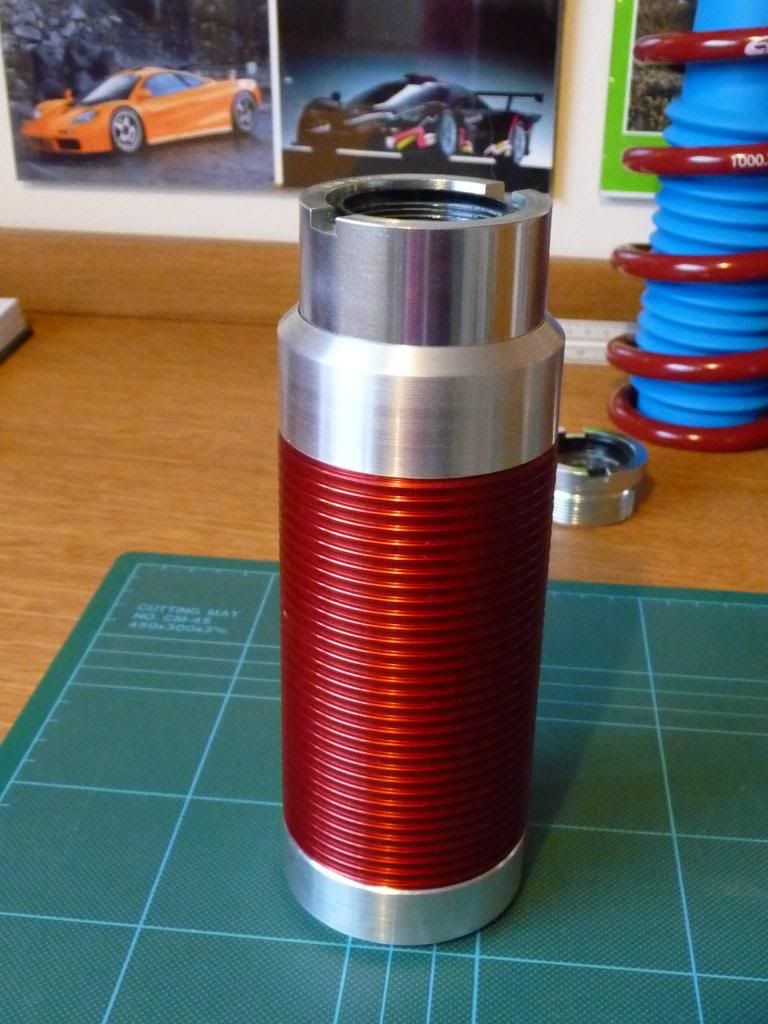
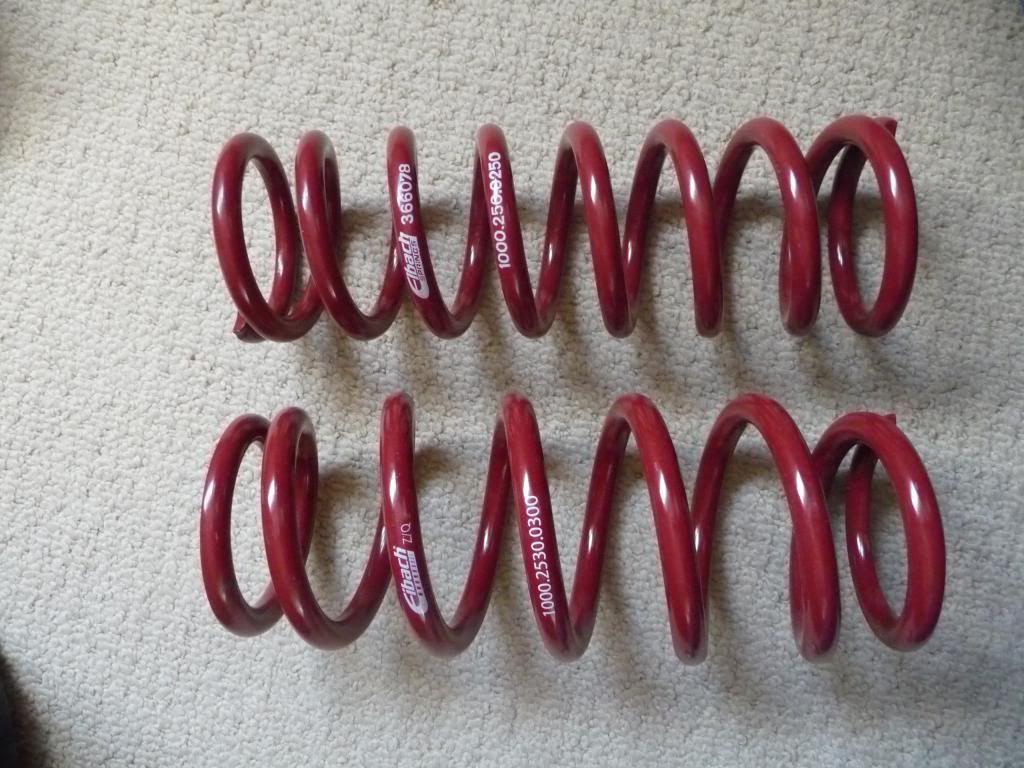
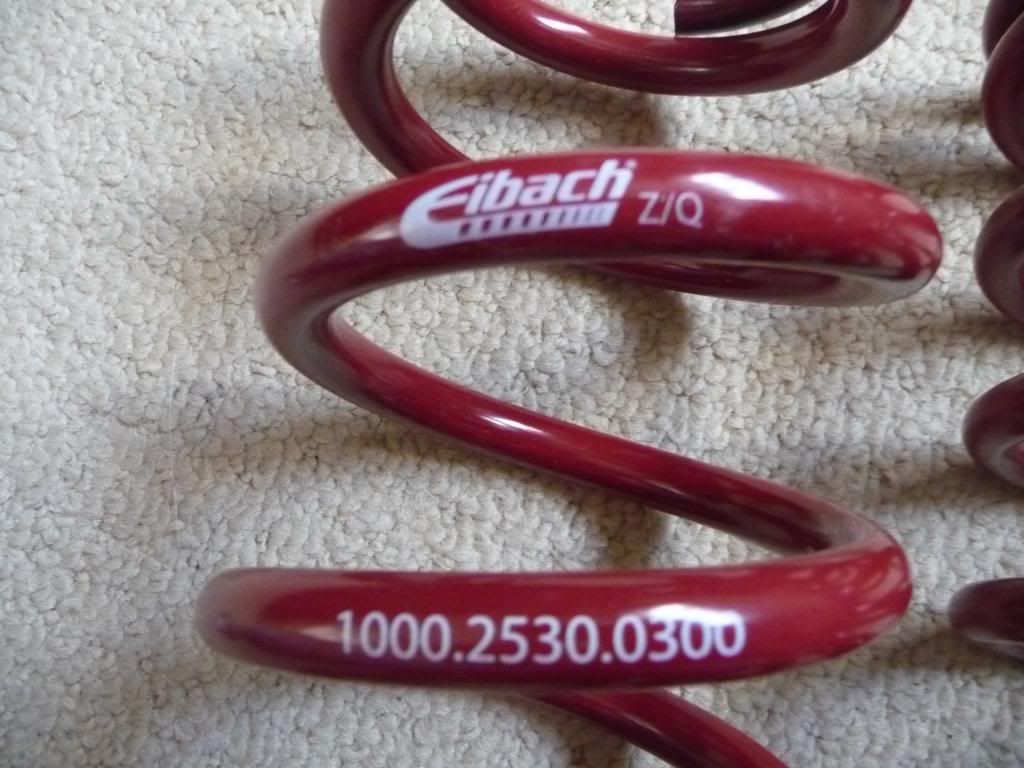
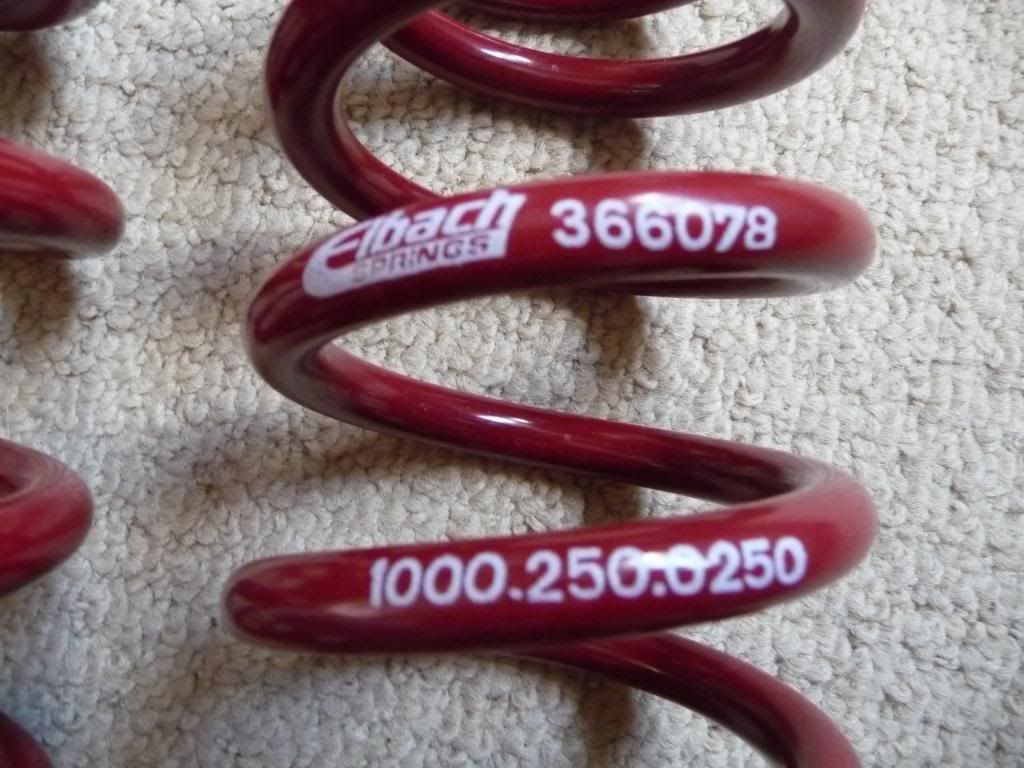
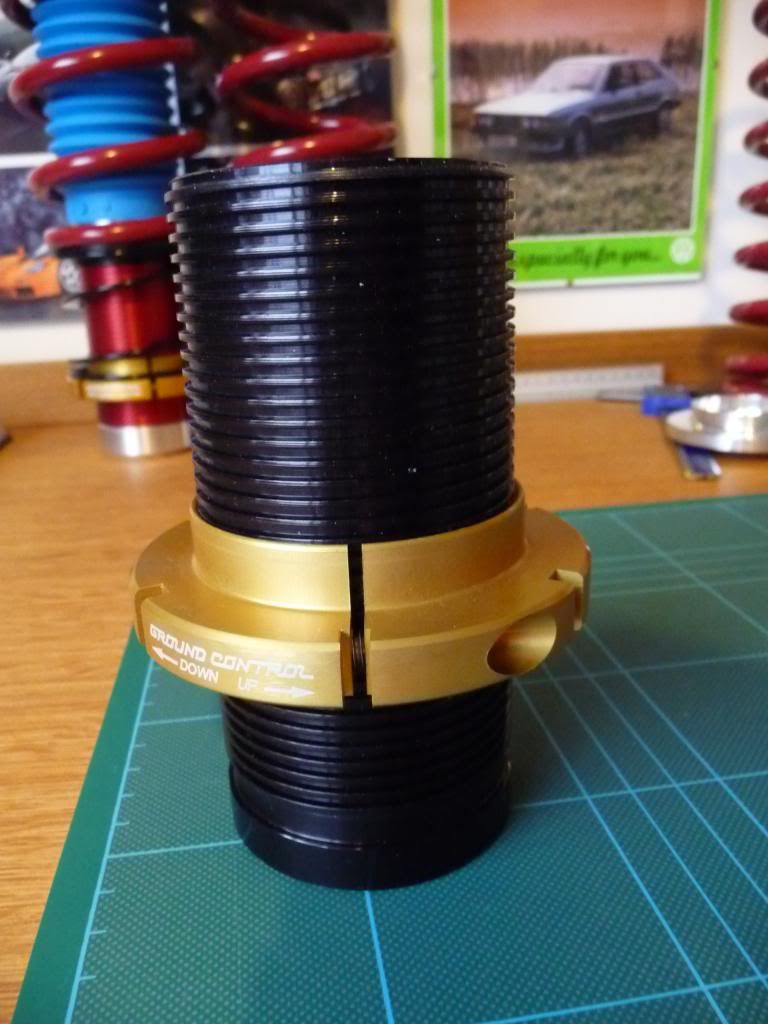
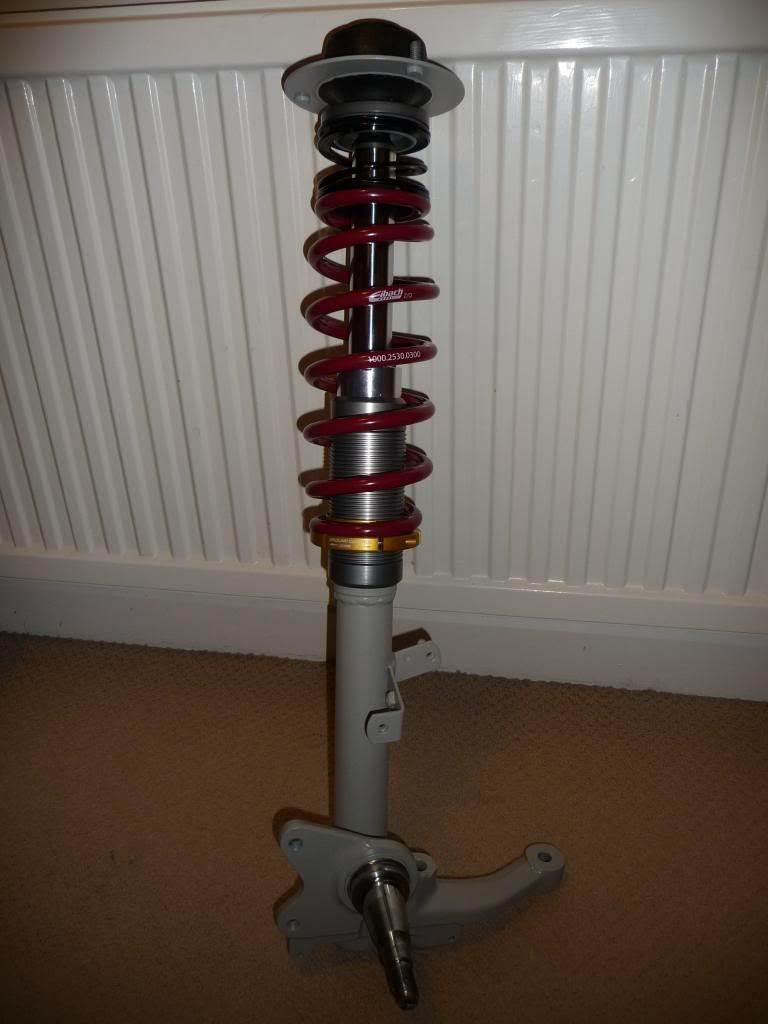
With it assembled, I could work out springs. I'd already decided to go with 300lb/inch front springs and 250lb/inch rears. 10" long seemed to work out right for both. The Ground control stuff is for 2.5" inner dia. and these are a little harder to find, but not much, however I discovered on US ebay (I swear I'm not sponcered by ebay...honest!) that you can get Eibach race springs for a couple of pounds more than Faulkners springs here. Seemed rude not to really! The fronts are barrell springs, which I got as they clear the bellows that protect the shock shaft on the bilsteins.
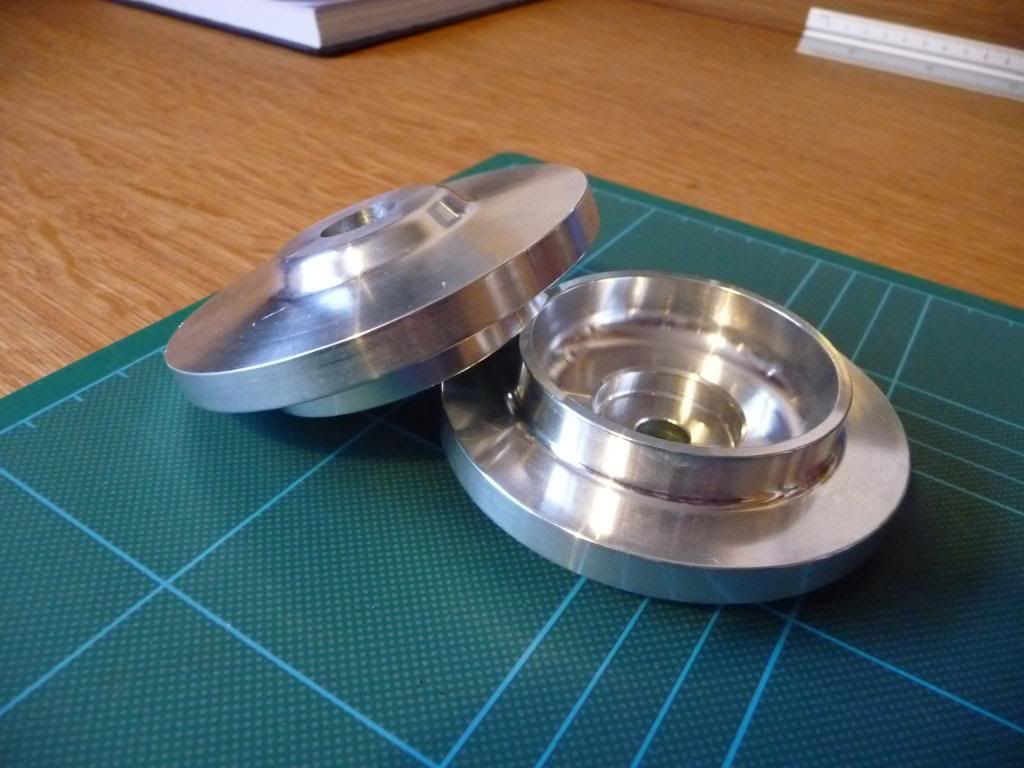
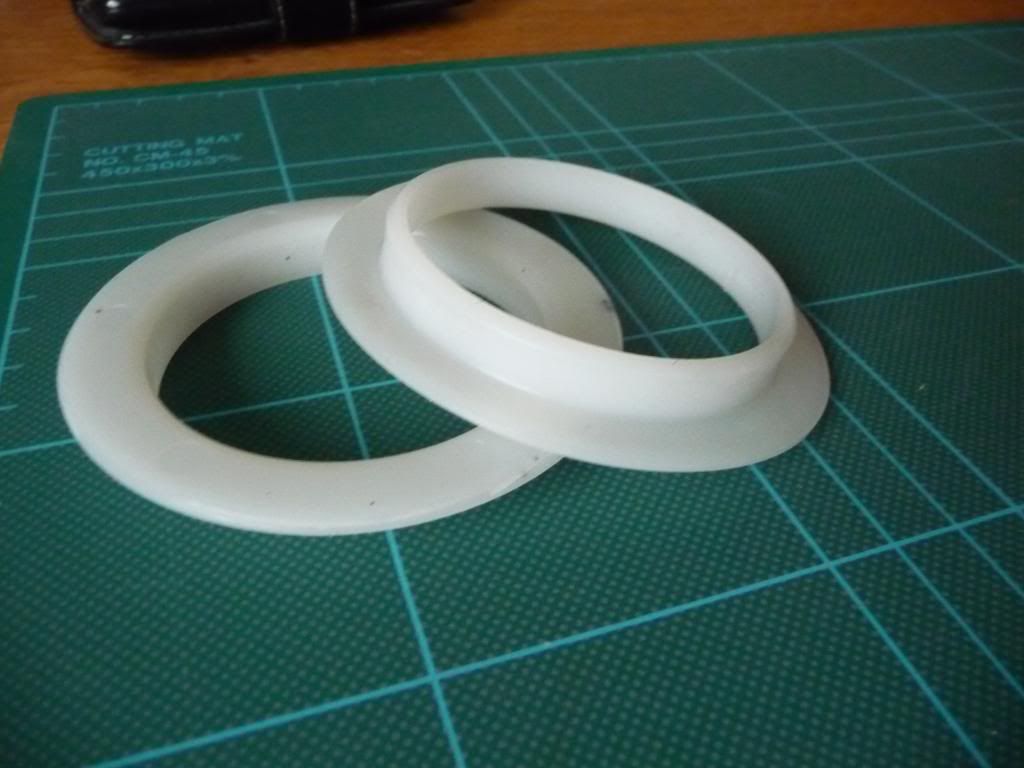
The top spring cups were again found on ebay, but are 2.25" as 2.5" are impossible to find at sensible prices. These were £12 each, really nicely made and whilst I could have made them myself, they wouldn't look this nice, and would've taken me ages. I got around the size problem with these neat little nylon adapter rings that are $2 each from Koni. Couldn't find any here in the UK though.
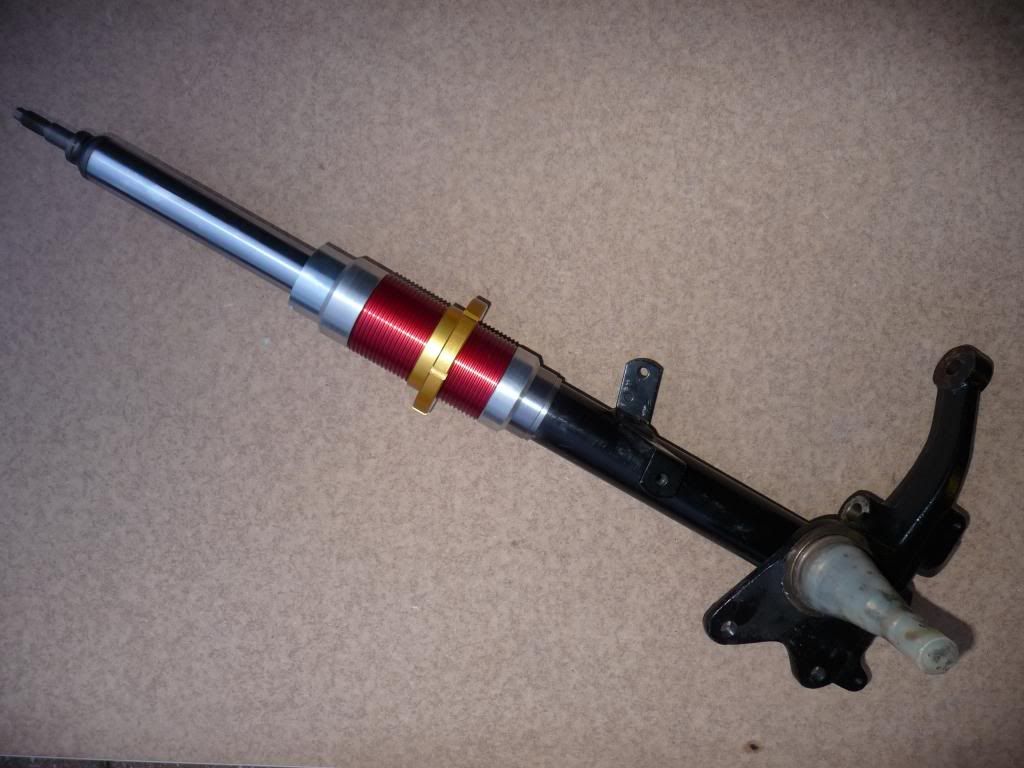
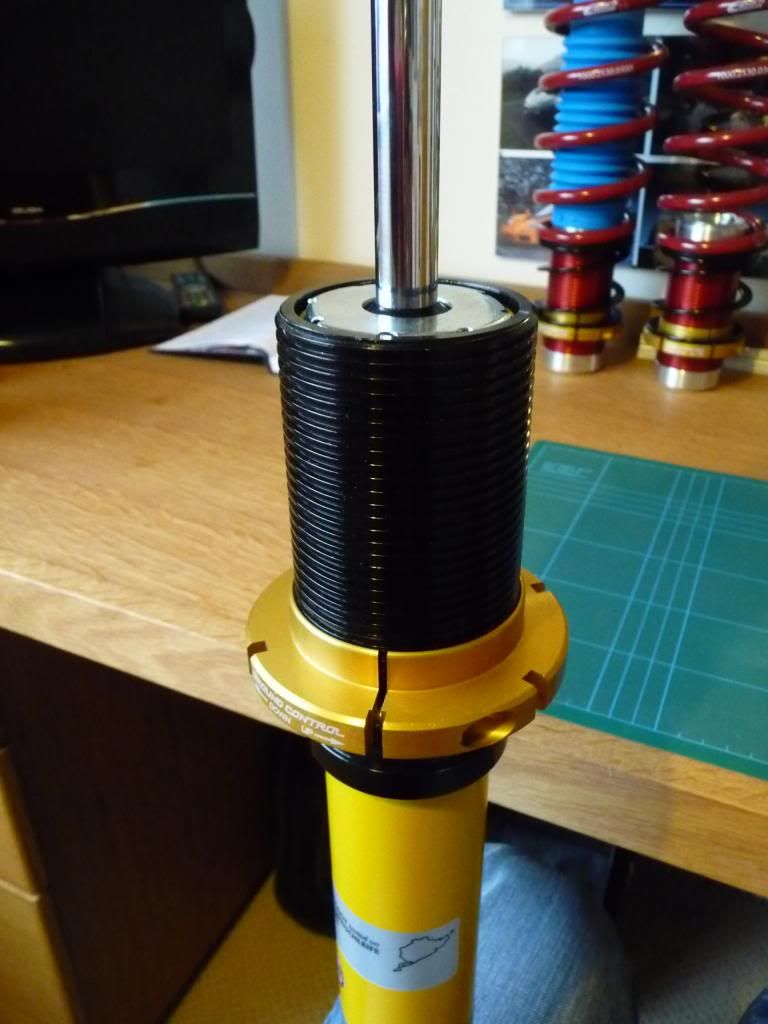
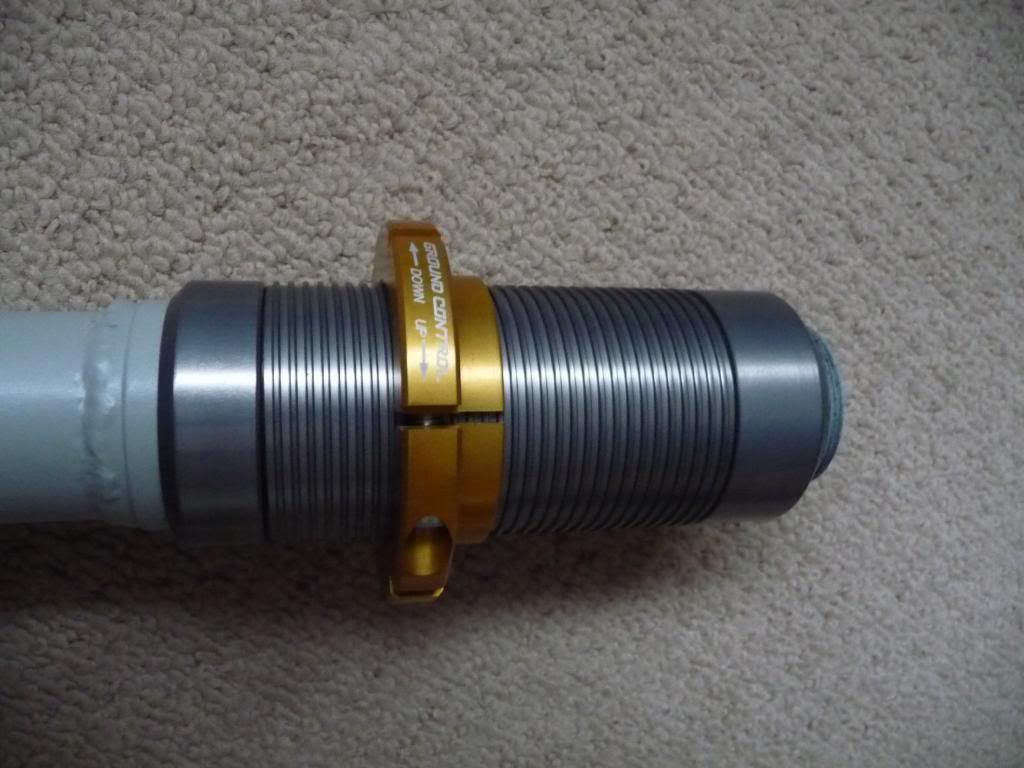
Also got a set of helper springs from GAZ, as unless the spring platforms are wound up, there was slack in the spring, and that's an MOT fail. New genuine stock top mounts were found on an internet auction site as I don't want the harshness that spherical top mounts. So all together it looks like this at the front:
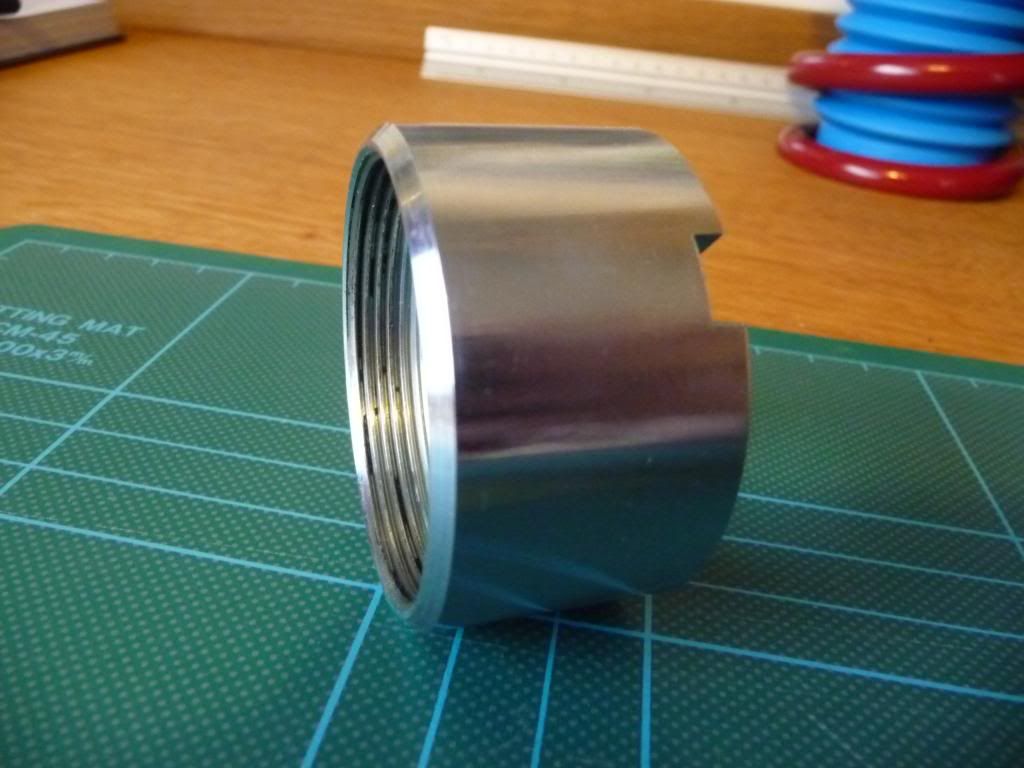
The rears were made VERY simple when I found these black ground control sleeves on Australian ebay:
Turned out the inner diameter was perfect to fit the rear bilsteins, and they had an inner step that perfectly fit the circlip for the spring platform
They just sat 10mm too high, so I got the shocks in the lathe, swallowed a brave pill, and cut a third groove 10mm lower down the body
Perfect!
Rear springs are again 10" long, and with helpers.
I just need some rear top mounts, and some bump stops, then I'm going to paint the rear shocks and front struts with epoxy chassis paint for greater protection, and get the machined parts hard anodised. Then it's fitment time!
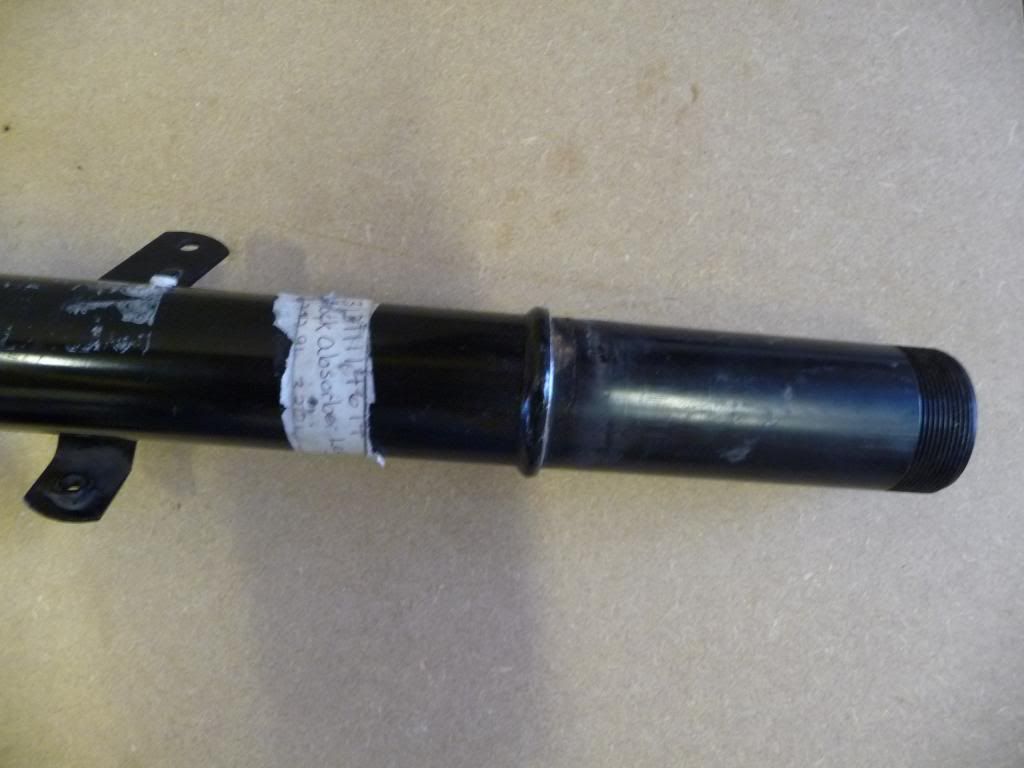
I purchased some Bilstein B6's for the car:
Then decided I wasn't keen on the lowering spring options available, so figured I'd make my own coilovers.
Now I don't want anyone to think I only buy stuff on ebay, but...... I scored these NOS front struts on US ebay. They're small dia for a 4 cyl car, but have the larger dia stub axles, so take the bigger bearings. I do need to get some hubs though, if anyone has some spare, I'm interested.
I have a friend in the states, so tend to have a few things shipped to him, then get him to send them here in bulk. Cuts down on shipping costs, and they can be, ahem, more thrifty with the customs info! I return the favour when there's stuff here he wants. So making the most of this, I got hold of a Ground Control kit. If you're not familiar, Ground Control are a US company that make alloy coilover sleeves to convert various import cars to coilovers. They retail for $300 and upwards, and inlude coilover sleeves, spring platforms, and eibach springs. I found a kit on US ebay for some Honda I'd never heard of, but the sleeves and platforms looked useful, and I could get my buddy to sell the springs on their own and recoup some money. The sleeves and platforms are nicely anodised alloy, and the platforms clamp onto the sleeves without having to lock 2 together, or driving grub screws into the threads.
The inner diameter of these sleves is 2" or 51mm, and the outer dia of the struts is 45mm, so an adapter for the bottom was needed for it to sit on, and one for the top that would allow the bistein strut caps to lock them in position. I have a lathe, so i ordered some 60mm alloy tube, with a 10mm wall thickness (inner dia 40mm) and set to work. I figured I'd make a steel ring to weld onto the strut tube , that the adapter would then sit on, so first off I made these:
They're waisted down at one end so the thickness matches the strut tube thickness so the weld can be gauged better.
Then I made the lower adapter. It's stepped outside at the top to sit inside the sleeve, and stepped inside at the base to fit over the steel ring that'll be welded to the strut.
Then I made the top adapter. This has to be stepped on the outside at the base to fit into the sleeve, and stepped inside at the top for the bilstein strut cap to fit inside, but the base of the cap has a 45 deg bevel, so the adapter had to match this.
So then you end up with this that's ready to fit the strut:
Next step is to chop the spring platform off the strut (If anyone wants these brand new spring platforms, let me know, you can have them for the price of postage!)
Then I got thinking. On my previous VW Sciroccos, I've been able to lower the cars about 30-35mm by chopping the struts and adding some to the bottom. If you do this right, you lower the car, but as the spring and shock are moved down by the same amount, there's no loss of suspension travel, and hence no degradation in ride quality. I wondered if something was possible on the E21......
Looking at the suspension, the bottom of the shock isn't over anything in the straight ahead position, but when on full lock, it's over the track control arm. The clearance is at it's least when the suspension in full droop, so when the car is jacked up, or you've gotten "air"
I decided to measure it at this point, and worked out with the bottom of the strut tube cut out, and a cup making up of just the right size, there was 25mm of suspension travel to be gained here. Might not sound much, but it makes a difference when you're cornering hard and hit that mid corner bump.
So, I made up a conical press tool from some scrap steel, and pressed out two round pieces from 3mm steel, and welded these to some short sections of steel tube. Then dressed the welds up in the lathe to ensude maximum clearance:
Tried them in place with the car jacked up:
1mm of clearance is plenty! Especially since the droop travel is reduced by doing this modification.
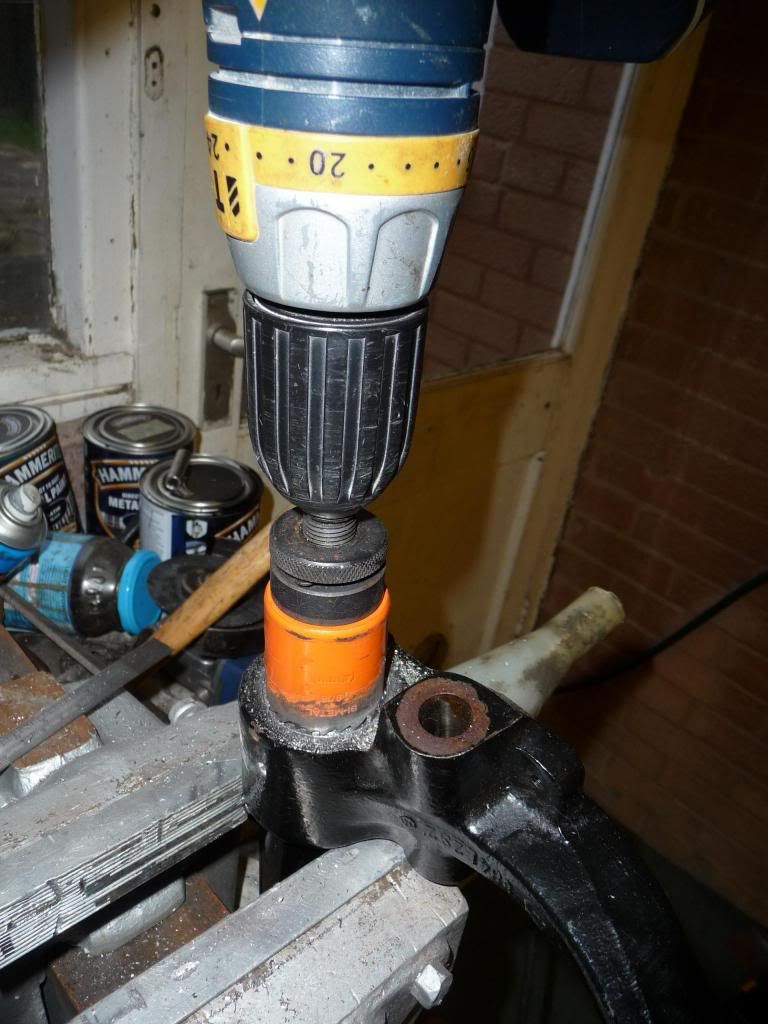
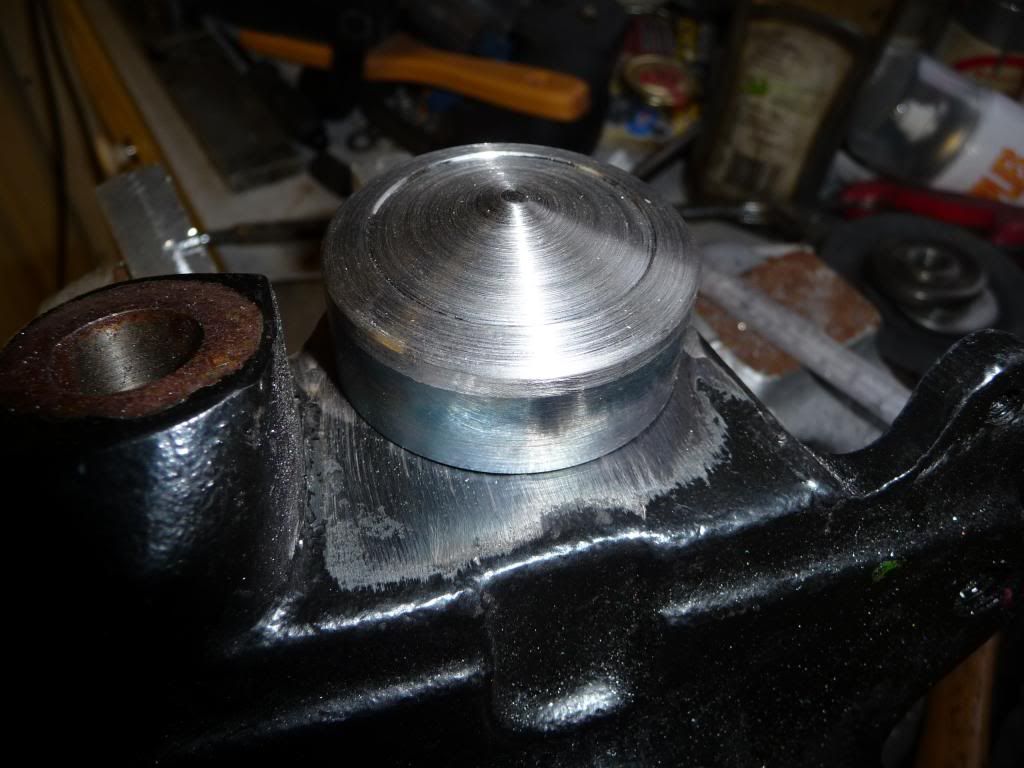
So, Power tools time!
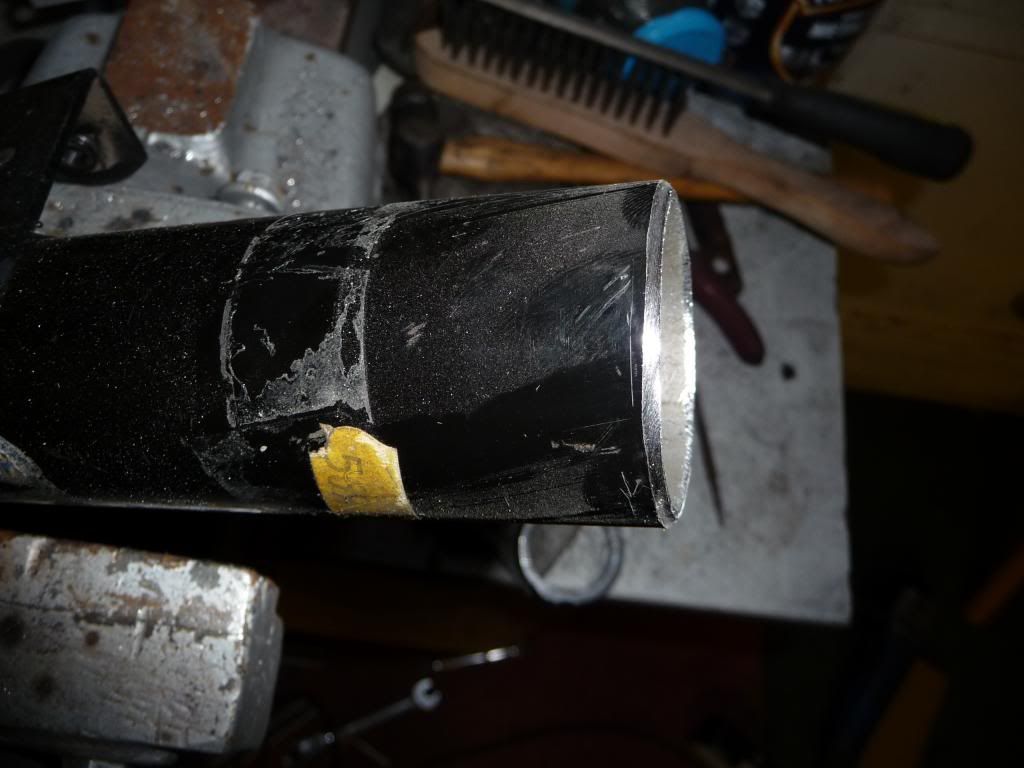
This is how far the bilstein comes down the strut stock
Time to weld on the new base
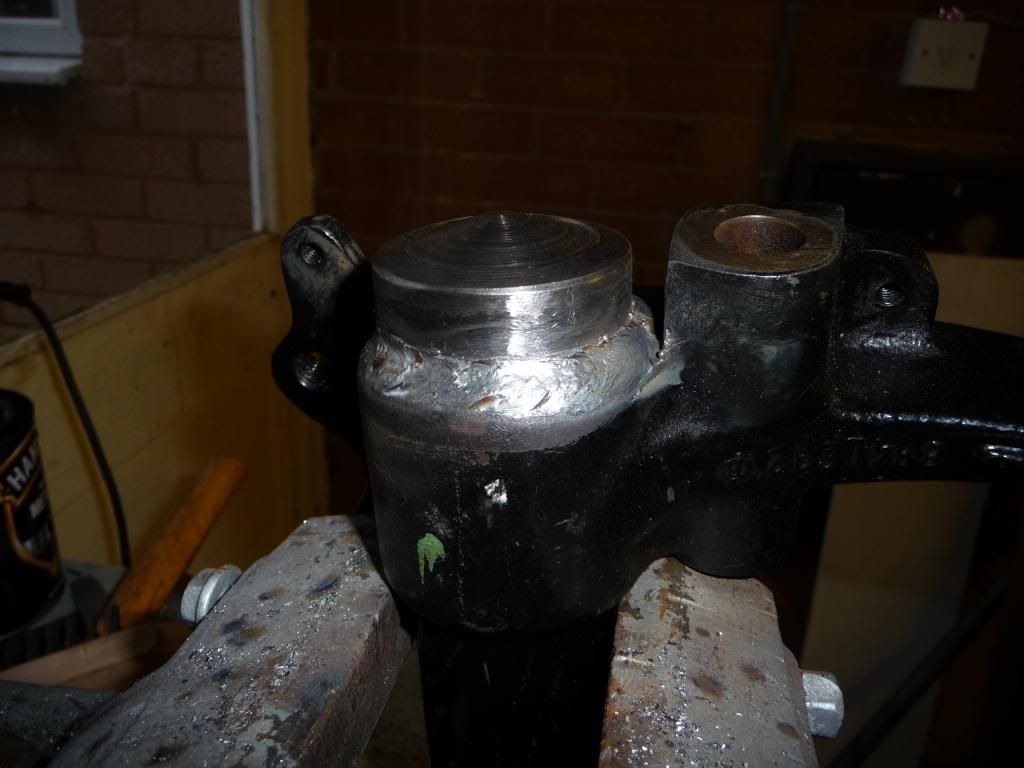
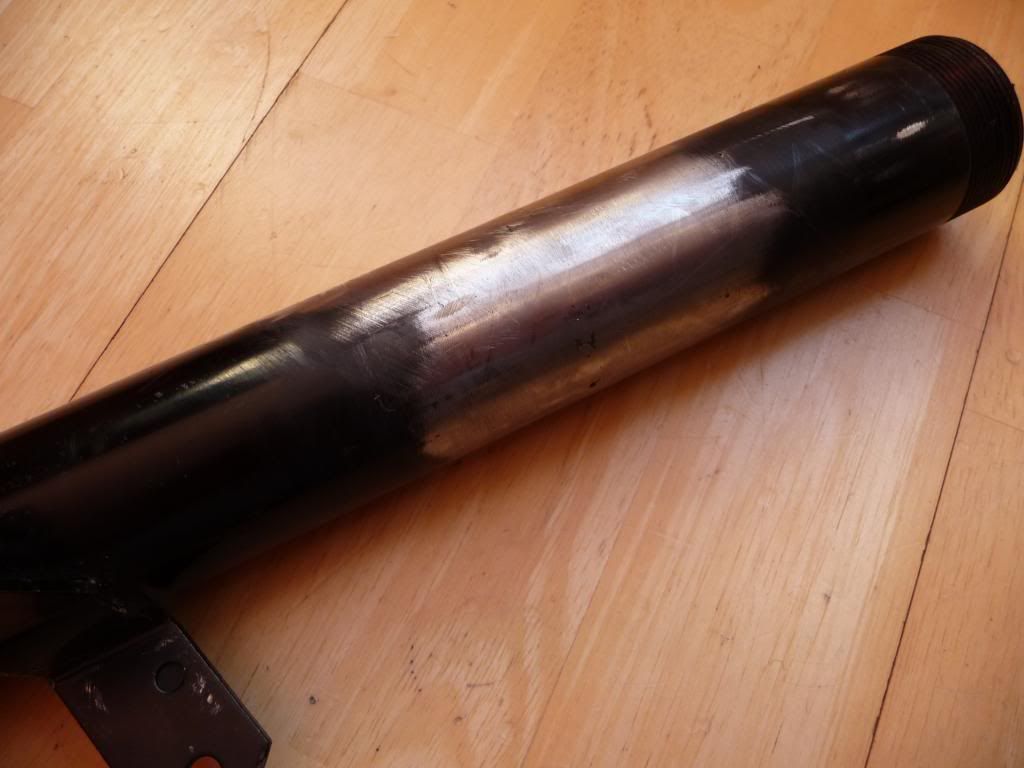
Next, it's time to shorten the strut tube. I did this under the area where the sleeve will fit, but in order to get the lower adapter over it, I had to make sure the welds were ground smooth, so getting good penetration was important. A 25mm section of the strut was removed, and the ends to be welded were beveled, then it was welded, ground smooth, and finally sanded.
So, now I have 1" shorter front struts, I now can assemble the various components, and figure out Springs.
The steel ring that it all rests on isn't welded yet, as that had to wait till the shock could be tightened down, then the sleeves, adapters, and the ring pushed up to the base of the cap. otherwise the risk is that when tightened down, the sleeves and adapters would be loose, or they'd be too high, and the shock wouldn't be clamped down fully.
With it assembled, I could work out springs. I'd already decided to go with 300lb/inch front springs and 250lb/inch rears. 10" long seemed to work out right for both. The Ground control stuff is for 2.5" inner dia. and these are a little harder to find, but not much, however I discovered on US ebay (I swear I'm not sponcered by ebay...honest!) that you can get Eibach race springs for a couple of pounds more than Faulkners springs here. Seemed rude not to really! The fronts are barrell springs, which I got as they clear the bellows that protect the shock shaft on the bilsteins.
The top spring cups were again found on ebay, but are 2.25" as 2.5" are impossible to find at sensible prices. These were £12 each, really nicely made and whilst I could have made them myself, they wouldn't look this nice, and would've taken me ages. I got around the size problem with these neat little nylon adapter rings that are $2 each from Koni. Couldn't find any here in the UK though.
Also got a set of helper springs from GAZ, as unless the spring platforms are wound up, there was slack in the spring, and that's an MOT fail. New genuine stock top mounts were found on an internet auction site
The rears were made VERY simple when I found these black ground control sleeves on Australian ebay:
Turned out the inner diameter was perfect to fit the rear bilsteins, and they had an inner step that perfectly fit the circlip for the spring platform
They just sat 10mm too high, so I got the shocks in the lathe, swallowed a brave pill, and cut a third groove 10mm lower down the body
Perfect!
Rear springs are again 10" long, and with helpers.
I just need some rear top mounts, and some bump stops, then I'm going to paint the rear shocks and front struts with epoxy chassis paint for greater protection, and get the machined parts hard anodised. Then it's fitment time!
Last edited by polov8 on Tue Feb 25, 2014 5:37 pm, edited 1 time in total.
Andy

Re: 316 Rolling resto and upgrades
awesome work! have you worked out your ride height range of adjustment?
I think the gaz I have are able to go lower by 80mm in total
I think the gaz I have are able to go lower by 80mm in total
[img]http://s13.photobucket.com/albums/a285/nasbucket/forumsig.jpg[/img]
-
polov8
- E21 Pro
- Posts: 512
- Joined: Wed May 29, 2013 6:30 pm
- My E21(s): '83 Polaris silver 316
- Location: Dronfield
Re: 316 Rolling resto and upgrades
Thanks Nas. I think These will go down by about the same amount, plus the 25mm I lowered the struts. I did make sure that at the top of the adjustment, the car is at stock height, just because I drive the car all year round, and when it snows, ground clearance is useful! But that's based on calculation and measurement, and whilst that's fine, real world testing is the only way to know for sure!
Andy
-
polov8
- E21 Pro
- Posts: 512
- Joined: Wed May 29, 2013 6:30 pm
- My E21(s): '83 Polaris silver 316
- Location: Dronfield
Re: 316 Rolling resto and upgrades
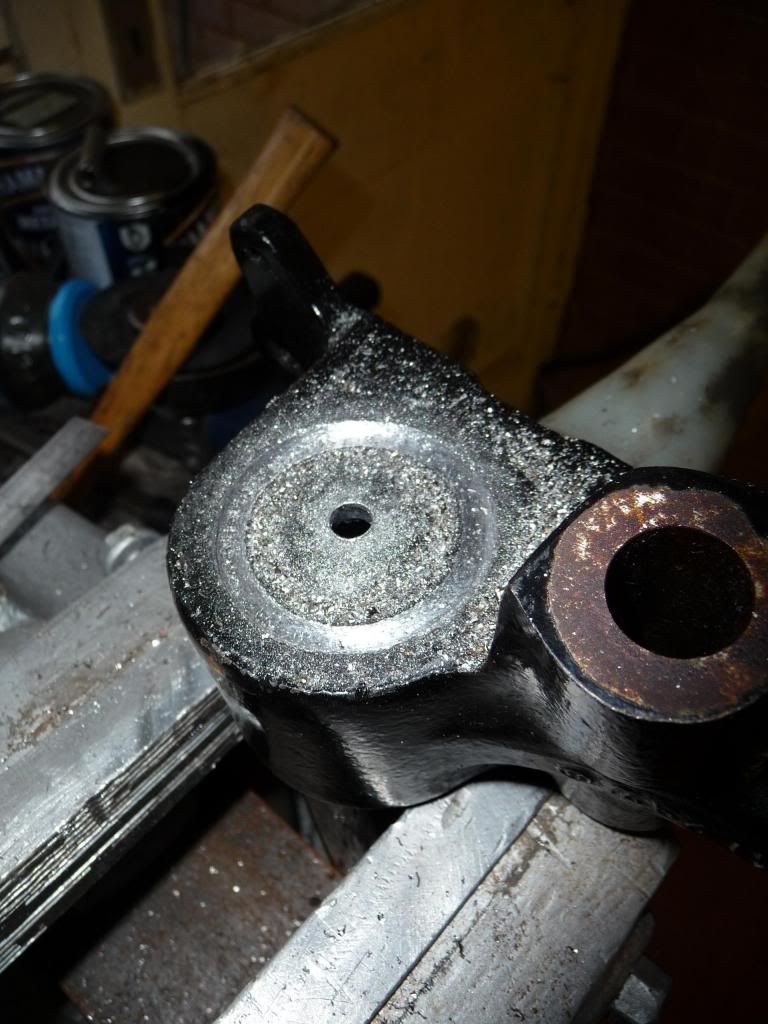
Another part that's been buging me is the rear subframe mounts. BMW seem to have lost the plot on the pricing on these at a whopping £160+ each (not that they have any you can order). I found these on US ebay, NOS uprated mounts in a higher durometer rubber than BMW mounts, and made by BBS! They're a bit grubby, I'm guessing they've been on a shelf somewhere for quite a while.
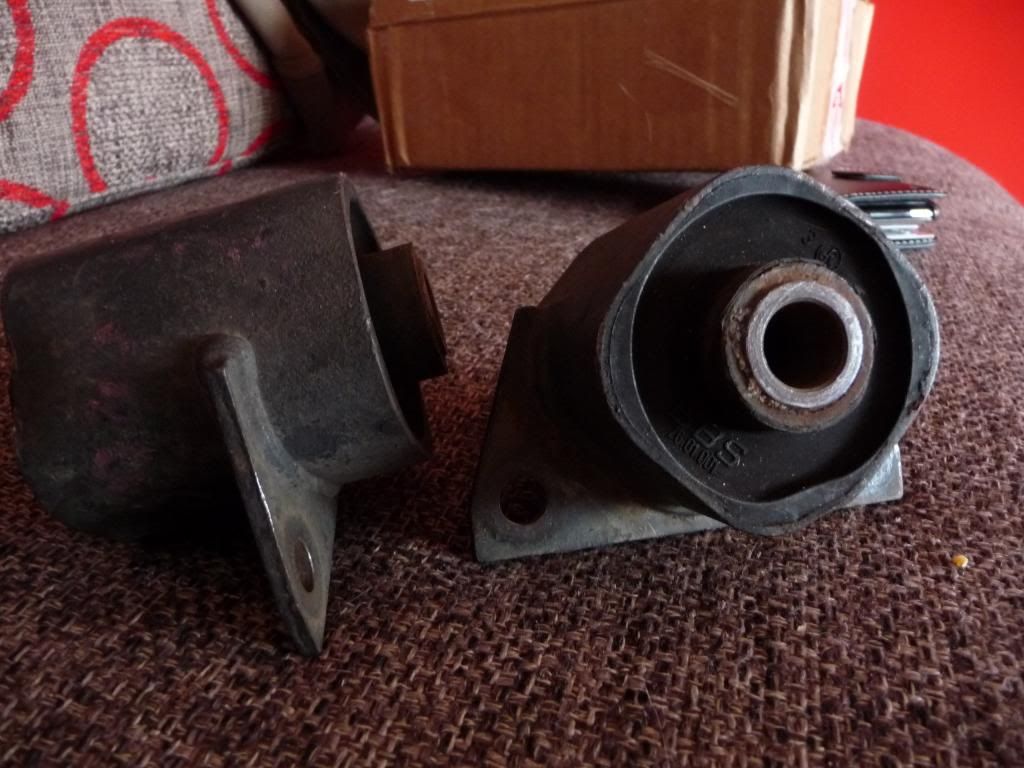
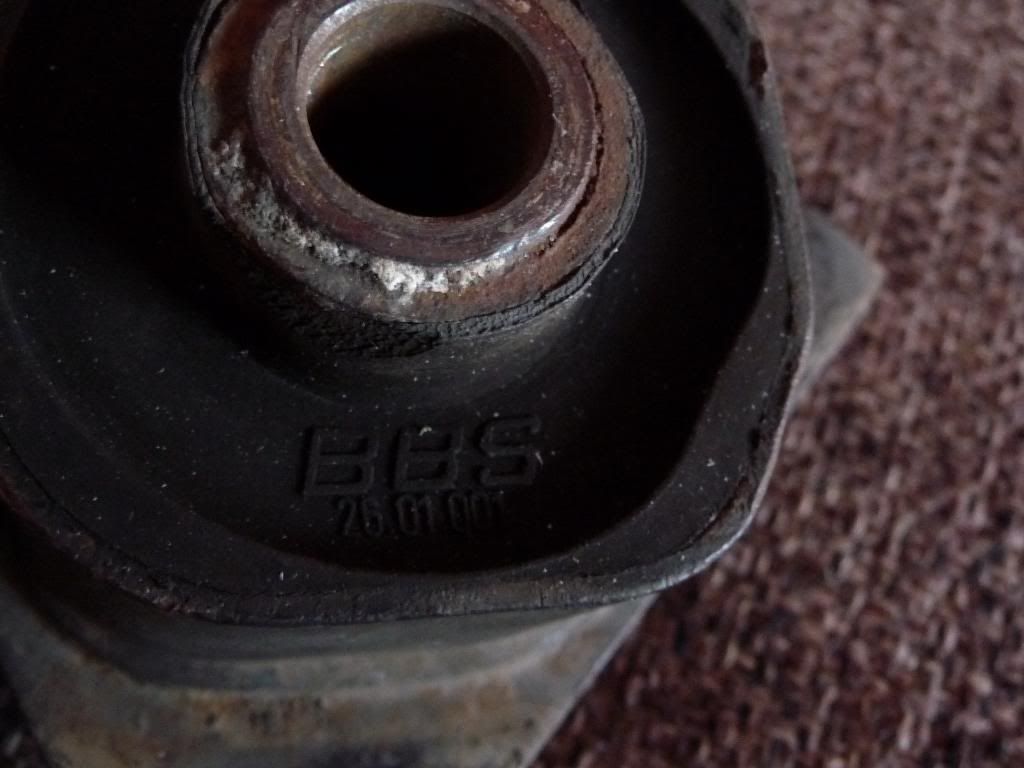
I had no idea BBS ever made bushes, learn something new every day I guess!
I had no idea BBS ever made bushes, learn something new every day I guess!
Andy
-
problemchild75
- E21 Fanatic
- Posts: 377
- Joined: Fri Jan 27, 2012 2:47 pm
- Location: manchester
- Contact:
Re: 316 Rolling resto and upgrades
Awesome work I'm very envious of your skills 
-
polov8
- E21 Pro
- Posts: 512
- Joined: Wed May 29, 2013 6:30 pm
- My E21(s): '83 Polaris silver 316
- Location: Dronfield
Re: 316 Rolling resto and upgrades
Well, it's been a few weeks, but I haven't been sat on my hands.
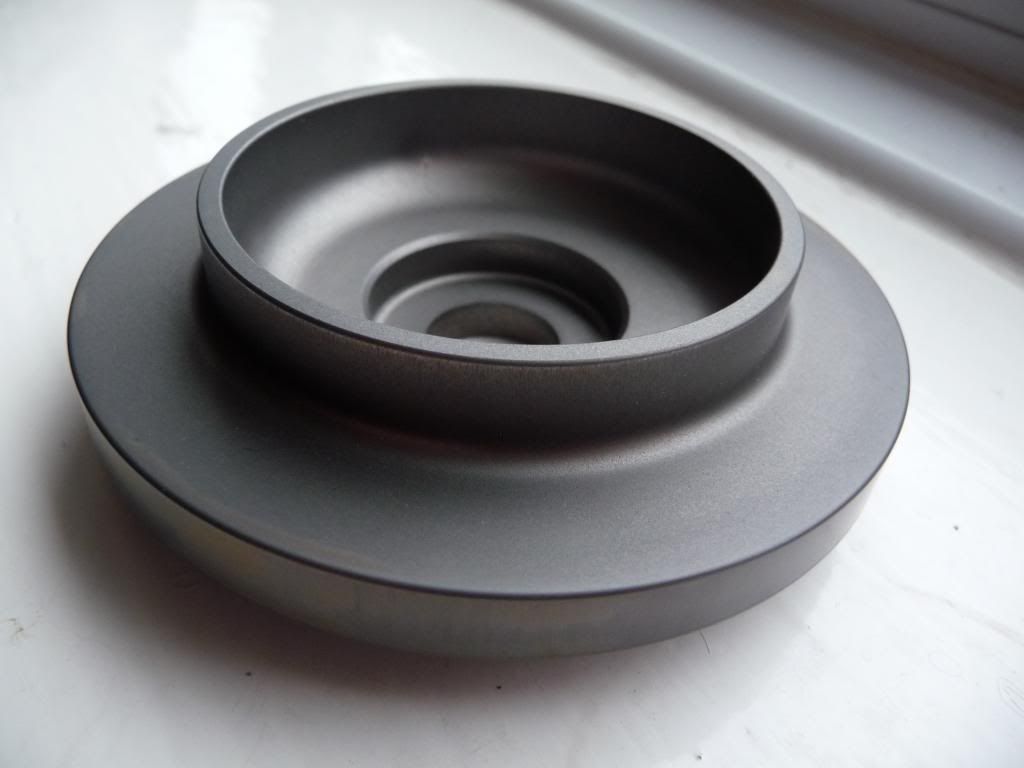
First off, I sent all the alloy bits for the coilovers to the anodisers. They're able to re anodise the red and black bits, so all of the parts are a nice subtle uniform gunmetal grey. It's hard anodising too, so it'll be extremely durable, and corrosion resistant.
I also got hold of some 2 part epoxy paint to use on all the steel parts. With the front struts and rear shocks being new, I want to keep them looking that way as long as possible. It's a big ask on a daily driven car so i wanted the best paint I could find. Powdercoat is tough, but if it gets chipped, the rust can spread like crazy, and the coating flakes off, so I went with this stuff, in grey: http://rust.co.uk/products/category/281 ... sis-paint/
Well worth a look at the other stuff on their site, there's alot of nifty paints and rust removers.
Anyway, a couple of coats and the struts looked like this
I also re painted the rear bilsteins, and yes, I did peel off all the stickers and put them back afterwards
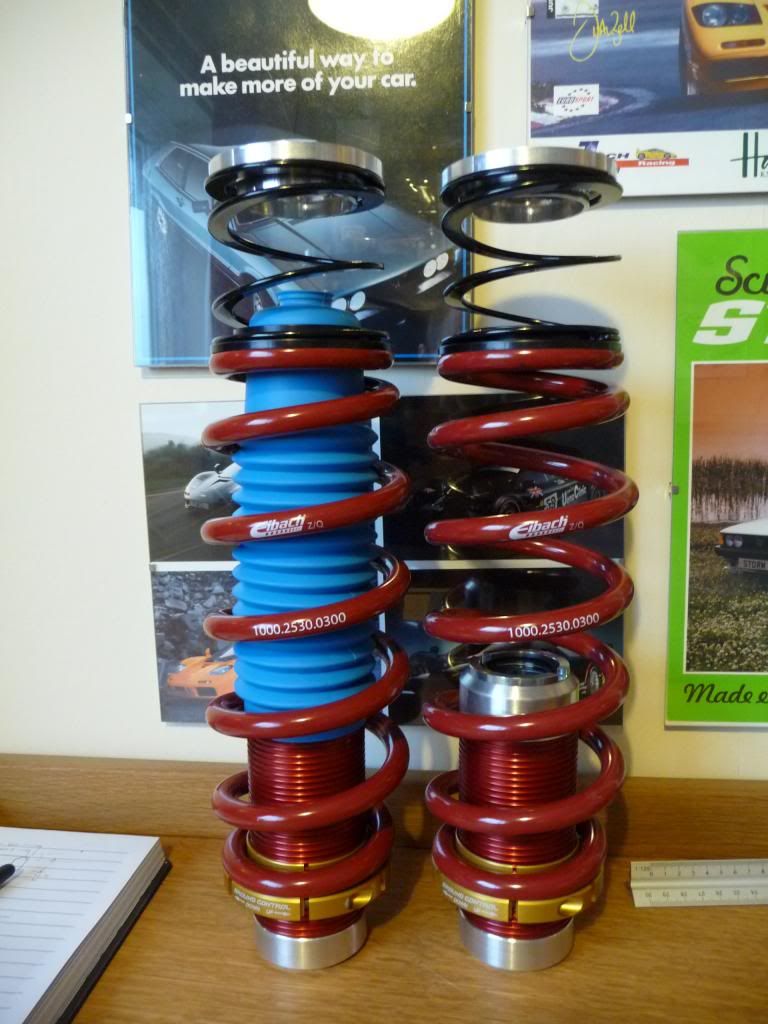
So putting the fronts together
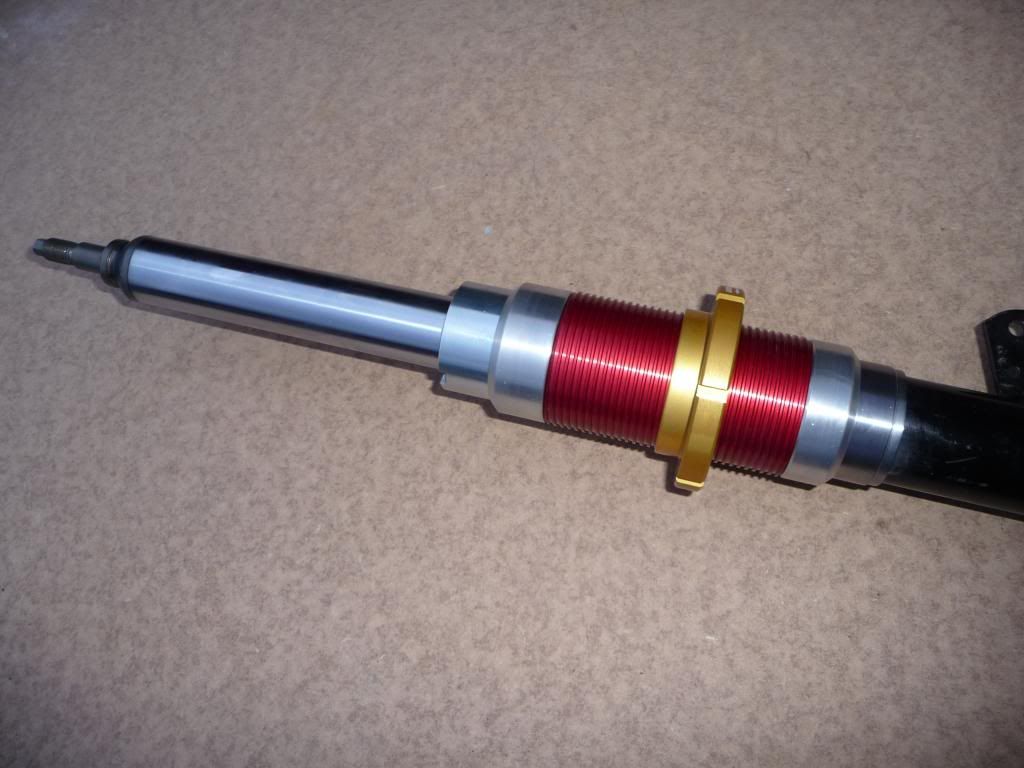
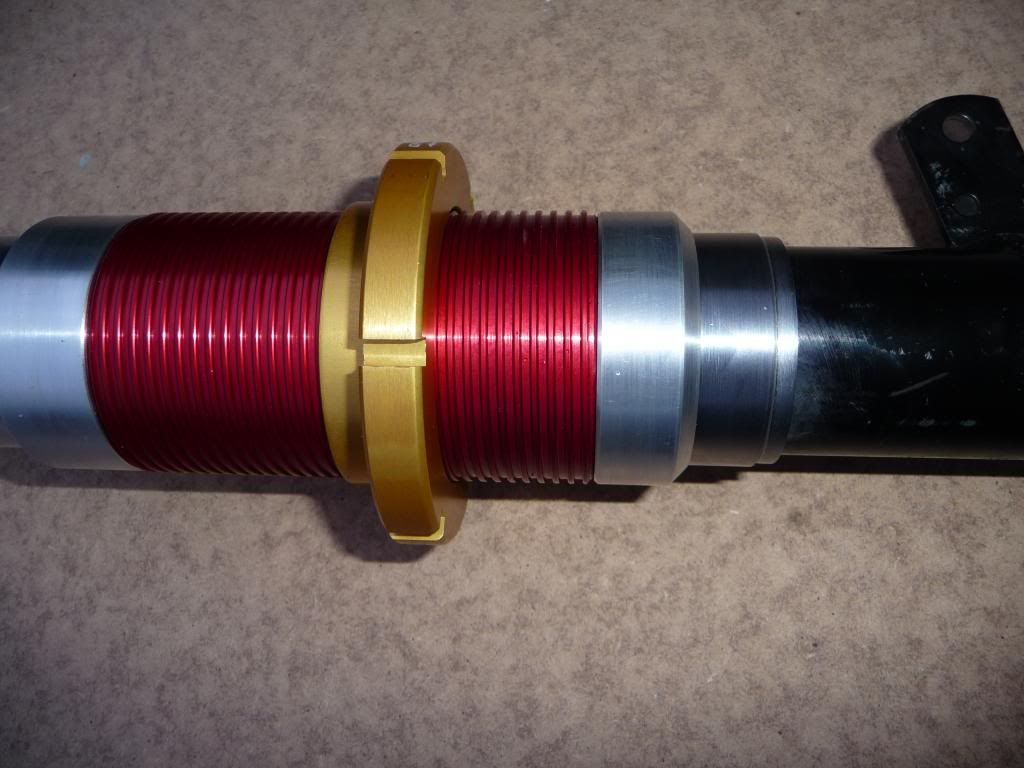
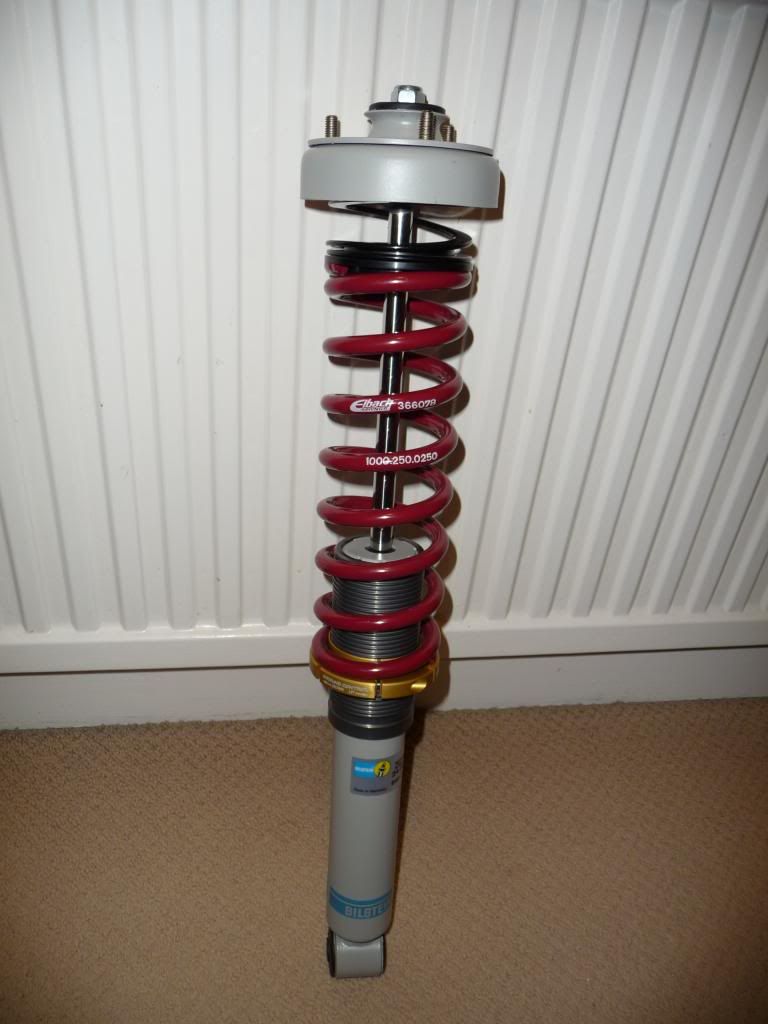
I kept the lower spring platforms gold, cuz they look cool
Bilstein inserts in
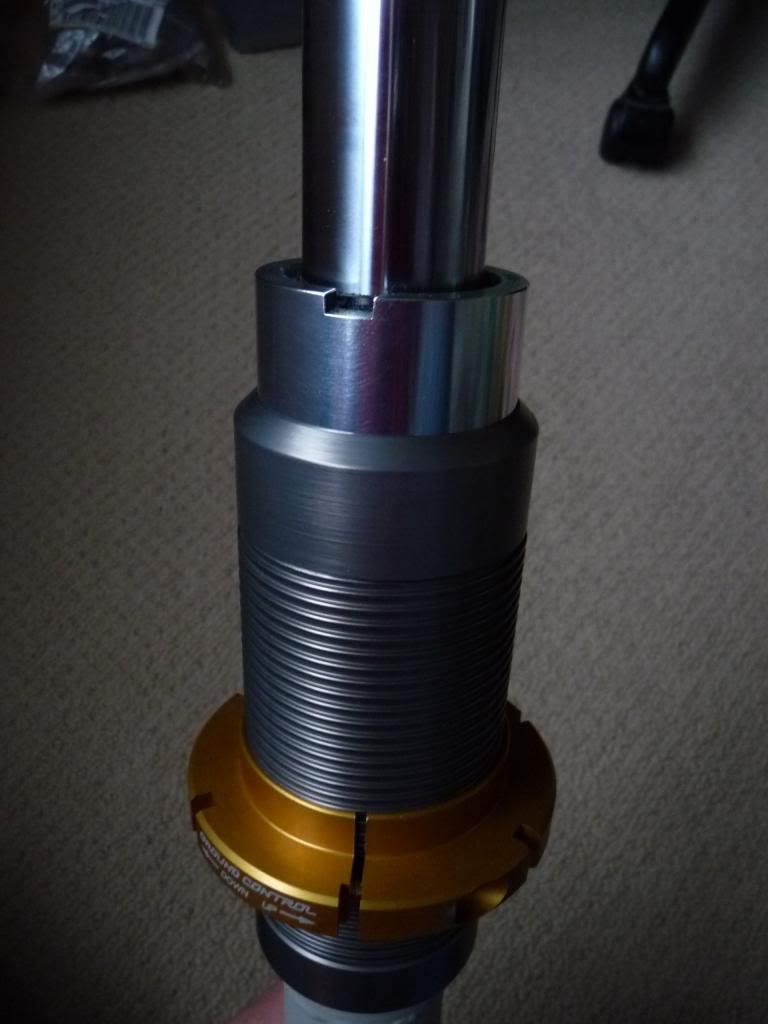

Springs and top mount added
All the top mounts front and rear are new standars ones, painted with the epoxy.
Rears
At the top of the rears I had a thought. if I used the coilover spring cap, that would mean the rubber bush in the centre of the rear top mount would be carrying the weight of the car, something it was never designed to do, as the stock springs bear their weight on a rubbery ring inside the top mount. the bush just transmits the shock absorber forces. To replicate this, I remembered my random ground control kit came with some funky dense silicon spring seats, for whatever car they were originally intended, and also some alloy shaped washers. Low and behold, these are perfect to fit inside the top mount and hold the spring, and the washer will sit next to the bush and locate the rear bump stops (which are in the post)!
The finished rears (pending bump stops)
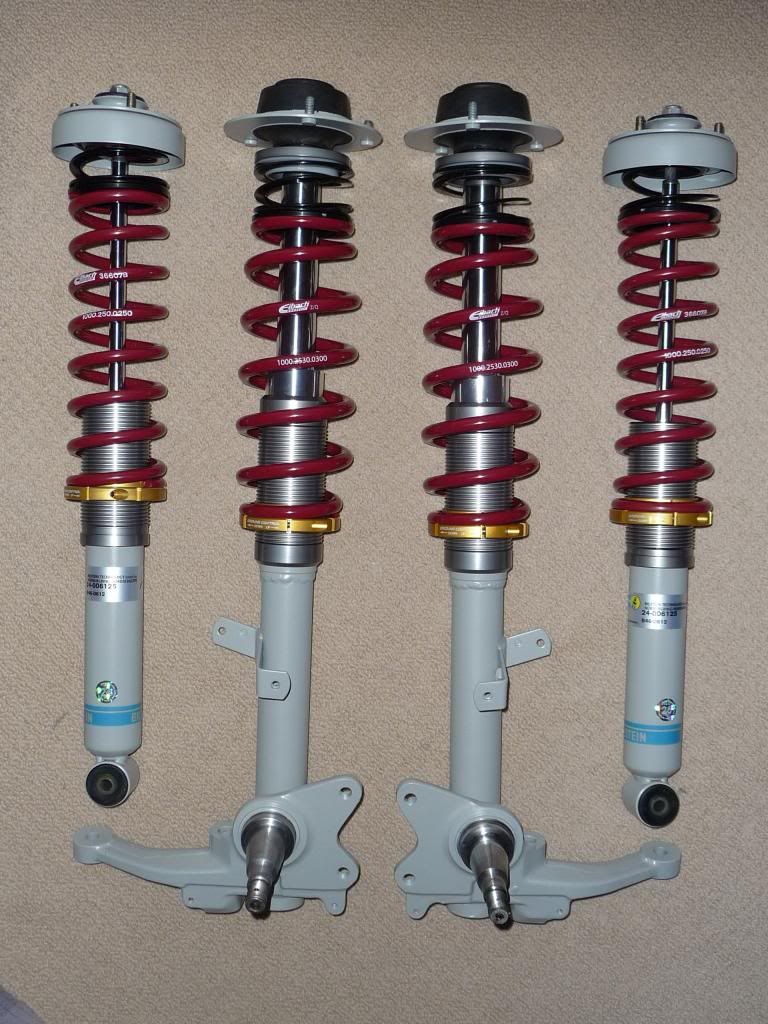
The full set!
Now, do i fit these now, or sort out the front brake upgrade first and fit the lot...................
First off, I sent all the alloy bits for the coilovers to the anodisers. They're able to re anodise the red and black bits, so all of the parts are a nice subtle uniform gunmetal grey. It's hard anodising too, so it'll be extremely durable, and corrosion resistant.
I also got hold of some 2 part epoxy paint to use on all the steel parts. With the front struts and rear shocks being new, I want to keep them looking that way as long as possible. It's a big ask on a daily driven car so i wanted the best paint I could find. Powdercoat is tough, but if it gets chipped, the rust can spread like crazy, and the coating flakes off, so I went with this stuff, in grey: http://rust.co.uk/products/category/281 ... sis-paint/
Well worth a look at the other stuff on their site, there's alot of nifty paints and rust removers.
Anyway, a couple of coats and the struts looked like this
I also re painted the rear bilsteins, and yes, I did peel off all the stickers and put them back afterwards
So putting the fronts together
I kept the lower spring platforms gold, cuz they look cool
Bilstein inserts in
Springs and top mount added
All the top mounts front and rear are new standars ones, painted with the epoxy.
Rears
At the top of the rears I had a thought. if I used the coilover spring cap, that would mean the rubber bush in the centre of the rear top mount would be carrying the weight of the car, something it was never designed to do, as the stock springs bear their weight on a rubbery ring inside the top mount. the bush just transmits the shock absorber forces. To replicate this, I remembered my random ground control kit came with some funky dense silicon spring seats, for whatever car they were originally intended, and also some alloy shaped washers. Low and behold, these are perfect to fit inside the top mount and hold the spring, and the washer will sit next to the bush and locate the rear bump stops (which are in the post)!
The finished rears (pending bump stops)
The full set!
Now, do i fit these now, or sort out the front brake upgrade first and fit the lot...................
Andy
-
croma_man
- E21 Pro
- Posts: 594
- Joined: Fri Sep 07, 2012 1:18 pm
- My E21(s): '83 EU 327i
- Location: Slovenia (EU)
- Contact:
Re: 316 Rolling resto and upgrades
nicely done ! great photo story. I love that you lowered the front shock in the mount, wish I did that when I was making my coilovers.