Eddie's E21 316
-
Jeroen

- Site Admin
- Posts: 30200
- Joined: Tue Sep 14, 2004 12:23 pm
- My E21(s): '81 323i Baur
- Location: The Netherlands
- Contact:
Re: Eddie's E21 316
The tools costs peanuts and you can just use about any drill. Works pretty good, on the clutch master as well.
Regards/groeten, Jeroen
-
Eddie.

- E21 Fanatic
- Posts: 479
- Joined: Mon Oct 29, 2012 11:31 am
- My E21(s): [O==[][]==O]
- Location: South Manchester
Re: Eddie's E21 316
Yeah I've found a honing tool on eBay.
I presume it doesn't need doing much, just a few passes? What's stopping you boring out the master cylinder so it ends up too big?
I'm guessing the abrasive pads are not too aggressive?
I presume it doesn't need doing much, just a few passes? What's stopping you boring out the master cylinder so it ends up too big?
I'm guessing the abrasive pads are not too aggressive?
-
Eddie.
- E21 Fanatic
- Posts: 479
- Joined: Mon Oct 29, 2012 11:31 am
- My E21(s): [O==[][]==O]
- Location: South Manchester
Re: Eddie's E21 316
Sigh.
Brakes International have just called me to say the brake master cylinder rebuild kit that was supposed to be due in today, is actually no longer available.
So I now have to try and source one again.
I really have had enough of this now.
Brakes International have just called me to say the brake master cylinder rebuild kit that was supposed to be due in today, is actually no longer available.
So I now have to try and source one again.
I really have had enough of this now.
-
Jeroen
- Site Admin
- Posts: 30200
- Joined: Tue Sep 14, 2004 12:23 pm
- My E21(s): '81 323i Baur
- Location: The Netherlands
- Contact:
Re: Eddie's E21 316
Just a few passes will do indeed.
Any other brake specialists around you can try? Otherwise the dealer?
Any other brake specialists around you can try? Otherwise the dealer?
Regards/groeten, Jeroen
-
Eddie.
- E21 Fanatic
- Posts: 479
- Joined: Mon Oct 29, 2012 11:31 am
- My E21(s): [O==[][]==O]
- Location: South Manchester
Re: Eddie's E21 316
Right, Bigg Red might have the kit in stock. Everyone cross their fingers.
Some pictures of the wheels in white primer, sprayed the other day:


In the meantime today, I got the base coat of silver on the wheels:


Some pictures of the wheels in white primer, sprayed the other day:
In the meantime today, I got the base coat of silver on the wheels:

Re: Eddie's E21 316
from memory early cars with twin servos and separate master cylinder had a lot in common with rhd 2002's maybe a 2002 specialist mighy have a rebuild kit.....i can't imagine having two servos level with each other facing opposite ends of the car helps when trying to get all the air out of the brake system.....
e21 320 (12/1975) 320i/4 (3/77)running gear.
e21 316 (1981) TRE702X.
e21 316 (1981) TRE702X.
-
Eddie.
- E21 Fanatic
- Posts: 479
- Joined: Mon Oct 29, 2012 11:31 am
- My E21(s): [O==[][]==O]
- Location: South Manchester
Re: Eddie's E21 316
Master cylinder rebuilt yesterday.
Pistons rebuilt with new seals:

All reassembled, ready for bench bleeding and refitting:

Wheels were flatted down, and then the final coat of base:


Then a few coats of lacquer:


Few running issues with my daily at the moment, so I've got 2 BMW's to be working on.
Pistons rebuilt with new seals:
All reassembled, ready for bench bleeding and refitting:
Wheels were flatted down, and then the final coat of base:
Then a few coats of lacquer:
Few running issues with my daily at the moment, so I've got 2 BMW's to be working on.
-
Eddie.
- E21 Fanatic
- Posts: 479
- Joined: Mon Oct 29, 2012 11:31 am
- My E21(s): [O==[][]==O]
- Location: South Manchester
Re: Eddie's E21 316
Great news!
The master cylinder rebuild has worked, or it certainly seems to have done. The brakes work like they used to, and a test drive confirms that the problem would seem to have been solved.
Very big thankyou to Nas who has put up with endless emails and texts off me about the brakes, very much appreciated mate
This meant I could press on with the interior, I got the waterproof skin on the inside of the doors tonight:

Then rain stopped play, so I had to call it a night.
Should make some good progress tomorrow, with a decent update to follow.
The master cylinder rebuild has worked, or it certainly seems to have done. The brakes work like they used to, and a test drive confirms that the problem would seem to have been solved.
Very big thankyou to Nas who has put up with endless emails and texts off me about the brakes, very much appreciated mate
This meant I could press on with the interior, I got the waterproof skin on the inside of the doors tonight:
Then rain stopped play, so I had to call it a night.
Should make some good progress tomorrow, with a decent update to follow.

Re: Eddie's E21 316
[img]http://s13.photobucket.com/albums/a285/nasbucket/forumsig.jpg[/img]
Re: Eddie's E21 316
Where did you get that sticky door plastic thing from?
[img]http://s13.photobucket.com/albums/a285/nasbucket/forumsig.jpg[/img]
-
Eddie.
- E21 Fanatic
- Posts: 479
- Joined: Mon Oct 29, 2012 11:31 am
- My E21(s): [O==[][]==O]
- Location: South Manchester
Re: Eddie's E21 316
I had an old eBay car cover that was made of wafer thin stretchy plastic.
I cut a sheet out, put some contact adhesive on it, hung it on the door and cut it to size. Then rubbed it into all the contours of the door to ensure a decent seal.
I cut a sheet out, put some contact adhesive on it, hung it on the door and cut it to size. Then rubbed it into all the contours of the door to ensure a decent seal.
Re: Eddie's E21 316
Hey that's a great idea. Could use a thick rubble sack couldnt I.
[img]http://s13.photobucket.com/albums/a285/nasbucket/forumsig.jpg[/img]
-
Eddie.
- E21 Fanatic
- Posts: 479
- Joined: Mon Oct 29, 2012 11:31 am
- My E21(s): [O==[][]==O]
- Location: South Manchester
Re: Eddie's E21 316
I see no reason why not?! I used the car cover because its so thin, so screwing through it for the armrests will be a doddle.
-
arshad76
- E21 Pro
- Posts: 951
- Joined: Thu May 26, 2005 11:06 am
- My E21(s): Considering another E21
- Location: Manchester England
Re: Eddie's E21 316
Keep it up Eddie! First class, passionate restoration. Loving the little "upgrades" you've been doing along the way. I used waterproof membrane from a DIY shop, your solution looks a lot slicker!
UK Moderator
-
Eddie.
- E21 Fanatic
- Posts: 479
- Joined: Mon Oct 29, 2012 11:31 am
- My E21(s): [O==[][]==O]
- Location: South Manchester
Re: Eddie's E21 316
So, the final push happened the other day.
I noticed a leak on the rear seat/carpet behind the drivers seat.
Looked up to see this:

Causing this:

That was immediately dealt with in the form of some silicone.
After that I started putting the final bits and pieces back together. Carpeted my centre console section:


I also sprayed my armrests black to match the new door cards. Left them to dry for a few days and they've come out brilliantly.

Most importantly the paint hasn't filled the "grain":

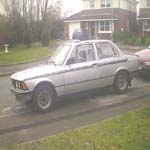
But of all the bits done recently, the best was getting some tyres on the wheels and getting them fitted


The front still needs to come down a bit, and they could do with some spacers, but I think the wheels look brilliant, very happy
So, it goes in for an MOT on Saturday, I see no reason why it shouldn't pass
I noticed a leak on the rear seat/carpet behind the drivers seat.
Looked up to see this:
Causing this:
That was immediately dealt with in the form of some silicone.
After that I started putting the final bits and pieces back together. Carpeted my centre console section:
I also sprayed my armrests black to match the new door cards. Left them to dry for a few days and they've come out brilliantly.
Most importantly the paint hasn't filled the "grain":
But of all the bits done recently, the best was getting some tyres on the wheels and getting them fitted
The front still needs to come down a bit, and they could do with some spacers, but I think the wheels look brilliant, very happy
So, it goes in for an MOT on Saturday, I see no reason why it shouldn't pass